The Ultimate Crispy Air Fryer Brussels Sprouts (You'll Actually Crave!)
Let's be honest: for many of us, Brussels sprouts were the dreaded vegetable of our childhood—often boiled into a mushy, unappetizing state. But it's time to forget everything you thought you knew. The air fryer has single-handedly revolutionized this humble vegetable, transforming it into a culinary superstar with an unbelievably crispy texture and a deep, caramelized flavor that's genuinely addictive.
This recipe harnesses the power of circulating hot air to achieve what was once only possible in restaurants with deep fryers. The result is a side dish that's not only spectacularly delicious but also remarkably healthy and quick to prepare. Get ready to make Brussels sprouts that are golden and crisp on the outside, perfectly tender on the inside, and destined to become a new favorite in your kitchen.
Why Make This Delicious Recipe & When to Serve It
The magic of this recipe lies in its texture. The air fryer creates a dual-texture experience that's hard to replicate—the outer leaves become shatteringly crisp, almost like potato chips, while the inside remains tender and sweet. The high, dry heat perfectly caramelizes the sprouts, eliminating any hint of bitterness and unlocking a wonderfully nutty, savory flavor.
Best of all, this impressive side dish is ready in under 20 minutes, making it a lifesaver for busy weeknights. It delivers that "restaurant-quality" wow factor with minimal effort and a fraction of the oil used in traditional roasting or frying.
This dish is incredibly versatile. It's a holiday hero, perfect for Thanksgiving or Christmas dinners because it frees up precious oven space for the main event. It's a weeknight wonder alongside roasted chicken, steak, or salmon. And it's a guaranteed potluck star that will convert even the most adamant sprout skeptics into fans. You might even find yourself making a batch as a healthy, crave-worthy snack!

Basic Ingredients (Serves 4 people)
- 1 pound (450g) fresh Brussels sprouts: These are the star of the show, providing a tender, slightly sweet base that transforms into a crispy, savory delight when air-fried.
- 1 tablespoon olive oil: This is essential for coating the sprouts, allowing the hot air to create a beautifully golden-brown and crispy exterior while keeping the inside moist.
- ½ teaspoon kosher salt: Salt not only enhances the overall flavor but also helps to draw out moisture from the surface of the sprouts, which is critical for achieving maximum crispiness.
- ¼ teaspoon black pepper: Freshly ground black pepper adds a subtle, pungent warmth that perfectly complements the nutty, caramelized flavor of the cooked sprouts.
- ½ teaspoon garlic powder: This provides a uniform, savory garlic flavor throughout the dish without the risk of burning that fresh minced garlic would have during the high-heat cooking process.

Step-by-Step Preparation
1. Prep the Sprouts (The Soaking Secret)
Trim the tough, woody stem ends off the 1 pound of Brussels sprouts and peel away any yellowed or damaged outer leaves. Cut any sprouts larger than one inch in half lengthwise. For an extra-tender interior, you can soak the trimmed sprouts in a bowl of warm water for 10 minutes; this optional step helps reduce bitterness and ensures they steam gently from the inside as they crisp up.
2. Dry and Season to Perfection
Drain the sprouts thoroughly and pat them completely dry with a clean kitchen towel or paper towels—this is the most important secret to getting them crispy, as moisture will cause them to steam. In a large bowl, toss the dry sprouts with 1 tablespoon of olive oil, ½ teaspoon of kosher salt, ¼ teaspoon of black pepper, and ½ teaspoon of garlic powder until every sprout is evenly coated.
3. Preheat and Arrange for Maximum Airflow
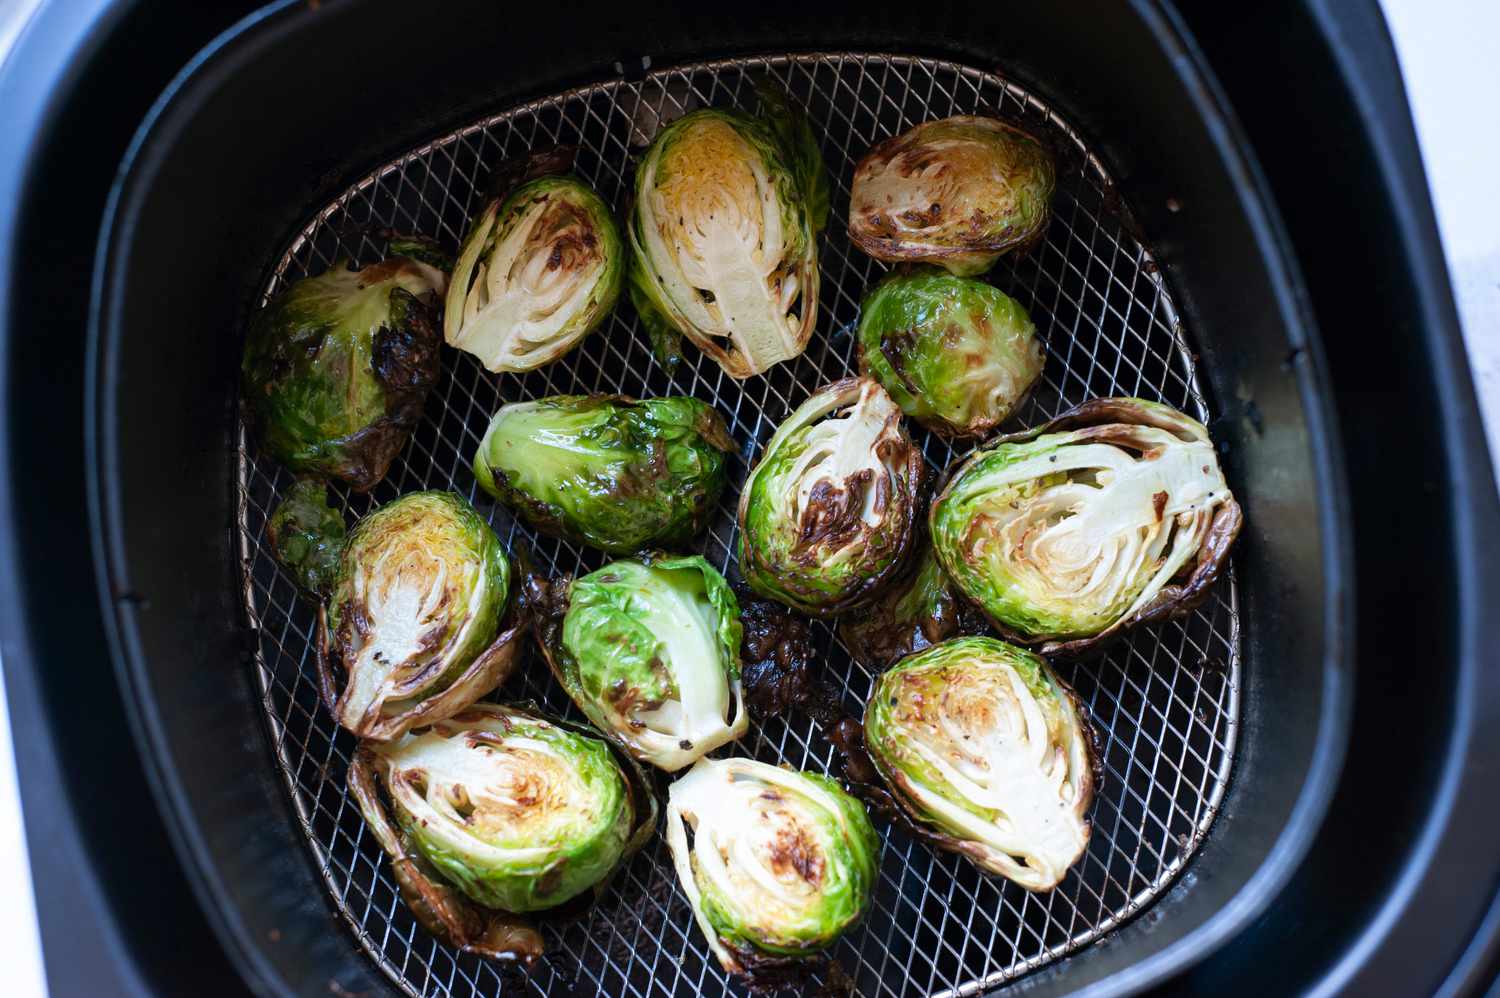
Preheat your air fryer to 380°F (190°C) for about 3-5 minutes, as a hot start is key for immediate crisping. Arrange the seasoned Brussels sprouts in the air fryer basket in a single, even layer. Do not overcrowd the basket; if necessary, cook in two batches to ensure hot air can circulate around each sprout for a perfect, even cook.
4. Air Fry to Golden Crispy Goodness
Cook for 12-15 minutes, pausing to remove the basket and shake it vigorously about halfway through the cooking time (around the 6-7 minute mark). This toss ensures all sides get exposed to the heat. The sprouts are done when the outer leaves are deeply browned and crispy and the centers are easily pierced with a fork.

Tips for the Perfect Recipe
- Texture is Everything: For the crispiest results, ensure your sprouts are bone dry after washing. Any lingering moisture will create steam and prevent that desirable crunch.
- Give Them Space: The number one rule of air frying is to never overcrowd the basket. Cook in batches if you have to; giving the sprouts space allows the hot air to work its magic on all sides, resulting in even crisping instead of soggy steaming.
- Smart Flavor Timing: If using fresh garlic, add it only in the last 2-3 minutes of cooking to prevent it from burning and turning bitter. Similarly, toss the sprouts with sweet glazes like balsamic or honey after they come out of the air fryer, as the sugars can burn quickly under the intense heat.
- Embrace the Loose Leaves: Don't discard the outer leaves that fall off during prep! Toss them with the same seasonings and air fry them. They will turn into incredibly crispy, chip-like morsels that everyone will fight over.

Serving Ideas
- Classic Garnishes: Finish the hot sprouts with a drizzle of rich balsamic glaze, a generous sprinkle of freshly grated Parmesan cheese, or a bright squeeze of fresh lemon juice to cut through the richness.
- Hearty Add-ins: For a more substantial side, toss the cooked sprouts with crispy, crumbled bacon or pancetta, toasted pecans or walnuts, or creamy crumbled feta or goat cheese.
- Sweet & Spicy Kick: Drizzle with hot honey by warming honey with a pinch of red pepper flakes for a trendy and delicious sweet-heat combination.
- Build a Bowl: Use the crispy sprouts as a hearty base for a harvest bowl, adding quinoa, roasted sweet potatoes, a protein of your choice, and a creamy tahini dressing.
- Upgrade Your Salad: Coarsely chop the cooled sprouts and toss them into a kale or spinach salad for an amazing textural contrast and a boost of flavor.

Tips for Storing and Reheating
Storing Leftovers
- Cool Completely: Allow the Brussels sprouts to cool to room temperature before storing to prevent condensation from making them soggy.
- Airtight Container: Place the cooled sprouts in an airtight container and store them in the refrigerator for up to 4 days.
Reheating Tips
- Avoid the Microwave: Microwaving will make your crispy sprouts soft and steamy. For the best results, you must use the air fryer again.
- Revive in the Air Fryer: Place the leftover sprouts back in the air fryer basket and cook at 350°F (175°C) for 3-5 minutes, or until they are heated through and have regained their wonderful crispiness.
Conclusion
Forget everything you thought you knew about boring Brussels sprouts. With the magic of your air fryer and just a few simple ingredients, you can whip up a side dish that is unbelievably crispy, packed with flavor, and surprisingly healthy. This recipe is a true game-changer that will have everyone, even the skeptics, asking for seconds.
Frequently Asked Questions
Q: Why didn't my Brussels sprouts get crispy?
A: Your sprouts likely had too much moisture or the air fryer basket was overcrowded. Ensure they are completely dry before seasoning and always cook them in a single layer to allow hot air to circulate, which is essential for crisping rather than steaming.
Q: Can I use frozen Brussels sprouts for this recipe?
A: While fresh sprouts yield the best crispy texture, you can use frozen ones. Do not thaw them; toss with seasonings and air fry at 400°F (200°C) for about 20 minutes, shaking often to drive off the extra moisture and encourage browning.
Q: Is it necessary to soak the Brussels sprouts before air frying?
A: Soaking is an optional but highly recommended step. It helps to tenderize the dense centers of the sprouts and can reduce some of their natural bitterness, resulting in a more pleasant texture and flavor profile without sacrificing the crispy exterior.
Q: How do I prevent the outer leaves from burning before the inside is cooked?
A: This can happen if your air fryer runs very hot. You can remove any very loose, detached leaves before cooking, as they will burn the fastest. Also, be sure to shake the basket halfway through and start checking for doneness a few minutes early.