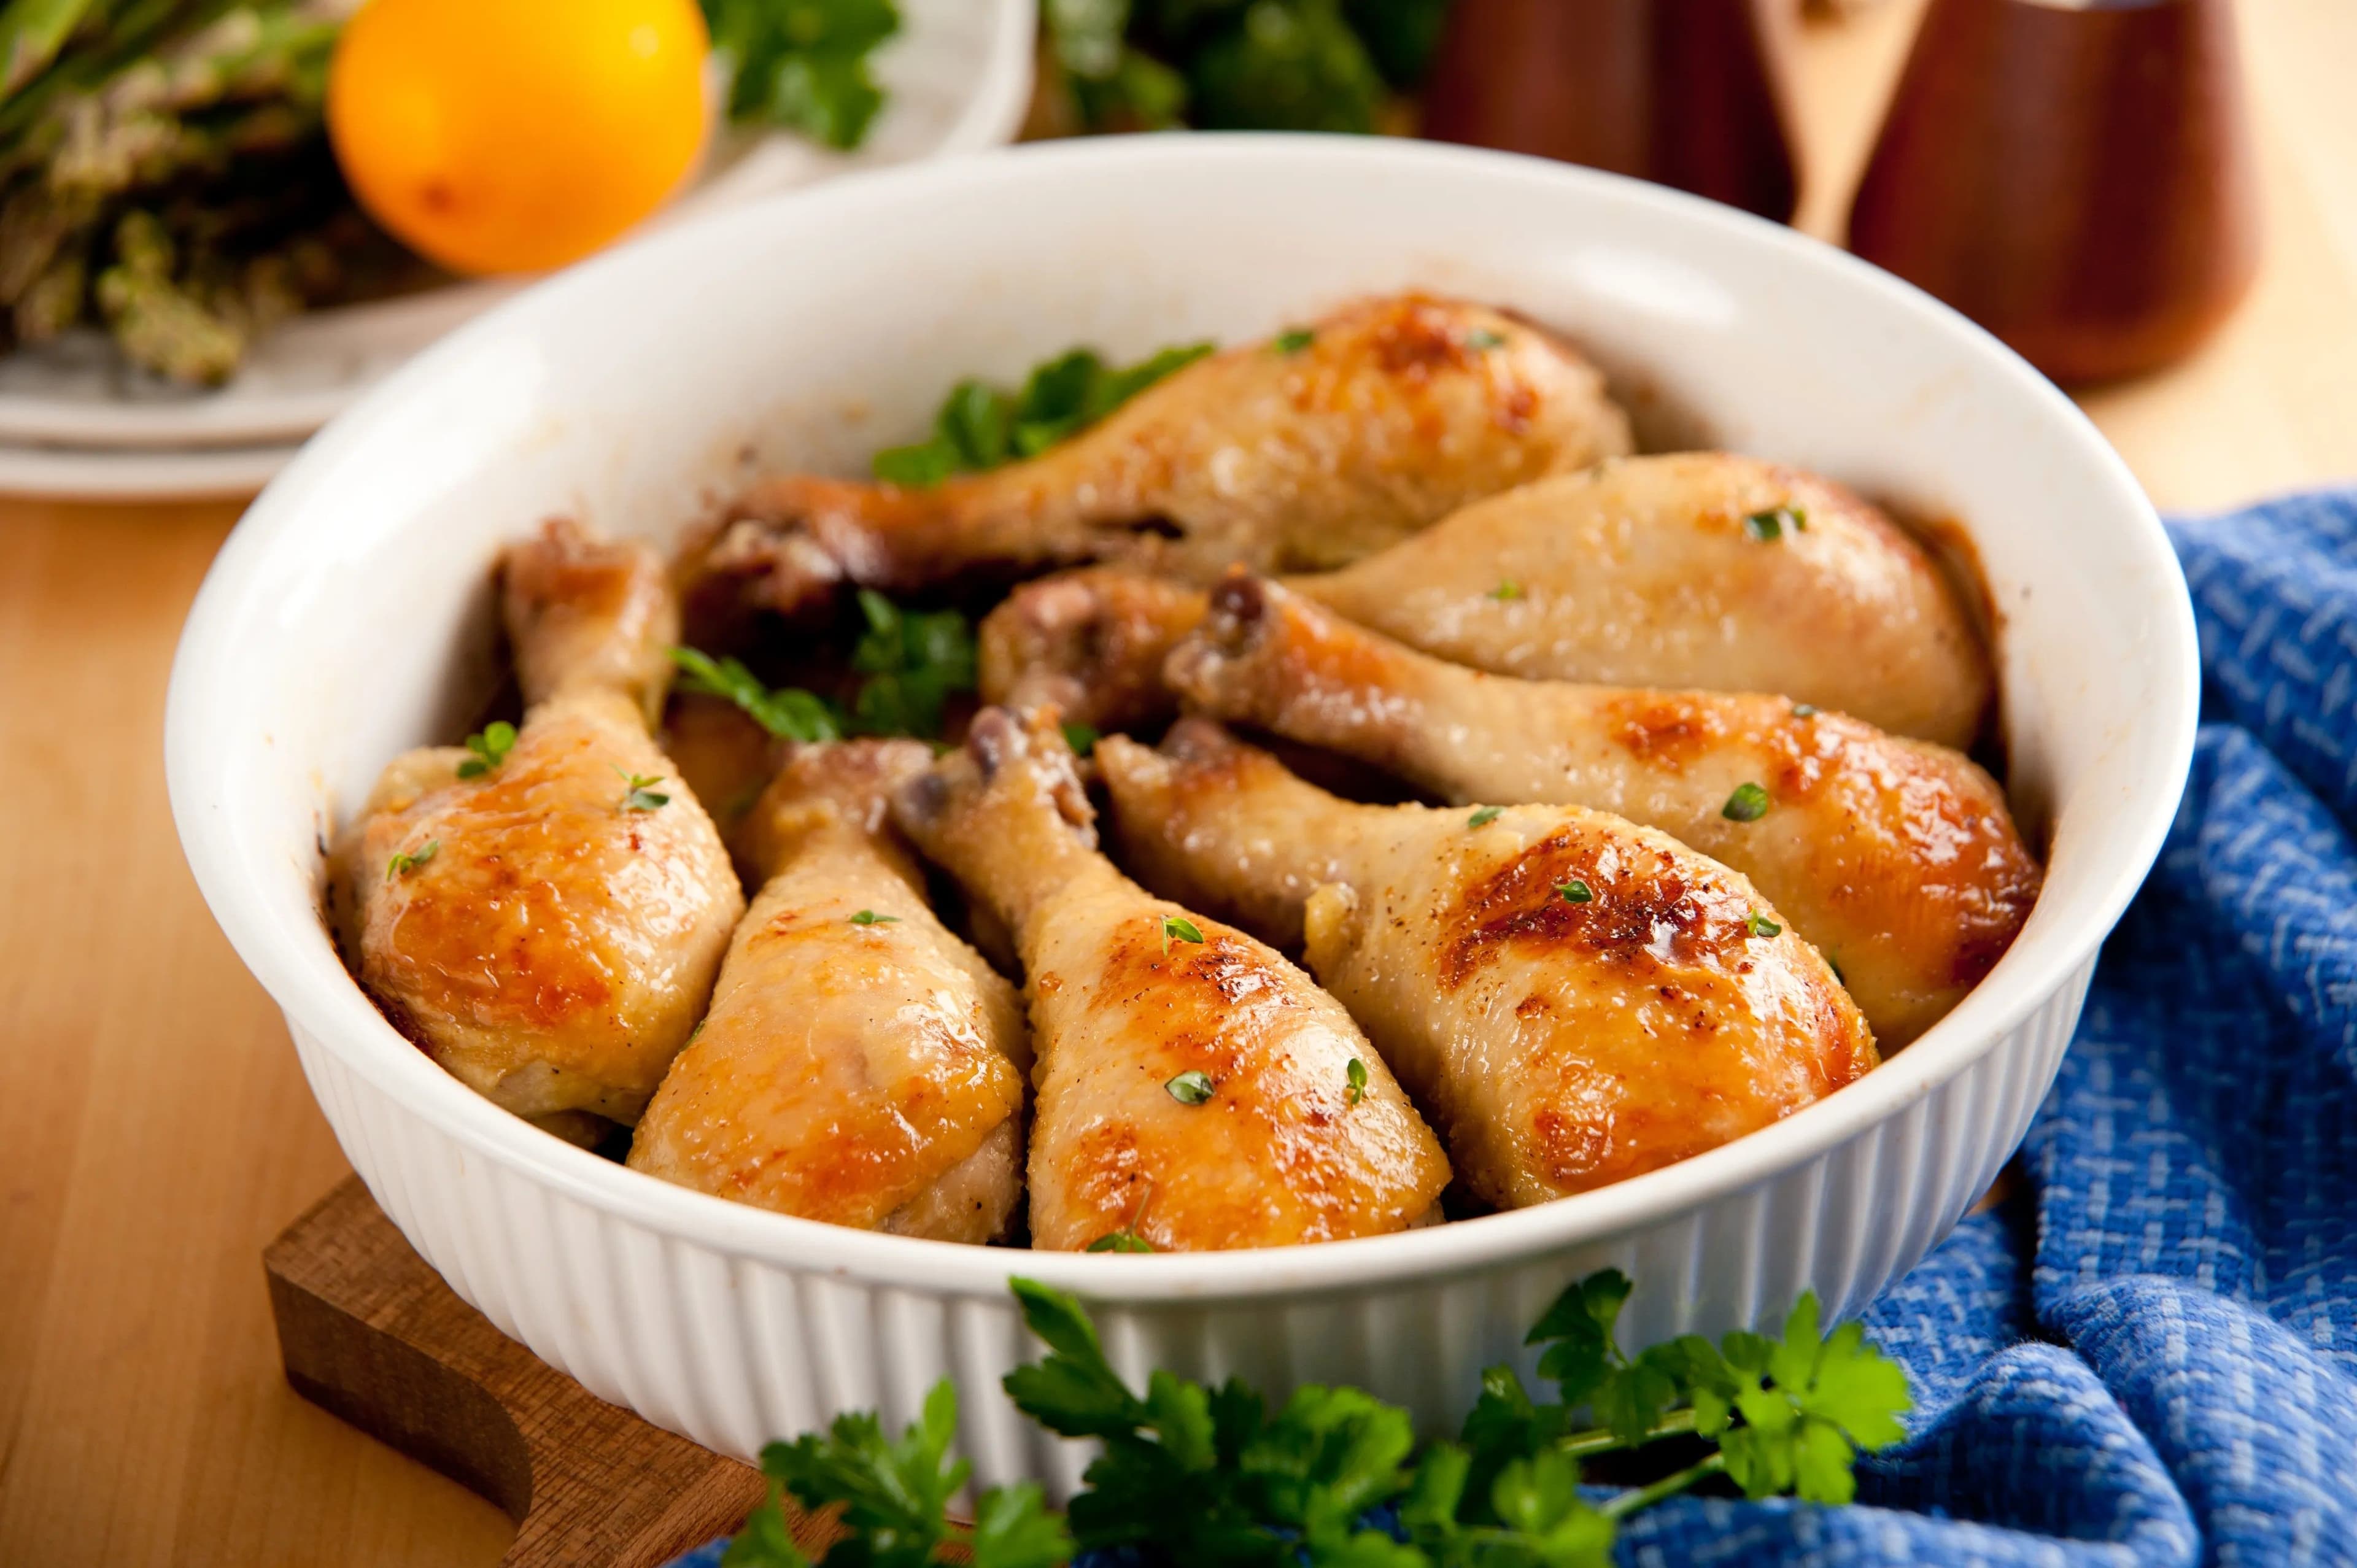
The Guide to Perfectly Crispy, Juicy Baked Chicken Drumsticks
There are few dishes that evoke the same sense of comfort and nostalgia as a platter of perfectly baked chicken drumsticks. They are the centerpiece of countless Sunday dinners, the star of the potluck table, and a symbol of simple, satisfying home cooking. With their rich, dark meat and a built-in handle that makes them irresistibly fun to eat, they are a timeless classic that pleases everyone from toddlers to grandparents.
But for such a simple dish, the results can be frustratingly inconsistent. Too often, the promise of crackling, golden skin gives way to a soggy, pale disappointment, while the meat inside turns out dry and lackluster. This guide is here to change that. We will walk you through a foolproof method, grounded in a bit of kitchen science, to guarantee exceptionally crispy skin and incredibly succulent, juicy meat every single time you turn on your oven.
Why Make These Delicious Baked Chicken Drumsticks & When to Serve Them
The enduring appeal of chicken drumsticks lies in their incredible versatility and forgiving nature. They are one of the most affordable cuts of chicken, and their higher fat content means they stay moist and flavorful, making them a fantastic choice for cooks of all skill levels. They are a true blank canvas, ready to take on any flavor profile you can dream up.
For a busy weeknight, baked drumsticks are a lifesaver, embodying the "maximum taste, minimum effort" philosophy. With only about 10 minutes of active prep time, the oven does all the heavy lifting, freeing you up to help with homework, set the table, or simply relax.
They are also the ultimate crowd-pleaser for larger gatherings like family reunions and parties. You can easily scale up the recipe to make a big batch, and their universal appeal ensures everyone leaves happy.
Finally, they are the quintessential picnic food. Because they are delicious served warm or at room temperature, they travel beautifully. Better yet, they are considered a finger food, so you can leave the forks at home, making for an easy, relaxed outdoor meal.

Basic Ingredients (Serves 4-6 people)
- 8-10 bone-in, skin-on chicken drumsticks (about 3.5-4 lbs): These are the star of the show. Using bone-in, skin-on drumsticks is essential, as the bone imparts deep flavor and the skin renders down to create a crispy shell that self-bastes the meat, keeping it juicy.
- 2 tbsp extra virgin olive oil: This acts as a crucial binder, helping the spice rub cling tightly to the chicken skin. The fat also promotes even browning and helps conduct the oven's heat efficiently to achieve a beautifully golden and crisp exterior.
- 2 tsp smoked paprika: This spice is the heart of the rub, providing a gorgeous deep red color and a wonderfully complex, smoky flavor that mimics the taste of grilled chicken. It adds a layer of earthy depth that elevates the entire dish.
- 2 tsp garlic powder: This ingredient provides a foundational savory and pungent base note that is smoother and less sharp than fresh garlic. Its dry, powdered form ensures it disperses evenly and doesn't introduce moisture, which is key for a crispy finish.
- 2 tsp onion powder: Working in harmony with the garlic, onion powder adds a balancing, zesty sweetness to the flavor profile. Like garlic powder, it delivers a concentrated taste without the water content of a fresh onion, making it perfect for a dry rub.
- 1 ½ tsp kosher salt: Salt does more than just season the meat; it plays a vital chemical role by drawing moisture out from the surface of the skin. This drying action is a critical step in creating the ideal conditions for an exceptionally crispy texture.
- 1 ½ tsp baking powder (NOT baking soda): This is the secret weapon for unbelievably crispy skin. Baking powder raises the skin's pH level, which helps break down proteins more efficiently and encourages browning, resulting in a brittle, crunchy texture that is simply unmatched.
- 1 tsp black pepper, freshly ground: Providing a mild, aromatic heat, freshly ground black pepper cuts through the richness of the chicken. Its sharp notes offer a perfect counterpoint that balances the other savory spices in the blend.
- ½ tsp cayenne pepper (optional): For those who enjoy a little warmth, a touch of cayenne pepper adds a gentle, lingering heat that awakens the palate. The capsaicin in the pepper also enhances the perception of all the other flavors in the rub.

Step-by-Step Preparation
1. Preheat and Prepare Your Pan
Set your oven to preheat to 425 degrees F (218 degrees C). This high, intense heat is absolutely essential for quickly rendering the fat in the chicken skin, which is the first step toward achieving a wonderfully crispy exterior. Line a large, rimmed baking sheet with aluminum foil for effortless cleanup, and place a wire oven rack on top. The rack is a non-negotiable tool here, as it allows hot air to circulate completely around each drumstick, crisping the bottoms and preventing them from becoming soggy.
2. Create the Ultimate Spice Rub
In a small bowl, combine all of your dry seasonings: the 2 tsp of smoked paprika, 2 tsp of garlic powder, 2 tsp of onion powder, 1 ½ tsp of kosher salt, 1 ½ tsp of baking powder, 1 tsp of black pepper, and the optional ½ tsp of cayenne pepper. Use a whisk to mix these ingredients together thoroughly, ensuring that the flavor-giving spices and the texture-enhancing baking powder are perfectly and evenly distributed throughout the entire blend.
3. Pat the Chicken Completely Dry
This is perhaps the single most important step for guaranteeing crispy skin, so do not rush it. Take each of the 8-10 chicken drumsticks and use paper towels to pat them completely dry on all sides, removing every last bit of surface moisture. Moisture is the ultimate enemy of crispiness because it turns into steam in the hot oven, which will prevent the skin from browning and crisping properly.
4. Coat the Drumsticks in Oil and Seasoning
Place the thoroughly dried drumsticks into a large mixing bowl or, for a mess-free alternative, a gallon-sized zip-top bag. Drizzle the 2 tbsp of olive oil over the chicken, then toss or seal the bag and shake until every piece is coated in a thin, even layer of oil. Next, add the entire bowl of prepared spice rub and toss or shake again, using your hands to really massage the seasoning into every nook and cranny of the chicken for maximum flavor penetration.
5. Arrange and Bake to Perfection
Arrange the seasoned drumsticks in a single layer on the prepared wire rack, making sure they are not touching each other. Overcrowding the pan will trap steam and hinder the crisping process, so give each piece its own space. Place the baking sheet in the preheated 425 degrees F oven and bake for 25 minutes. After 25 minutes, use a pair of tongs to carefully flip each drumstick over, then return them to the oven to bake for another 15-20 minutes, which ensures even cooking and browning on all sides.
6. Verify Doneness and Rest the Chicken
The chicken is perfectly cooked when the skin is a deep golden-brown and crispy, and an instant-read thermometer inserted into the thickest part of the meat (without touching the bone) registers between 175 degrees F and 195 degrees F. Remove the chicken from the oven and let it rest on the wire rack for at least 5 minutes before serving. This resting period is crucial, as it allows the juices to redistribute throughout the meat, guaranteeing that every bite is succulent and tender.

Tips for the Perfect Baked Chicken Drumsticks
- The Secret to Truly Crispy Skin: Beyond just drying the chicken, the most impactful trick for incredible skin is adding baking powder to your spice rub. This is a technique used by professional chefs; it chemically raises the skin's pH level, which accelerates the breakdown of proteins and enhances the Maillard reaction, giving you a far crispier, more brittle, and beautifully browned result.
- The Key to Juicy, Fall-Off-the-Bone Meat: While the USDA states chicken is safe to eat at 165 degrees F, dark meat like drumsticks contains a lot of collagen and connective tissue. Cooking them to a higher internal temperature of 175 degrees F to 195 degrees F is the secret to melting that collagen into rich gelatin. This process results in unbelievably tender, moist meat that is never chewy or stringy.
- Don't Crowd the Pan: Always give your drumsticks plenty of personal space on the baking sheet. If they are packed too closely together, they will trap moisture and steam each other instead of roasting in dry heat. Proper spacing ensures that hot air can circulate freely around each piece, which is essential for crisping all sides of the skin.
- Always Use a Wire Rack: Baking chicken directly on a pan surface leads to soggy bottoms where the skin sits in rendered fat and juices. Elevating the drumsticks on a wire rack allows for 360-degree air circulation and lets those drippings fall away, ensuring the undersides get just as golden and crispy as the tops.
- The Mandatory 5-Minute Rest: Resisting the urge to dive in immediately is tough, but letting the chicken rest for 5 to 10 minutes after it comes out of the oven is critical. This allows the intensely hot, pressurized juices inside the meat to cool slightly, thicken, and redistribute evenly. Skipping this step will cause all that flavor and moisture to spill out onto your cutting board instead of staying in the chicken.

Serving Ideas
These baked chicken drumsticks are incredibly versatile and pair wonderfully with a wide variety of side dishes. Here are a few ideas organized by meal type:
- Classic Comfort Pairings
- Creamy Mashed Potatoes: The ultimate comfort food side, perfect for soaking up any delicious chicken juices that escape onto the plate. For extra decadence, try a version loaded with cheddar and sour cream.
- Gooey Macaroni and Cheese: A rich, cheesy casserole that is a guaranteed hit with both children and adults, making for a truly satisfying family dinner.
- Buttery Cornbread or Fluffy Biscuits: Ideal for rounding out a Southern-style meal and ensuring not a single drop of flavor is left behind.
- Healthy & Fresh Sides
- Simple Roasted Vegetables: A healthy and easy option. Toss broccoli, asparagus, carrots, or cauliflower with a little olive oil and seasoning and roast them for a simple, nutritious accompaniment.
- Crisp Green Salad: A simple garden salad tossed in a bright, acidic vinaigrette provides a refreshing contrast that cuts through the richness of the savory chicken.
- Perfect for Picnics & Potlucks
- Classic Potato Salad or Coleslaw: These chilled, creamy salads are quintessential picnic dishes that travel well and pair perfectly with chicken served either warm or at room temperature.
- Vibrant Black Bean and Corn Salad: A zesty, colorful salad that adds a wonderful textural contrast and a pop of freshness to the meal.
- Hearty Rice or Orzo Salad: A simple side of fluffy rice or a flavor-packed Mediterranean orzo salad can make the meal more substantial and satisfying for a hungry crowd.

Tips for Keeping Baked Chicken Drumsticks Fresh
Properly storing your leftover chicken is key to maintaining its flavor, texture, and safety. Follow these simple steps to keep your drumsticks fresh.
Storing Leftovers
- Cool Down First: Before storing, allow the cooked chicken to cool to room temperature on the counter. However, do not leave it out for more than two hours, as this is when bacteria can begin to multiply rapidly.
- Use an Airtight Container: Place the cooled drumsticks into an airtight container or a heavy-duty, sealable plastic bag. This is the most important step for preventing the chicken from drying out, absorbing other odors in the fridge, and protecting it from airborne bacteria.
Keeping Fresh Longer
- Refrigerator Lifespan: When stored correctly in an airtight container, your baked chicken drumsticks will stay fresh and safe to eat for up to 3 to 4 days in the refrigerator.
- Freezing for the Future: For long-term storage, freezing is an excellent option. For best results, place the individual drumsticks on a baking sheet and freeze them until solid. Then, transfer the frozen drumsticks to a heavy-duty freezer bag, squeezing out as much air as possible to prevent freezer burn. They will maintain good quality for up to 4 months.
Conclusion
With just a few key techniques—a hot oven, a scientifically designed spice rub, and the patience to let the chicken rest—you can transform simple drumsticks into a truly memorable meal. Gone are the days of choosing between crispy skin and juicy meat. Now you have the knowledge to achieve both, creating a dish that is perfect for any occasion. We encourage you to try this recipe and rediscover the simple joy of sharing delicious, perfectly cooked chicken with the people you love.
Frequently Asked Questions
Q: What is the best internal temperature for baked drumsticks?
A: While chicken is safe to eat at 165 degrees F, you should aim for a final temperature between 175 degrees F and 195 degrees F for the most tender results. This higher heat is necessary to properly break down the abundant connective tissue in dark meat, resulting in a far superior, juicy texture.
Q: Why isn't my chicken skin crispy?
A: The two most common reasons for soggy skin are too much moisture and not enough heat. Always pat the chicken completely dry with paper towels before seasoning, and be sure to bake at a high temperature, like 425 degrees F, on a wire rack to ensure hot air circulates and prevents any steaming.
Q: Should I cover the chicken with foil when baking?
A: No, you should never cover chicken drumsticks with foil while they are baking in the oven. Covering the pan traps steam, which is the direct enemy of crispy skin. Baking them uncovered is what allows the skin to dry out, render its fat, and turn delightfully golden brown and crisp.
Q: Is it safe if the meat is pink near the bone after cooking?
A: Yes, this can be perfectly normal and safe. In younger chickens, the bones are not yet fully calcified, which can allow pigment from the bone marrow to leach into the surrounding meat, leaving a pinkish hue. Always trust a reliable meat thermometer over visual color; if the internal temperature is at least 165 degrees F, the chicken is safe to eat.
Works cited
- Easy Baked Chicken Drumsticks Recipe - The Salty Marshmallow, accessed July 8, 2025, https://thesaltymarshmallow.com/easy-baked-chicken-drumsticks-recipe/