
What is Creme Brulee?
Creme brulee is an elegant French dessert consisting of a smooth and creamy custard base, made primarily with egg yolks, heavy cream, and vanilla. This delicate cream, cooked in a water bath, achieves a velvety texture that melts in your mouth, while its golden and crispy surface, made of caramelized sugar, offers a unique contrast when broken with a spoon.
The distinctive feature of this dessert is the dramatic contrast between its crispy and caramelized top layer and its smooth, silky interior that maintains a cold temperature. The name "crème brûlée" literally means "burnt cream" in French, referring to the final method where sugar is caramelized until achieving that characteristic golden touch.

The Secrets to Achieving the Perfect Creme BruleeTexture
The perfect texture of creme brulee depends on several fundamental technical elements that must be executed with precision. The secret lies in the correct combination of ingredients and the proper cooking method.
Dairy Proportions
The key to achieving a silky texture is using the right proportion of dairy products. The ideal mixture combines equal parts heavy cream (with 35% fat content) and milk, which provides the perfect balance to obtain a full-bodied custard.
Cooking Technique
The water bath (bain-marie) is essential for achieving a uniform velvety texture. The oven should be preheated to 320°F and maintain a constant temperature throughout the process, ensuring even cooking and preventing unwanted lumps.
Temperature Control
Maintaining precise temperature control during preparation is essential:
- The cream must not boil during initial heating, always maintaining a gentle and constant heat.
- The ideal cooking temperature is 176°F, ensuring the ingredients blend properly.
- The approximate baking time is 30-45 minutes, until the cream is slightly firm but still jiggly in the center.
Cooling Process
The cooling process is crucial for the final texture. The cream must:
- First cool at room temperature, allowing the temperature to drop gradually.
- Refrigerate for a minimum of 2-4 hours, ensuring the cream sets properly.
- Ideally, rest overnight in the refrigerator to achieve the optimal creamy texture.

Caramelizing Techniques
There are different methods to achieve the characteristic crispy layer of creme brulee. Each technique requires precision and care to obtain a uniform and golden caramelization.
Using a Torch or Burner
The most professional and controlled method for caramelizing. Sprinkle a thin, uniform layer of sugar over the cold cream surface and pass the flame in circular motions for 2-3 minutes until achieving a uniform golden color.
Using the Oven Broiler
An alternative without a torch involves placing the ramekins under the preheated broiler at maximum temperature. It must be watched constantly as the sugar caramelizes very quickly, approximately in 2-5 minutes.
With a Hot Spoon
This traditional method requires heating a metal spoon directly over the stove flame until very hot. Press gently over the sprinkled sugar, but it's important not to go over the same area as the sugar may lift.
Important Tips
- The sugar layer must be thin and uniform for even caramelization. Too much sugar will result in a caramel that's too thick.
- White or brown sugar can be used, though white sugar typically gives better results. White sugar produces a crispier and more uniform layer.
- The cream must be completely cold before caramelizing. The sugar won't caramelize properly if the surface is warm.
- Caramelizing should be done just before serving to maintain crispiness. Moisture can soften the caramelized layer.

The Art of Achieving the Perfect Crispy Layer
Achieving a perfect crispy layer on burnt cream is a crucial step that requires precision and technique. The key is to create a golden and crispy surface that contrasts with the smooth creamy interior.
Surface Preparation
- The cream must be completely cold and firm before starting the caramelization process.
- Remove any condensation from the surface with paper towels to ensure the sugar adheres properly.
Sugar Application
- Sprinkle a thin, uniform layer of white sugar (approximately 10g per ramekin) covering the entire surface.
- The sugar layer should be neither too thick nor too thin to achieve the ideal caramel thickness.
Caramelization Technique
- Hold the torch 2-3 cm away from the surface.
- Make constant circular movements to achieve uniform browning for 2-3 minutes.
- The sugar should melt gradually until reaching an amber golden color.
Final Stage
- The caramel is ready when it achieves a uniform golden color and hardens as it cools.
- When tapping gently with a spoon, you should hear a cracking sound indicating the correct crispy texture.
- Let it rest for 1-2 minutes before serving to allow the layer to completely harden.

Essential Ingredients
To prepare a classic and perfect creme brulee, we need just a few ingredients, but each one plays a fundamental role in the final texture and flavor of the dessert.
- Egg yolks: 4 units - Provide creaminess and act as a natural thickener to give structure to the custard.
- Heavy cream: 400 ml (35% fat content) - Provides the rich and smooth base characteristic of the dessert.
- White sugar: 80 g for the custard + 40 g for caramelizing (10 g per ramekin) - Sweetens the cream and creates the crispy top layer.
- Vanilla: 1 pod or 1 teaspoon of pure extract - Adds the traditional aromatic flavor.
- Salt: 1 pinch - Enhances all flavors and balances the sweetness.
- Hot water: As needed - Used for the water bath during cooking.

How to Make Creme Brulee Step by Step
Making creme brulee requires attention to detail and patience. By following these steps meticulously, you'll create a dessert worthy of a French restaurant.
Step 1: Initial Preparation
- Preheat the oven to 320°F and place the rack in the middle position while preparing a large container for the water bath.
- Arrange 4 ramekins in a deep baking pan and bring the water to a boil for the water bath.
Step 2: Cream Infusion
- Heat 400 ml of heavy cream with the split vanilla pod (or 1 teaspoon of extract) over medium-low heat until just before boiling point.
- Remove from heat and let the mixture steep for 15 minutes to allow the vanilla to fully infuse into the cream.
Step 3: Base Preparation
- Beat 4 egg yolks with 80 g of sugar and a pinch of salt until the mixture becomes pale and thick.
- Remove the vanilla pod and slowly pour the cream over the egg mixture, whisking constantly to temper.
Step 4: Baking
- Carefully pour the mixture into the 4 ramekins, leaving a small space at the top for the caramel layer.
- Add hot water to the baking pan halfway up the sides of the ramekins and bake for 30-45 minutes.
Step 5: Checking Doneness
- The custard is ready when the edges are set but the center still jiggles slightly when the ramekin is moved.
- Carefully remove the ramekins from the water bath and let them cool completely to room temperature.
Step 6: Resting and Cooling
- Once at room temperature, cover each ramekin with plastic wrap without touching the custard surface.
- Refrigerate for at least 4 hours, preferably overnight, to allow the custard to set and achieve the perfect texture.
Step 7: Final Caramelization
- Sprinkle 10 g of sugar evenly over each cold dessert, ensuring complete surface coverage.
- Using a torch held 2-3 cm away, caramelize the sugar using circular motions until achieving a uniform golden and crispy finish.
The success of this classic dessert lies in patience and precision at each step. Serve immediately after caramelizing to enjoy the perfect contrast between the crispy layer and creamy base.

The Importance of Resting
Resting is a crucial stage in the preparation of creme brulee that should not be overlooked. This process is divided into two fundamental phases that directly affect the final quality of the dessert.
Room Temperature Rest
- The initial cooling must be done gradually at room temperature (68-72°F) for 30-45 minutes to avoid sudden temperature changes that could affect the texture.
- This process allows the cream to stabilize and prevents condensation that could ruin the dessert's surface.
Refrigeration Rest
- Minimum refrigeration should be 4 hours at 40°F, although letting it rest overnight is ideal.
- During this time, the cream develops a firmer and silkier texture, and the flavors intensify and blend better.
Benefits of Proper Resting
- Improves the final consistency of the cream, making it smoother and more velvety.
- Facilitates the caramelization process, as a well-chilled cream better withstands the heat of the torch.
The resting time should not be seen as wasted time, but as an essential part of the process that ensures the quality and success of the dessert.

Tips for Serving and Presenting the Dessert
The presentation of creme brulee is as important as its preparation, as this French dessert is characterized by its elegance and refinement.
Serving Temperature
- The dessert must be served immediately after caramelizing the surface to maintain the contrast between crispy and creamy.
- The custard base must be completely cold while the top layer should be freshly caramelized.
Ideal Accompaniments
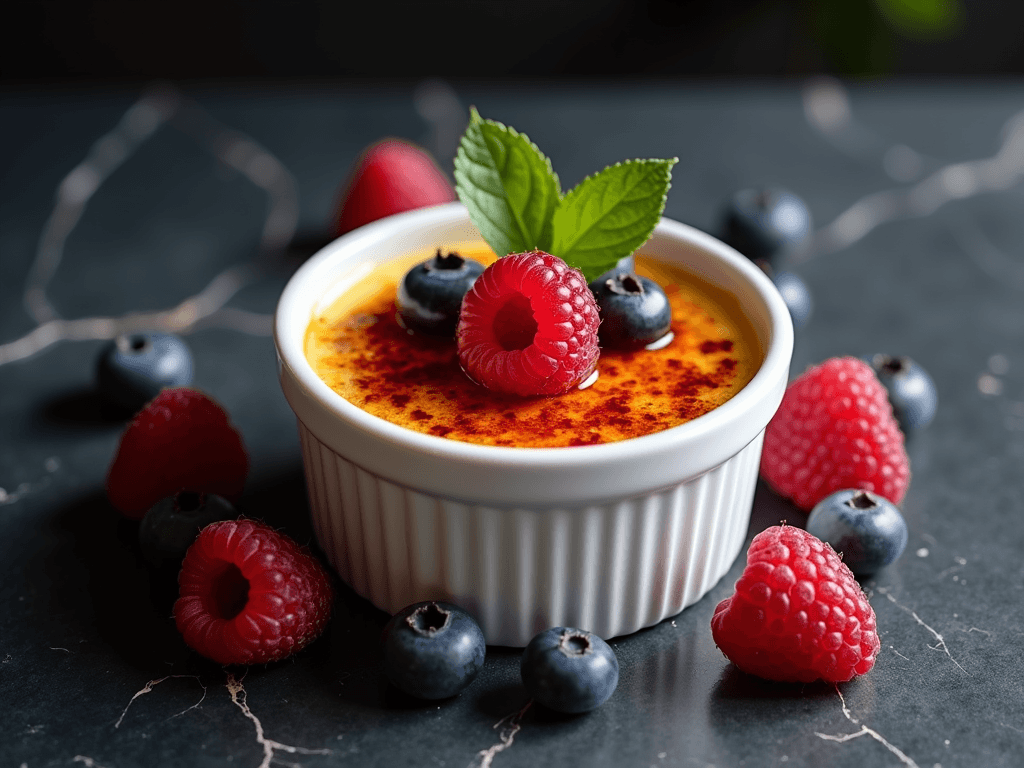
- It can be decorated with fresh fruits, especially berries such as raspberries and blueberries.
- A fresh mint leaf adds a touch of color and elegance to the presentation.
Dishware and Presentation
- Serve the dessert in the same ramekin it was cooked in, placing it on an elegant base plate.
- Use traditional ceramic or terracotta ramekins, which better maintain the temperature.
Final Details
- The surface should have a uniform and shiny golden color.
- When gently tapping with the spoon, you should hear the characteristic crack of the caramel.
- Place a dessert spoon beside the ramekin, preferably of appropriate size to enjoy each bite.
Storage and Freezing Techniques
Proper storage of crème brûlée is essential to maintain its quality and texture. There are different methods depending on the state of the dessert and how long you wish to store it.

Refrigeration Storage
- For non-caramelized creme brulee: Cover each ramekin with plastic wrap without touching the surface and refrigerate for 2 to 3 days at 40°F.
- For creme brulee with caramel layer: Can only be refrigerated for 1-2 days at 40°F, as the caramel will begin to dissolve due to moisture.
Freezer Storage
- Cool the custard completely at room temperature before freezing and wrap each ramekin with plastic wrap.
- The baked custard without caramel can be frozen for up to 1-2 months at 0°F.
- Place the ramekins in an airtight container and label with the storage date.
Important Tips
- The custard must be completely cold (40°F) before storing to prevent condensation.
- Keep the refrigerator temperature between 35-45°F for optimal preservation.
- Never freeze the dessert with the caramel layer, as it will completely dissolve when thawed at room temperature.
Signs of Spoilage
- If the custard loses consistency or has a lot of separated liquid, it should be discarded immediately.
- If strange odors or color changes appear on the surface, it is not fit for consumption.

Frequently Asked Questions (FAQs)
Q: What's the difference between creme brulee and crema catalana?
A: The main difference lies in the ingredients and flavors: creme brulee uses heavy cream and is flavored with vanilla, while crema catalana uses only milk and is flavored with citrus and cinnamon.
Q: Why should creme brulee be served cold?
A: The dessert needs to be cold so that the custard has the proper texture and so that the caramel layer can harden properly, achieving the characteristic contrast in textures.
Q: How long does it take to make creme brulee?
A: The total preparation takes approximately 10 hours, including 45 minutes of baking time and several hours of refrigeration to achieve the perfect texture.
Q: Why is it baked in a water bath?
A: The water bath allows for gentle and uniform cooking, preventing the surface from drying out and avoiding cracks in the custard during baking.


