
The Nutritional Benefits of Hummus for Health
Hummus is one of the most nutritious and versatile foods in Mediterranean cuisine, standing out for its excellent nutritional profile.
- Complete proteins: High in plant-based proteins, providing all essential amino acids when combined with wheat bread.
- Digestive health: Rich in dietary fiber that improves digestion and helps maintain stable blood sugar levels.
- Essential nutrients: Excellent source of iron and folate, nutrients especially important for pregnant women and vegetarians.
- Healthy fats: Contains healthy fats thanks to olive oil and tahini, beneficial for cardiovascular health.
- Key minerals: Provides essential minerals like magnesium, potassium, and zinc, fundamental for various bodily functions.
- Glycemic control: Low glycemic index, making it ideal for people with diabetes or those looking to control their weight.
- Antioxidant properties: Rich in antioxidants that help fight inflammation and protect body cells.
Regular hummus consumption can be part of a balanced and healthy diet, being especially beneficial for people seeking nutritious alternatives to animal proteins.

How to Choose the Best Chickpeas for Making Hummus
Selecting the right chickpeas is crucial for achieving exceptional quality hummus.
- Types of chickpeas: The Kabuli variety is most recommended, characterized by its medium to large grain and wrinkled texture, ideal for achieving creamy hummus.
- Dried vs. canned: Dried chickpeas offer better cooking control and lower sodium content, although they require more preparation time.
- Recommended variety: The Castellano or Fuentesaúco chickpea is excellent for hummus due to its wrinkled skin and light yellow color, characteristics that provide a smoother texture.
- Visual quality: Look for chickpeas with uniform color, without dark spots or signs of deterioration, preferably of similar size.
- Ideal texture: Pedrosillano chickpeas, although requiring longer cooking time, offer a delicious flavor and perfect texture for hummus.
- Storage considerations: If using canned chickpeas, drain and rinse well to reduce sodium content.
- Freshness: Check the packaging or expiration date, especially for dried chickpeas, to ensure the best quality.
The proper selection of chickpeas will largely determine the final quality of your hummus, with dried chickpeas being the most traditional and versatile option for this preparation.

Key Ingredients for Making Hummus
The traditional ingredients for preparing authentic hummus are:
- Dried chickpeas (1 cup): Main base that provides the creamy texture and high protein content.
- Tahini (1/4 cup): Sesame paste that provides the silky consistency and characteristic Middle Eastern flavor.
- Olive oil (2 tablespoons): Adds smoothness and a Mediterranean touch, while helping to emulsify.
- Lemon juice (3 tablespoons): Adds freshness and acidity, while acting as a natural preservative.
- Garlic (1 clove): Gives the characteristic aroma and antimicrobial properties to the hummus.
- Water (1/2 cup): Helps adjust the consistency during processing.
- Salt (to taste): Enhances all flavors and balances the mixture.
- Ground cumin (1/2 teaspoon): Optional ingredient that adds a traditional spiced touch.
- Chives (2 tablespoons): Provides freshness and a decorative touch when serving.
- Paprika (1/2 teaspoon): Adds color and a mild smoky flavor in the final decoration.
These basic ingredients can be complemented with additional spices according to personal taste to create variations of traditional hummus.

How to Make Hummus, Step by Step
Traditional hummus preparation requires attention to detail and patience to achieve the perfect texture. The secret lies in following each step precisely and using ingredients at the right time.
Step 1: Chickpea Preparation
- Soak 1 cup of dried chickpeas for 8-12 hours in cold water, adding 1/2 teaspoon of baking soda to soften them.
- Drain and rinse the chickpeas, then cook them in fresh water for 45-60 minutes until very soft.
- Peel the chickpeas while still warm to achieve a creamier, smoother texture.
Step 2: Base Preparation
- Place the cooked chickpeas in the food processor with 1 peeled garlic clove and process until you get a thick paste.
- Add 1/4 cup tahini and 3 tablespoons fresh lemon juice, processing until completely integrated.
- Incorporate 1/2 teaspoon ground cumin and salt to taste, continuing to process.
Step 3: Texture Adjustment
- While processing, slowly drizzle in 2 tablespoons of olive oil to emulsify.
- Gradually add 1/2 cup cold water until reaching desired consistency, may need more or less.
Step 4: Final Flavor Adjustment
- Taste and adjust flavors by adding more salt, lemon, or cumin as needed.
- Process for an additional 3-5 minutes to ensure an ultra-creamy texture.
Step 5: Presentation and Decoration
- Pour the hummus into a deep plate, creating decorative swirls with the back of a spoon.
- Garnish with a drizzle of olive oil, sprinkle with paprika and fresh chopped chives.
Freshly prepared hummus can be stored in an airtight container in the refrigerator for up to 5 days, though its flavors are best during the first 48 hours.

Techniques for Peeling Chickpeas and Achieving Creamier Hummus
The perfect hummus texture begins with chickpea preparation. Here are the most effective techniques for peeling chickpeas:
- Baking soda method for dried chickpeas: For every 2 cups of chickpeas, add 1.5 tablespoons of baking soda and heat over medium heat for 3 minutes. Then cover with cold water and cook for an additional 5 minutes.
- Technique for cooked chickpeas: Rinse and drain the chickpeas, add one teaspoon of baking soda per 200g and heat them in the microwave until warm.
- Water peeling process: Place the chickpeas in a container with hot water and gently rub them between your hands. The skins will detach and float to the surface.
- Rolling pin method: Place the chickpeas between a clean kitchen towel and roll over them several times with a rolling pin. The skins will easily come off.
- Cooking technique: Add a teaspoon of baking soda to the cooking water. The skins will naturally detach and rise to the surface.
For extra creamy hummus, ensure the chickpeas are very soft. The definitive test is when you can easily crush a chickpea between your fingers without effort.

The Role of Olive Oil in Perfect Hummus Texture
Extra virgin olive oil is a fundamental ingredient that makes the difference in traditional hummus preparation.
- Silky texture: Olive oil provides a smooth and silky texture to hummus, helping to emulsify all ingredients and create a perfect cream.
- Ideal proportion: It is recommended to use approximately 100 ml of extra virgin olive oil (equivalent to half a cup) to balance fatty acids and improve texture.
- Incorporation timing: The oil should be added gradually during final processing, never at the beginning, to achieve perfect emulsion.
- Oil quality: It is crucial to use high-quality extra virgin olive oil, avoiding refined oils that can alter taste and texture.
- Additional benefits: Besides improving texture, olive oil provides cardioprotective properties and helps reduce bad cholesterol while increasing good cholesterol.
- Final decoration: It is recommended to add an extra drizzle of extra virgin olive oil when serving to enhance presentation and flavor.
Olive oil not only improves hummus texture but also makes it a healthier and more nutritious food, being an essential part of the traditional Mediterranean recipe.

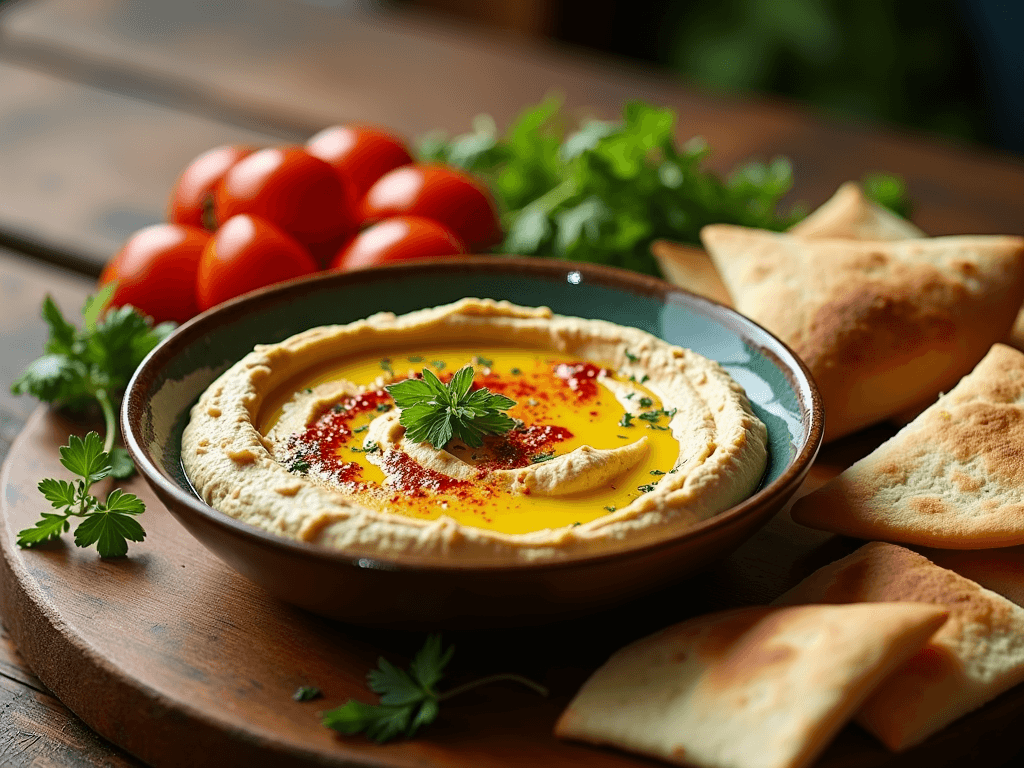
How to Serve and Present Hummus Attractively
The presentation of hummus can transform this traditional dish into a memorable visual and gastronomic experience.
- Volcano technique: Press the tip with a spoon forming a hole in the center and rotate the plate to create a small "pool" to hold the other ingredients.
- Presentation base: Serve the hummus in a wide, shallow bowl, creating decorative swirls on the surface with the back of a spoon.
- Essential toppings: Garnish with a drizzle of extra virgin olive oil, chili flakes, and za'atar for a traditional touch.
- Decorative elements: Add whole cooked chickpeas, crumbled feta cheese, caramelized onions, toasted pine nuts, and fresh sprouts.
- Colorful accompaniments: Surround the hummus with:
Hummus can also be served as part of an appetizer or mezze platter, combining different textures and flavors to create a more elaborate and attractive presentation.

Tips for Storing Homemade Hummus
Proper storage of homemade hummus is essential to maintain its freshness and flavor.
- Protective layer: Cover the hummus surface with a medium layer of extra virgin olive oil, creating an antioxidant barrier.
- Proper freezing: For long-term storage, freeze in small portions using airtight plastic containers, can last up to 6 months.
- Gradual thawing: Thaw in the refrigerator 24 hours before consuming to maintain texture.
- Container space: Leave free space between the hummus, oil, and lid for better preservation.
- Hygiene: Always use clean utensils when serving to avoid cross-contamination.
- Proper container: Use glass containers with airtight seals, as their surface is more inert and odorless, delaying the appearance of microorganisms.
- No garnishes: Store the hummus without decorative elements like parsley, cumin, or additional oil.
- Refrigeration temperature: Keep the hummus between 2 and 4 degrees Celsius in the refrigerator, where it will last 4 to 7 days.
Well-preserved homemade hummus will maintain its freshness and original flavor, allowing you to enjoy this delicious preparation for longer.

Frequently Asked Questions (FAQs)
Q: Why isn't my hummus creamy?
A: The key is to peel the chickpeas and process them while they're still warm. It's also important to add ice cubes during processing to achieve a silkier texture.
Q: How long can I store homemade hummus?:
A: Homemade hummus stays fresh for 4-7 days in an airtight container in the refrigerator. Freezing is not recommended as it loses texture.
Q: Which tahini brand is the best?:
A: Recommended brands include Cedar's, Seed & Mill, or Soom, which offer a smooth texture and sesame flavor without bitterness.
Q: What's the secret to perfect hummus?:
A: The processing order is crucial: first mix the tahini with lemon juice until creamy, then add the remaining ingredients.


