The Comfort of a Golden-Brown Roast
There are few culinary experiences as universally comforting as a roasted chicken. The aroma alone—a rich blend of savory herbs, garlic, and golden-brown skin—has the power to fill a home with an unmistakable sense of warmth and well-being. It is more than just a meal; it is an edible symbol of care, a nostalgic connection to family dinners and simpler times, and a tangible act of love that nourishes both body and soul.
For many, however, the idea of roasting a whole bird can seem like a daunting culinary peak to scale, a "small, important victory for adulthood" that feels just out of reach. This guide is here to change that. We will demystify the process with a reliable, step-by-step recipe that banishes all guesswork, empowering you to achieve a spectacular result every single time: incredibly juicy, tender meat and shatteringly crisp, deeply golden skin.
Why Make This Delicious Meal & When to Serve It
Roasted chicken is the ultimate culinary all-rounder. It possesses a unique versatility, feeling perfectly at home as the elegant centerpiece of a holiday dinner or a special Sunday supper, yet it is equally suited for a quiet, cozy weekend meal when you simply need to feel comforted and cared for.
Its universal appeal makes it the perfect crowd-pleaser for any occasion. Whether you are contributing to a potluck, hosting a family gathering, or simply having friends over for dinner, a beautifully roasted chicken is a celebrated choice that brings people together. The communal act of carving and sharing the meal fosters a genuine sense of connection and togetherness.
Beyond its deliciousness, mastering this dish is an incredibly rewarding kitchen project. There is a profound sense of satisfaction that comes from pulling a perfect, golden-brown bird from the oven—a tangible, delicious accomplishment that builds confidence and makes you feel truly capable as a home cook. This recipe isn't just about one meal; it's about learning a foundational skill that will serve you for years to come.

Basic Ingredients (Serves 4-6 people)
The ingredients are chosen for their classic, complementary roles, working in harmony to produce a chicken that is flavorful to the bone.
- 1 (5- to 6-pound) Whole Roasting Chicken: The star of the show. A high-quality roaster provides the ideal meat-to-fat ratio for a juicy interior and a beautifully rendered, crispy exterior. Ensure the giblets are removed from the cavity before you begin.
- 6 Tablespoons Unsalted Butter, softened: This is the primary fat, used to create a flavorful compound butter. The milk solids in butter promote a deep, golden-brown color on the skin and add an unmistakable richness to the finished dish.
- 4-5 Cloves Garlic, minced: An essential aromatic that infuses the compound butter with a pungent, savory depth. The garlic mellows during roasting, adding a sweet, complex flavor that permeates the meat and scents the entire kitchen.
- 2 Tablespoons Fresh Rosemary, finely chopped: This robust, piney herb is a classic pairing for chicken. Chopping it finely allows its essential oils to release into the butter, ensuring its flavor is distributed evenly under and over the skin for a fragrant result.
- 1 Large Lemon: This multi-purpose ingredient provides both flavor and moisture. Half will be juiced for the compound butter to add brightness, while the remaining halves are placed inside the cavity to gently steam the bird from within.
- 1 Large Yellow Onion, thickly sliced: This vegetable serves as a natural, edible roasting rack. Slicing it thickly and placing it under the chicken elevates the bird for even cooking and prevents a soggy bottom, while it caramelizes in the pan drippings.
- 1 Tablespoon Kosher Salt: The most crucial seasoning for flavor and texture. Kosher salt's large crystals are ideal for drawing out moisture from the skin to help it crisp up, and for seasoning the meat deeply and evenly.
- 2 Teaspoons Freshly Cracked Black Pepper: Provides a gentle, spicy warmth that cuts through the richness of the chicken and butter. Using freshly cracked pepper offers a much more potent and aromatic flavor than its pre-ground counterpart.
- Kitchen Twine: An optional but highly recommended tool for trussing. Tying the legs together helps the chicken cook more evenly by creating a compact shape and prevents the legs and wings from drying out before the breast is cooked.

Step-by-Step Preparation
This method deliberately separates the goals of browning the skin and cooking the meat through, giving you precise control and ensuring a perfect result.
1. Prepare Your Roasting Station and Aromatics: First, preheat your oven to 425°F (220°C). Arrange an oven rack in the lower-middle position to ensure the top of the chicken won't be too close to the heating element. Slice your large yellow onion into thick, 1/2-inch rounds and arrange them in a single layer in a roasting pan or large cast-iron skillet.
2. Create the Compound Butter: In a small bowl, combine the 6 tablespoons of softened butter, the minced garlic, the 2 tablespoons of chopped fresh rosemary, and 1 tablespoon of juice from your lemon. Add half of the kosher salt (1.5 teaspoons) and half of the black pepper (1 teaspoon) and mix with a fork until everything is thoroughly incorporated into a fragrant paste.
3. Prepare the Chicken: Remove the chicken from its packaging and take out the giblet bag from the cavity. Pat the entire surface of the chicken, including the inside of the cavity, meticulously dry with paper towels. This step is absolutely critical, as dry skin is the secret to achieving a perfectly crispy, golden-brown finish.
4. Season the Chicken Generously: Gently slide your fingers between the skin and the breast meat to create a pocket. Push about two-thirds of the compound butter mixture into this space, spreading it as evenly as possible over the breasts. Rub the remaining butter all over the exterior of the chicken, including the legs and wings.
5. Season and Stuff the Cavity: Sprinkle the remaining 1.5 teaspoons of kosher salt and 1 teaspoon of black pepper inside the chicken's cavity. Cut the zested and juiced lemon into halves or quarters and place them inside the cavity. This will release aromatic steam as the chicken cooks, keeping the meat moist and flavorful from the inside out.
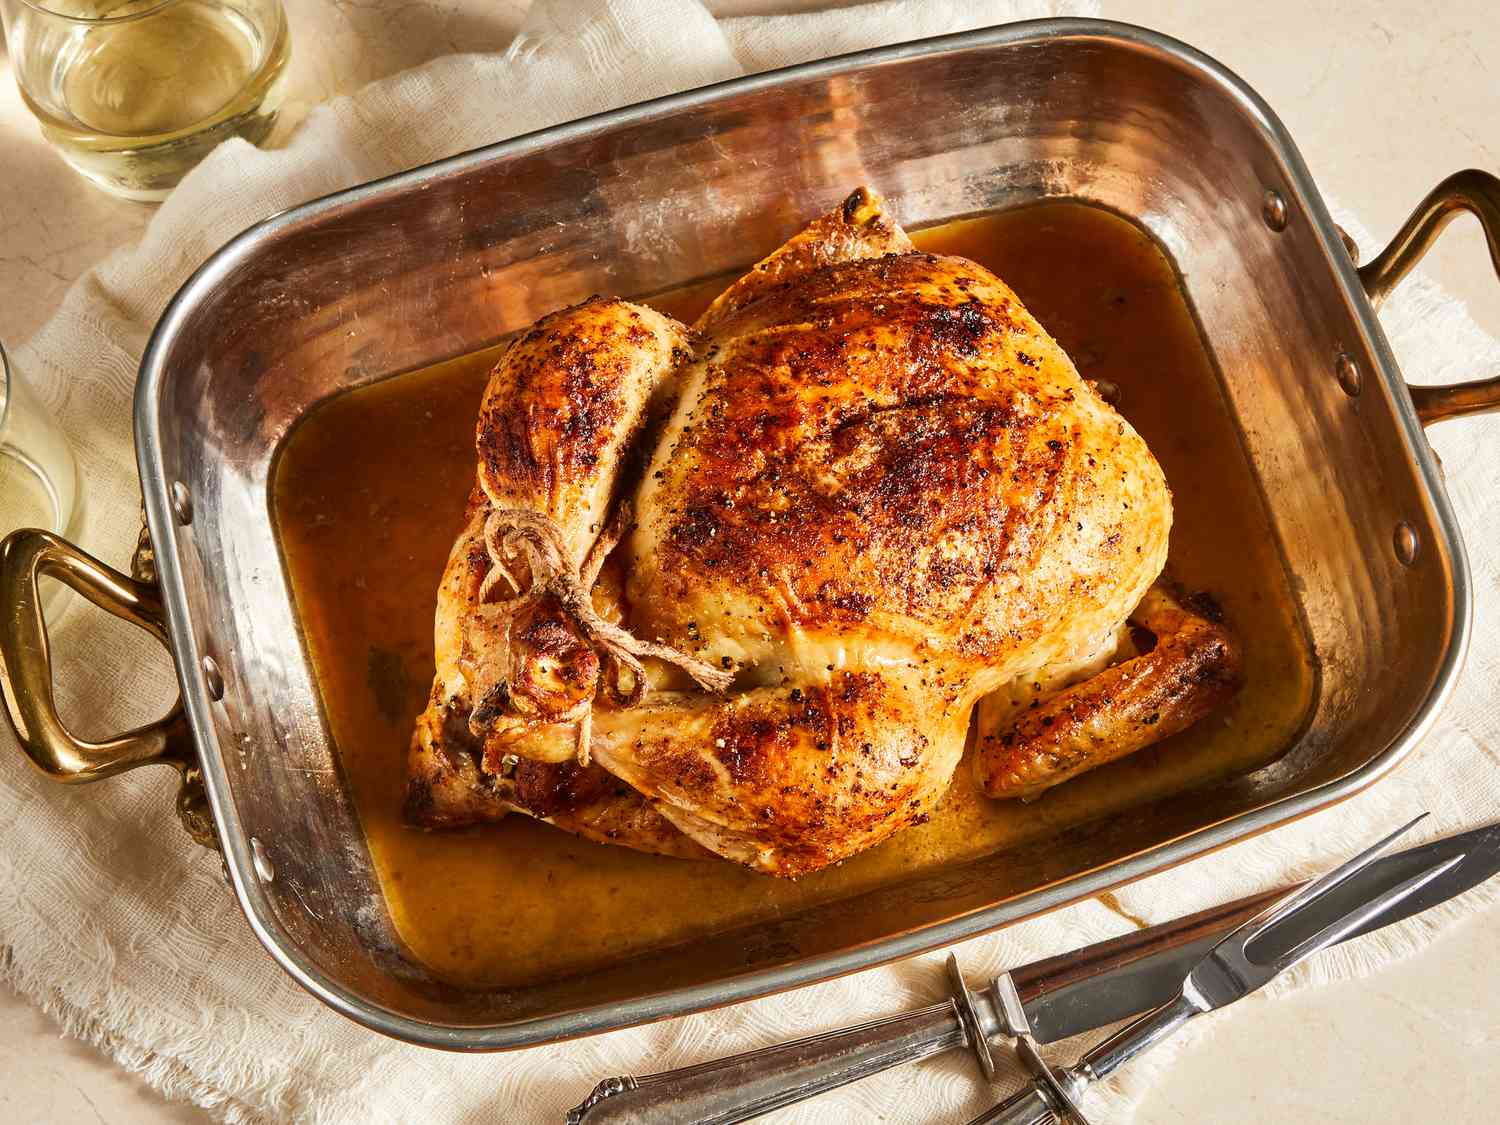
6. Truss the Chicken for Even Cooking: Place the seasoned chicken breast-side up on top of the onion slices in your pan. Cross the legs and tie them together securely with a piece of kitchen twine. Tuck the wing tips under the body of the chicken to prevent them from burning and to create a more compact, evenly-cooking shape.
7. The Initial High-Heat Roast: Place the roasting pan into the preheated 425°F oven. Roast at this high temperature for 20 minutes. This initial blast of heat is designed to kick-start the browning process, rendering the fat and beginning to crisp the skin, effectively sealing in the juices for a moist result.
8. The Second, Slower Roasting Stage: After 20 minutes, reduce the oven temperature to 350°F (175°C) without opening the oven door. Continue to roast for another 60-80 minutes. The total cooking time will be about 20 minutes per pound, but using a thermometer is the only way to guarantee perfection.
9. Check for Doneness with a Thermometer: The chicken is done when an instant-read thermometer inserted into the thickest part of the thigh (without touching the bone) registers 165°F (74°C). The juices should also run clear when the area between the leg and thigh is pierced. This is the most reliable way to avoid both undercooked and dry, overcooked chicken.
10. Rest the Chicken Before Carving: Carefully transfer the roasted chicken to a cutting board and tent it loosely with aluminum foil. Let it rest for at least 15-20 minutes before carving. This crucial final step allows the juices that have migrated to the center of the bird to redistribute throughout the meat, ensuring every slice is tender and succulent.

Tips for the Perfect Meal
These expert tips focus on the key principles of moisture and heat management, elevating your roasted chicken from great to unforgettable.
- For the Crispiest Skin:
- Dryness is Non-Negotiable: The single most important factor for crispy skin is removing moisture. Patting the chicken thoroughly dry with paper towels before seasoning is the absolute minimum requirement for success.
- The 24-Hour Air-Dry (Advanced Tip): For truly spectacular, glass-like skin, season the chicken and leave it uncovered on a rack in the refrigerator for up to 24 hours before roasting. This dehydrates the skin, guaranteeing an incredible crunch.
- For the Juiciest Meat:
- Trust the Thermometer, Not the Clock: Cooking time is only an estimate; oven temperatures vary and chicken sizes differ. An instant-read thermometer is the only foolproof way to ensure your chicken is perfectly cooked to 165°F and not a degree more.
- Resting is a Commandment: Do not skip the 15-20 minute rest period. This allows the constricted muscle fibers to relax and reabsorb the flavorful juices. Carving too early will lead to a flood of juices on your cutting board and dry meat on the plate.
- For the Richest Flavor:
- Season Under the Skin: Pushing compound butter or seasonings directly onto the meat ensures the flavor penetrates beyond the surface, seasoning the breast meat from the inside for a much more delicious result.
- Don't Waste the Drippings: The browned bits (known as fond) and rendered fat in the bottom of the pan are liquid gold. Use them to make a simple, flavorful pan gravy while the chicken is resting.

Serving Ideas
A well-composed plate is an exercise in balancing flavors and textures. Pair your rich, savory chicken with sides that offer contrast and brightness.
- Classic Starchy Sides:
- Creamy Mashed Potatoes: The ultimate vehicle for soaking up delicious pan gravy, creating a truly comforting combination.
- Crispy Roasted Potatoes: Tossed in olive oil and herbs, their fluffy interiors and crunchy exteriors are a perfect textural counterpoint.
- Herbed Rice Pilaf or Couscous: A lighter but equally satisfying option, especially when cooked in chicken broth for an extra layer of flavor.
- Vibrant Vegetable Pairings:
- Honey-Glazed Carrots: The natural sweetness of the carrots, enhanced by the glaze, provides a beautiful contrast to the savory chicken.
- Garlic Green Beans or Parmesan Asparagus: These simple, quick-cooking vegetables add a welcome splash of green and a fresh, clean flavor to the plate.
- Roasted Brussels Sprouts or Broccoli: The slight bitterness and charred notes from roasting complement the rich chicken perfectly and prevent the meal from feeling too heavy.
- Fresh and Creative Additions:
- A Simple Green Salad: A bright, acidic lemon vinaigrette cuts through the richness of the meal and cleanses the palate between bites.
- Roasted Fennel with Parmesan: Roasting brings out fennel's sweet, anise-like flavor for a sophisticated side dish that pairs wonderfully with poultry.
- Warm Dinner Rolls or Crusty Bread: An absolute essential for mopping up every last drop of gravy and juice from your plate.

Tips for Storing and Reheating
Proper storage and reheating are key to enjoying your leftovers. The goal is always to retain as much moisture as possible.
Storing Leftovers
- Cool Down Promptly: For food safety, allow the chicken to cool slightly, but ensure it is transferred to the refrigerator within two hours of cooking.
- Airtight is Right: Store the chicken in an airtight container or wrap it tightly in foil. This prevents it from drying out and absorbing other odors from the fridge. It will keep well for 3-4 days.
- Freeze for the Future: For longer storage, remove the meat from the bones and freeze it in airtight bags or containers for up to 3 months. This is perfect for future soups, salads, or tacos.
Reheating Tips
- Best Method (Oven): To reheat larger pieces, place them in an oven-safe dish with a splash of chicken broth, cover with foil, and warm in a 350°F (175°C) oven for about 20 minutes. Remove the foil for the last 5 minutes to re-crisp the skin.
- Fastest & Crispiest (Air Fryer): For the best texture in the shortest time, the air fryer is king. Reheat pieces at 350°F (175°C) for 4-7 minutes until hot and the skin is wonderfully crunchy again.
- Last Resort (Microwave): Avoid microwaving bone-in pieces, as it creates rubbery skin. If you must, use it for small, boneless portions. Cover with a damp paper towel and heat in short 30-second bursts to prevent overcooking.
Conclusion
Roasting a chicken is one of the most satisfying and rewarding experiences a home cook can have. It transforms a handful of simple ingredients into a meal that is deeply comforting and impressively delicious. Embrace the process, trust your thermometer, and get ready to enjoy the soul-satisfying results of your work, creating new traditions and cherished memories in your own home.
Frequently Asked Questions
Q: Why shouldn't I stuff my chicken with bread stuffing?
A: Stuffing the cavity insulates it, meaning the stuffing won't reach a food-safe temperature of 165°F until the surrounding chicken meat is severely overcooked and dry. It is much safer and yields a better result to cook your stuffing in a separate dish.
Q: How can I tell if the chicken is cooked without a thermometer?
A: While a thermometer is strongly recommended for safety and accuracy, the traditional method is to pierce the thickest part of the thigh. If the juices that run out are completely clear, with no pink tinge, the chicken is likely cooked through.
Q: Do I absolutely have to truss the chicken?
A: Trussing is not mandatory, but it is highly recommended for a superior result. Tying the chicken into a compact shape helps the breast and thigh meat cook more evenly and prevents the wing tips from burning, leading to a more uniformly cooked bird.
Q: What is the single biggest mistake that leads to dry, tough chicken?
A: The most common mistake is simply overcooking it. Many cooks are fearful of undercooked poultry and leave it in the oven for far too long. Using an instant-read thermometer and pulling the chicken out the moment it hits 165°F is the single best way to guarantee juicy, tender meat.
Works cited
- It is proven that Fried Chicken is the Comfort Food Culture - Meat and Eat, accessed July 17, 2025, https://meatandeat.in/fried-chicken-and-comfort-food-culture/
- Comfort Food: Unraveling the Emotional Ties to Our Meals - CHEF iQ, accessed July 17, 2025, https://chefiq.com/blogs/blog/comfort-food-unraveling-the-emotional-ties-to-our-meals
- Comfort Food Doesn't Have To Be A Guilty Pleasure - Ellie Krieger, accessed July 17, 2025, https://www.elliekrieger.com/comfort-food-doesnt-guilty-pleasure/
- Redefining Comfort Food | JFP Mobile | Jackson, Mississippi, accessed July 17, 2025, https://m.jacksonfreepress.com/news/2012/mar/28/redefining-comfort-food/
- Roasting a Whole Chicken: An Emotional Rollercoaster | The ..., accessed July 17, 2025, https://bittmanproject.com/roasting-a-whole-chicken-an-emotional-rollercoaster/
- A Whole Roast Chicken Worth Making, Even for One, accessed July 17, 2025, https://food52.com/blog/16661-a-whole-roast-chicken-worth-making-even-for-one
- Simple Whole Roasted Chicken - Delicious by Design, accessed July 17, 2025, https://deliciousbydesign.net/classic-roasted-chicken/
- Perfect Roast Chicken Recipe | Ina Garten - Food Network, accessed July 17, 2025, https://www.foodnetwork.com/recipes/ina-garten/perfect-roast-chicken-recipe-1940592
- Roast Chicken Recipe - The Pioneer Woman, accessed July 17, 2025, https://www.thepioneerwoman.com/food-cooking/recipes/a10727/roast-chicken/
- Classic Oven Roasted Chicken - Accidental Happy Baker, accessed July 17, 2025, https://www.accidentalhappybaker.com/oven-roasted-chicken/
- Crispy Skin Roast Chicken Recipe JUICY EASY - White On Rice Couple, accessed July 17, 2025, https://whiteonricecouple.com/crispy-skin-roast-chicken/
- Perfect Roast Chicken - My Diary of Us, accessed July 17, 2025, https://www.mydiaryofus.com/blog/perfect-roast-chicken
- How to achieve a crispy skin when roasting a chicken? - Seasoned Advice - Stack Exchange, accessed July 17, 2025, https://cooking.stackexchange.com/questions/93757/how-to-achieve-a-crispy-skin-when-roasting-a-chicken
- The Best Way To Get Crispy Chicken Skin (A Tip You'll Need for ..., accessed July 17, 2025, https://www.simplyrecipes.com/best-way-to-get-crispy-chicken-skin-8717487
- Roast Chicken, Questions and Answers | Twice Cooked - Cooking ..., accessed July 17, 2025, http://www.twice-cooked.com/2014/05/08/roast-chicken-questions-answers/
- What sides do you typically pair with roasted chicken for a well-balanced meal? - Quora, accessed July 17, 2025, https://www.quora.com/What-sides-do-you-typically-pair-with-roasted-chicken-for-a-well-balanced-meal
- Common Issues with Roast Chicken : r/cookingforbeginners - Reddit, accessed July 17, 2025, https://www.reddit.com/r/cookingforbeginners/comments/jtc1zs/common_issues_with_roast_chicken/
- What are your go to sides for a roasted chicken dinner? : r/Cooking - Reddit, accessed July 17, 2025, https://www.reddit.com/r/Cooking/comments/14c3bqk/what_are_your_go_to_sides_for_a_roasted_chicken/
- Sides for a Roast Chicken | Ottolenghi, accessed July 17, 2025, https://ottolenghi.co.uk/blogs/stories/sides-for-a-roast-chicken
- 25 Sides for Chicken the Whole Family Will Love | Taste of Home, accessed July 17, 2025, https://www.tasteofhome.com/collection/sides-for-chicken/
- 16 Delicious Side Dishes for Your Chicken Dinner - Simply Recipes, accessed July 17, 2025, https://www.simplyrecipes.com/side-recipes-to-serve-with-chicken-8697871
- Super Easy Roast Chicken - Downshiftology, accessed July 17, 2025, https://downshiftology.com/recipes/easy-roast-chicken/
- How to Reheat Rotisserie Chicken - Valerie's Kitchen, accessed July 17, 2025, https://www.fromvalerieskitchen.com/how-to-reheat-rotisserie-chicken/
- How To Reheat Rotisserie Chicken in the Oven - Care and Share Food Bank, accessed July 17, 2025, https://careandshare.org/wp-content/uploads/2021/09/Reheat-Rotisserie-Chicken-Instructions.pdf
- Don't let that Chicken Go to Waste! Five Ways to Reheat Rotisserie Chicken, accessed July 17, 2025, https://hereheremarket.com/blogs/news/how-to-reheat-rotisserie-chicken-5-ways