It is a common frustration for home cooks: a beautiful, thick-cut steak, lovingly prepared, yet it lacks that profound, savory crust and juicy, tender center that defines a true steakhouse experience. The difference often lies not in a secret ingredient, but in mastering a few fundamental techniques and understanding the science behind them. This guide demystifies the process, transforming the act of cooking a steak from a guessing game into a precise, repeatable craft. From the moment the steak is selected to the final, critical step of resting, every stage contributes to a perfect result.
The Pre-Game: Foundation for Flavor
Achieving an exceptional steak begins long before it ever touches a hot pan. The preparation is a series of deliberate choices that set the stage for success, focusing on the quality of the meat itself and the ideal condition of its surface.
Choosing Your Champion Cut
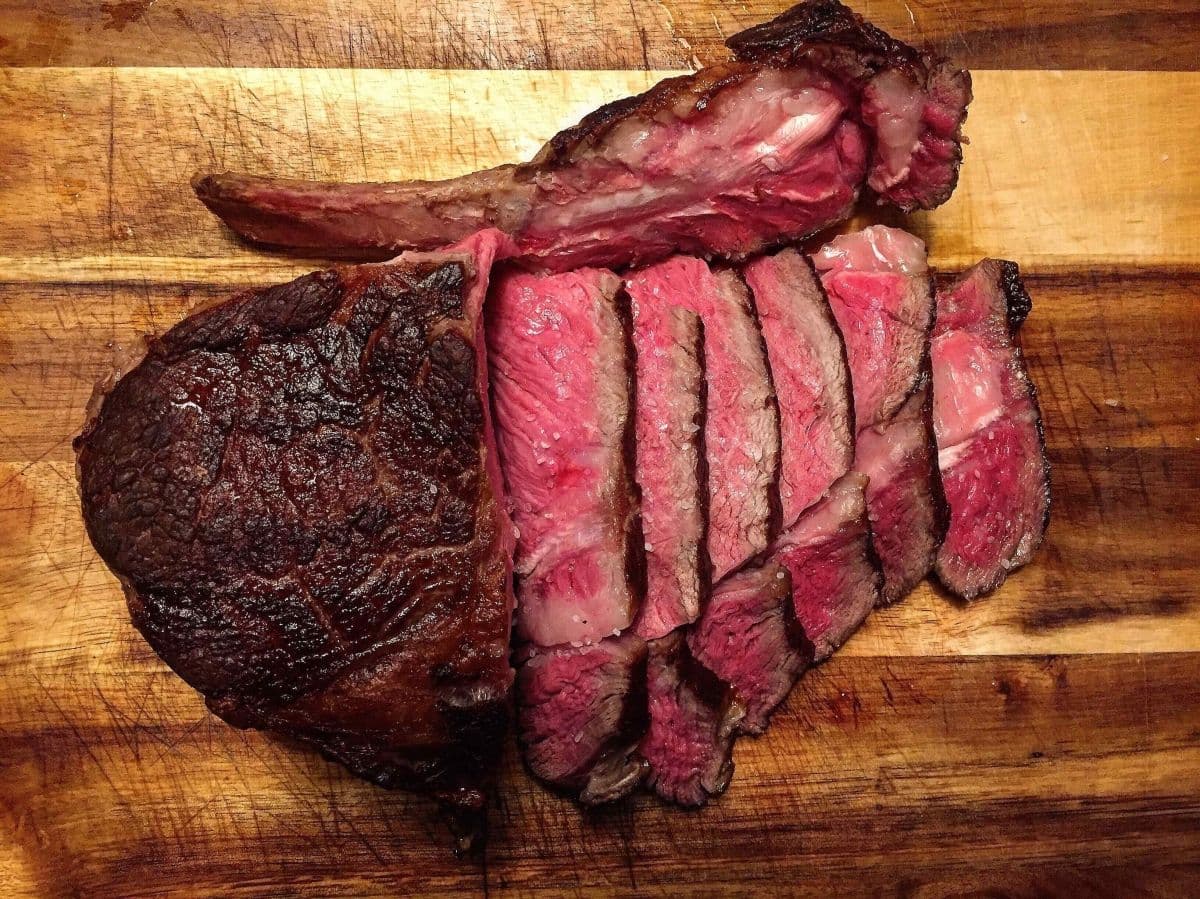
For a perfect medium-rare steak, the ribeye is an unparalleled choice. This cut is celebrated for its rich, buttery flavor and remarkable tenderness, a direct result of its abundant intramuscular fat, known as marbling. As the steak cooks, this fat renders, melting into the muscle fibers and infusing the meat with moisture and a deep, savory flavor. This characteristic makes the ribeye forgiving and ensures a consistently juicy result, a distinct advantage over leaner, tougher cuts that are best suited for different cooking methods.
The Science of Surface Preparation
Once the ideal cut is chosen, the next steps are to prepare its surface for high-heat cooking. This process is more about science than intuition and is non-negotiable for a superior sear and flavor.
The Room Temperature Rule
For many years, the standard advice has been to let a steak sit out for 20 to 45 minutes to come to room temperature before cooking. While this practice is widely recommended and can prevent the surface from being chilled, its primary benefit is not a significant rise in the steak's core temperature, which would take hours to achieve in a thick cut. Instead, the key objective is to remove the refrigerator chill from the surface of the meat. This prevents a temperature shock when the steak hits the hot pan, promoting a more even cook and allowing the crucial chemical reactions on the surface to begin immediately.
The Dry Surface Imperative
The most critical step in preparation is ensuring the steak's surface is completely dry. Any moisture on the exterior of the meat, whether from the refrigerator or from the washing process, will turn into steam the moment it hits the heat. This steam will prevent the surface from browning and forming a crust, instead causing the meat to boil or steam in its own moisture. To avoid this, a steak must be patted thoroughly dry on all sides with a paper towel. The surface must be bone-dry to allow the heat to transfer efficiently and begin the browning process immediately upon contact.
Generous Seasoning
Under-seasoning is a common pitfall. Since only the exterior of a steak can be seasoned, a generous application of kosher salt and freshly ground black pepper is essential to flavor the entire thick cut. While some seasoning will naturally fall away during cooking, a liberal coating ensures that enough adheres to create a robust and flavorful crust. For an even deeper flavor, salting the steak at least 45 minutes before cooking allows the salt to penetrate the surface. Any moisture that the salt draws out should be patted dry right before cooking to maintain a dry surface.

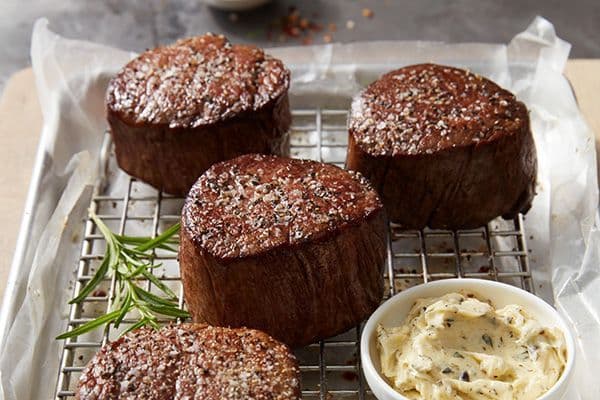
The Art of the Sear: A Deep Dive into the Maillard Reaction
The hallmark of a great steak is its dark, caramelized crust. This is achieved not by burning, but by harnessing the power of a scientific principle known as the Maillard reaction.
The Right Tools for the Job
The choice of cookware and cooking fat directly impacts the sear. A pan must be able to withstand and retain extremely high temperatures to properly execute the Maillard reaction.
- Cast Iron Skillet: The undisputed champion for searing, a cast iron skillet is a heavy, durable pan that excels at retaining and distributing heat evenly. It gets incredibly hot, which is essential for forming a perfect crust.
- Stainless Steel Pan: An excellent and highly durable alternative, a good stainless steel pan can also reach the high temperatures required for searing. It is important to note that a small amount of oil is typically required to prevent the steak from sticking to the surface.
- High Smoke Point Oils: The oil used for searing must be able to withstand high temperatures without burning and producing off-flavors or smoke. An oil with a high smoke point, such as avocado oil, canola oil, or clarified butter, is ideal. Oils with lower smoke points, like extra virgin olive oil or regular butter, should be reserved for the final basting stage.
The Maillard Reaction, Unpacked
The Maillard reaction is a complex chemical reaction between amino acids and reducing sugars that occurs when food is exposed to high heat. It is responsible for the enticing brown color and the hundreds of new flavor compounds that create the savory, nutty, and charred notes of a perfectly seared steak.
A common misconception is that searing "locks in" a steak's juices. This is not the case. A steak continuously loses moisture as it cooks, and the sizzle heard when the meat hits a hot pan is the sound of water on the surface vaporizing. The purpose of searing is not to retain moisture but to develop flavor. The juiciness of a steak is determined by its internal temperature and, most importantly, the resting period after cooking. A steak's surface must be dry and hot enough to reach the necessary temperature for the Maillard reaction to take place.
The Step-by-Step Method
This method is designed to provide a perfect medium-rare result every time by using a combination of high heat and controlled cooking.
- Heat the Pan: Place a cast iron or heavy-bottomed pan over medium-high heat. Allow it to get "VERY hot" until it is lightly smoking and any added oil shimmers.
- Sear the Fat Cap: Using a pair of tongs, hold the ribeye on its side and press the fat cap directly against the hot pan. This renders the fat, releasing incredible flavor and moisture.
- Initial Sear: Lay the steak flat in the pan. Press it down with a heavy object, such as a grill press or another heavy pan, to ensure full contact with the surface. Sear for 2 to 3 minutes without moving the steak to allow a crust to develop.
- Cook to Perfection: After the initial sear, flip the steak. It is a misconception that a steak should only be flipped once. Flipping the steak every minute or so during cooking promotes a more even cook and can reduce cooking time by up to 30%, resulting in a juicier steak.
- Baste with Flavor: Once the steak is near your desired doneness, reduce the heat to low and add a knob of butter, a few garlic cloves, and a sprig of rosemary. Tilt the pan and spoon the melted, aromatic butter over the steak repeatedly to infuse it with flavor.
- Check the Temperature: Do not guess. The only reliable way to determine doneness is by using an instant-read meat thermometer. Insert the probe into the thickest part of the steak, avoiding any bones or fat pockets.
The Temperature Guide
A steak's internal temperature will continue to rise by 5 to 10°F after it is removed from the heat, a process known as carryover cooking. To achieve a perfect final medium-rare temperature, the steak must be removed from the heat at a slightly lower "pull temperature."
- Rare: 120-125°F (49-52°C)
- Medium-Rare: 125-130°F (52-54°C)
- Medium: 135-145°F (57-63°C)
- Medium-Well: 145-155°F (63-68°C)
- Well Done: 160°F+ (71°C+)
The Crucial Rest: The Final 5 Minutes
This is the most critical step for ensuring a juicy steak. The heat from cooking causes the muscle fibers in the meat to contract, pushing the flavorful juices toward the cent
er and surface. Cutting into the steak immediately will cause those juices to spill onto the plate, leaving the meat dry and less flavorful.
Resting the steak allows the muscle fibers to relax and reabsorb the moisture, redistributing the juices throughout the cut. This results in an evenly moist and tender steak from edge to edge. The steak should be placed on a cutting board or warmed plate and left to rest for at least 5 to 10 minutes before slicing.

Elevate Your Plate: Perfect Pairings
A great steak can stand on its own, but a thoughtfully chosen side dish or sauce can elevate the entire meal.
Classic Sides That Steal the Show
A great steak dinner is often defined by its complements. Sides can be chosen to provide a balancing contrast of flavor, texture, and richness.
- The Comfort Factor: Mashed potatoes, with their creamy texture, are a classic choice that pairs perfectly with the rich flavor of a ribeye. Mac and cheese also offers a savory, creamy indulgence.
- The Fresh Contrast: The robust flavor of a ribeye is beautifully complemented by sautéed vegetables. Sautéed mushrooms and onions add a hearty, umami element. Crispy green beans or roasted asparagus provide a clean, fresh contrast.
- The Lightener: For a lighter option, a fresh Caesar or wedge salad adds a crisp, cool element that cuts through the richness of the meat.
Sauces to Savor
While the inherent flavor of a ribeye is a complete experience, a well-chosen sauce can introduce new layers of complexity.
- Rich & Creamy: A bold and creamy peppercorn sauce, made with butter, heavy cream, Dijon mustard, and whole peppercorns, adds a perfect touch of heat and richness.
- Herby & Bright: A fresh chimichurri, with its vibrant blend of parsley, oregano, garlic, and vinegar, offers a sharp, herby counterpoint to the steak's richness.
- The Secret Pan Sauce: A simple pan sauce can be made by deglazing the hot skillet with a little stock or wine after the steak is removed. The leftover brown bits, known as fond, contain incredible caramelized flavor that can be transformed into a simple yet profound sauce.

The Recipe Card
Ingredients
- 1 ribeye steak, approximately 12-16 ounces and 1½ inches thick.
- Kosher salt and freshly ground black pepper, to taste.
- 1 tablespoon avocado oil or another high smoke point oil.
- 2 tablespoons unsalted butter.
- 4 whole garlic cloves.
- 1 sprig of fresh rosemary.
Instructions
- Remove the steak from the refrigerator and pat it thoroughly dry with paper towels. Season both sides generously with salt and pepper.
- Heat a cast iron skillet over medium-high heat until it is smoking hot. Add the oil and allow it to shimmer.
- Using tongs, sear the fat cap on the side of the ribeye until it is browned, which adds significant flavor.
- Lay the steak flat in the pan. Sear for 2 to 3 minutes on the first side without moving it. Flip and continue searing for another 2 to 3 minutes. For an even cook, flip the steak every minute or so thereafter.
- Reduce the heat to low. Add the butter, garlic, and rosemary to the pan. Tilt the pan and spoon the melted butter over the steak, basting repeatedly.
- Use an instant-read meat thermometer to check the internal temperature. For medium-rare, remove the steak at 125-130°F (52-54°C).
- Transfer the steak to a plate and let it rest for 5 to 10 minutes before slicing. The temperature will continue to rise during this time.

Frequently Asked Questions
Q: Why does my steak not have a good crust?
A: A good crust is the result of a dry surface and high heat. If the pan isn't hot enough or the steak is still damp, the moisture will steam off, preventing the Maillard reaction from creating that coveted crust.
Q: How do I know when my steak is done without a thermometer?
A: While a thermometer is the only reliable method, an experienced cook can use the firmness test. A medium-rare steak will feel firm to the touch on the outside but will still have some give in the middle when gently pressed.
Q: What if I prefer my steak more done than medium-rare?
A: To achieve a higher level of doneness, simply continue cooking the steak for a few more minutes, monitoring the temperature with a meat thermometer. Always remember to remove the steak a few degrees early to account for carryover cooking.