A Classic Recipe for Every Baker
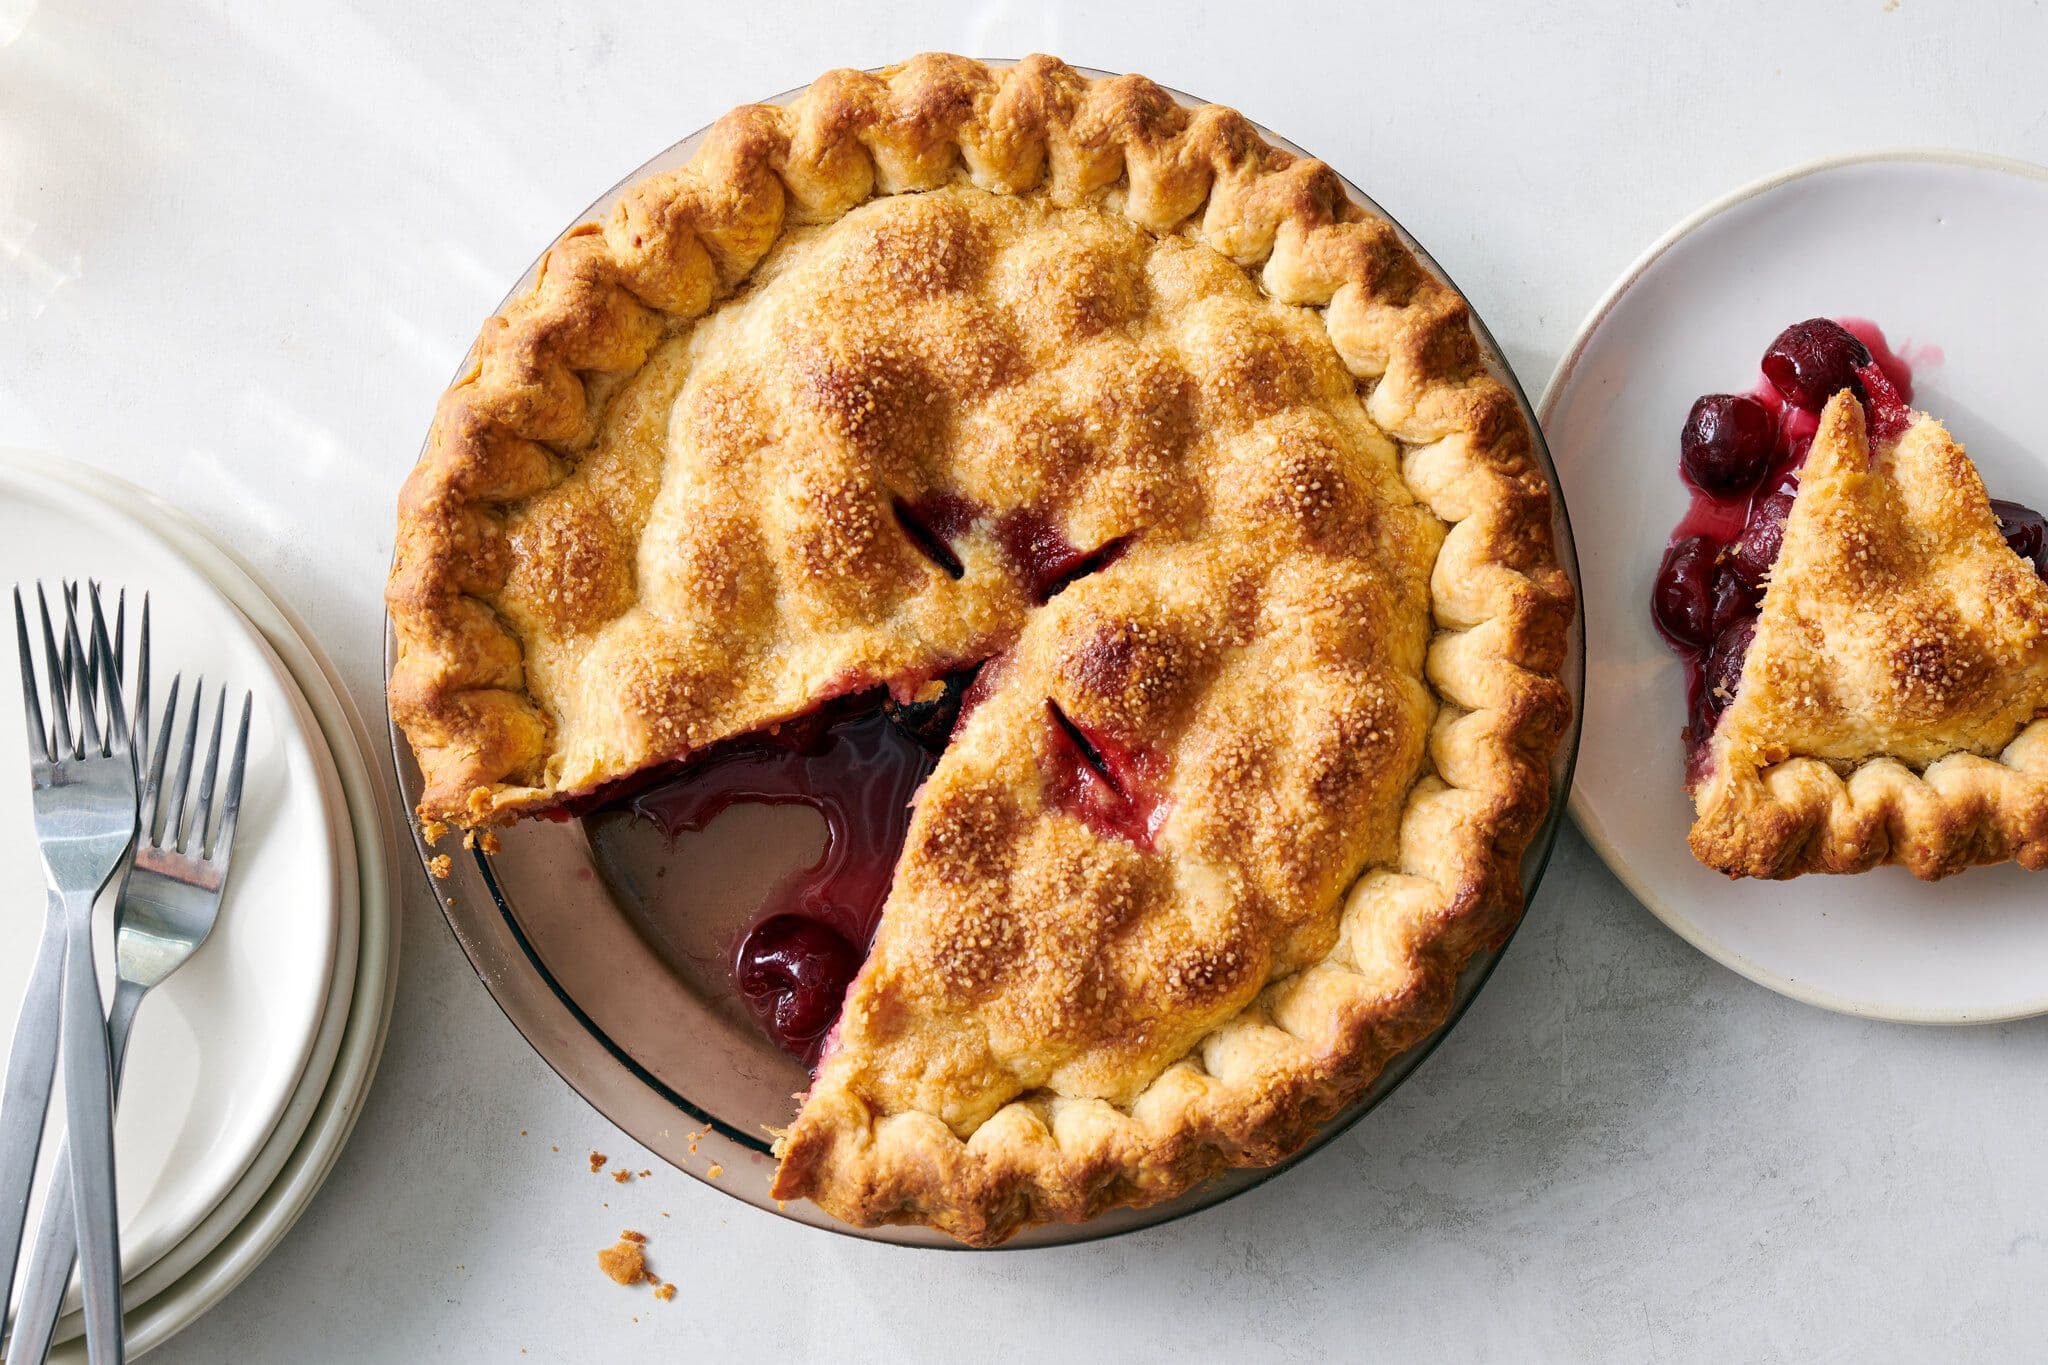
There are few desserts that capture the heart quite like a homemade cherry pie. Imagine a vibrant, ruby-red filling, perfectly sweet and tantalizingly tart, bubbling invitingly beneath a golden, flaky lattice crust. It’s an iconic American classic, a centerpiece of celebrations, and a warm slice of comfort and nostalgia all in one.
This recipe is your definitive guide to creating that perfect pie experience in your own kitchen. We’ll walk you through a process that demystifies every step, combining time-tested techniques with expert secrets to guarantee a stunning, crowd-pleasing result. Prepare to create a dessert that’s not just delicious, but a true memory in the making.
Why Make This Delicious Recipe & When to Serve It
Baking a cherry pie from scratch is a deeply satisfying experience. The aroma that fills your home and the pride you’ll feel when you pull this beautiful creation from the oven are unmatched. While it may seem like a project, the process is incredibly rewarding, and the flavor is worlds away from anything you can buy in a store.
This pie is a true all-rounder, fitting perfectly into any occasion. It’s the star of a 4th of July barbecue or a sunny summer cookout, celebrating the season’s best flavors. It brings a festive and traditional touch to holiday tables for Thanksgiving, Christmas, or Easter, offering a bright contrast to richer desserts.
Even without a major holiday, this cherry pie transforms an ordinary family dinner into a special event or makes a cozy weekend feel even more comforting. It’s the kind of dessert that brings everyone together.
For any home baker, mastering a classic fruit pie is a delicious rite of passage. This recipe provides a foundational skill set, teaching you the secrets to a perfect crust and a flawless filling. It’s a must-try recipe that will become a treasured part of your baking repertoire.

Basic Ingredients (Serves 8)
Each ingredient is carefully selected to build a perfect balance of flavor and texture, creating a pie that is complex, satisfying, and far greater than the sum of its parts.
For the All-Butter Flaky Crust
- 2 ½ cups (325g) All-Purpose Flour: This forms the structural backbone of your crust, providing the ideal gluten content for a sturdy yet tender result that doesn’t become tough or chewy.
- 1 teaspoon Kosher Salt: An essential flavor enhancer, salt magnifies the rich, buttery notes of the pastry and provides a crucial savory contrast to the sweet-tart filling.
- 1 tablespoon Granulated Sugar: This small amount of sugar doesn't just add a hint of sweetness; it also helps the crust become more tender and achieve a beautiful, even golden-brown color as it bakes.
- 1 cup (227g) Cold Unsalted Butter, cubed: This is the secret to flakiness. The cold butter pieces create pockets of steam as they melt in the oven, separating the dough into the distinct, delicate layers that define a perfect pie crust.
- ½ cup (120ml) Ice Water: Using ice-cold water is critical for binding the dough while keeping the butter solid. It prevents over-development of gluten, which is the key to ensuring your final crust is wonderfully tender, not tough.
For the Sweet-Tart Cherry Filling
- 6 cups (about 900g) Pitted Sour Cherries (fresh or frozen): Sour cherries are the star, delivering the classic, vibrant tartness that makes this pie unforgettable. High-quality frozen cherries are an excellent year-round choice, retaining fantastic flavor and texture.
- 1 ¼ cups (250g) Granulated Sugar: Sugar provides the necessary sweetness to balance the tart cherries. Scientifically, it also plays a crucial role in helping the filling thicken properly by raising the temperature at which the cornstarch gelatinizes.
- ¼ cup (30g) Cornstarch: This is our essential thickener. It transforms the ruby-red cherry juices into a luscious, perfectly sliceable filling that holds its shape beautifully and won't run when you cut into the pie.
- ¼ teaspoon Almond Extract: This is the secret weapon for flavor. A mere hint of almond extract doesn’t make the pie taste nutty; instead, it magically enhances and deepens the natural fruit flavor of the cherries themselves.
- 1 tablespoon Lemon Juice: This provides a critical acidic counterpoint. The bright, fresh flavor of lemon juice cuts through the sweetness of the filling, making the overall taste more complex and vibrant.
- 2 tablespoons (28g) Unsalted Butter, cut into small pieces: Dotted over the filling just before baking, these small pieces of butter melt into the fruit, adding a final touch of richness and creating a silky, luxurious mouthfeel.
- 1 Large Egg, beaten with 1 tablespoon of water (for egg wash): This simple mixture is purely for a professional finish. Brushing it over the lattice crust before baking guarantees a beautiful, glossy, and deeply golden-brown top.

Step-by-Step Preparation
Part 1: Making the All-Butter Flaky Crust
- Combine Dry Ingredients. In a large bowl, whisk together the 2 ½ cups of all-purpose flour, 1 teaspoon of kosher salt, and 1 tablespoon of granulated sugar. This quick step ensures that the salt and sugar are evenly distributed throughout the flour for consistent flavor and browning.
- Cut in the Cold Butter. Add the 1 cup of cubed, cold unsalted butter to the flour. Using a pastry blender or two knives, cut the butter into the flour mixture until it resembles coarse crumbs with some pea-sized pieces of butter still visible. Resisting the urge to overmix here is crucial for creating those flaky layers.
- Hydrate the Dough. Evenly sprinkle 4 tablespoons of the ½ cup of ice water over the mixture. Gently toss with a fork until the dough starts to form shaggy clumps. If needed, add more ice water, just one tablespoon at a time, until the dough just holds together when you squeeze a piece in your hand.
- Form and Chill the Dough. Turn the dough out onto a clean surface, divide it in half, and gently pat each half into a 1-inch-thick disk. Wrap each disk tightly in plastic wrap and refrigerate for at least 1 hour. This essential resting period allows the gluten to relax and the butter to re-solidify, which guarantees a tender, flaky crust that won’t shrink.
Part 2: Preparing the Filling and Assembling the Pie
- Prepare the Cherry Filling. In a medium saucepan, combine the 6 cups of pitted sour cherries, 1 ¼ cups of granulated sugar, and ¼ cup of cornstarch. Cook this mixture over medium heat, stirring constantly, until it comes to a boil and visibly thickens, which should take about 5 to 7 minutes. This pre-cooking step is the secret to a perfectly thick, non-runny filling every time.
- Finish and Cool the Filling. Remove the saucepan from the heat and immediately stir in the 1 tablespoon of lemon juice and ¼ teaspoon of almond extract. Set the filling aside to cool to lukewarm; adding a hot filling to the raw pie dough can melt the butter in the crust and compromise its flaky texture.
- Roll and Place the Bottom Crust. On a lightly floured surface, roll one of the chilled dough disks into a 12-inch circle. Carefully transfer the dough to a 9-inch pie plate, gently easing it into the bottom and up the sides without stretching it. Trim the dough so it overhangs the rim of the plate by about ½ inch.
- Fill the Pie and Prepare the Top. Pour the cooled cherry filling into the prepared pie crust and dot the top evenly with the 2 tablespoons of butter pieces. Roll out the second disk of dough into an 11-inch circle. Using a pizza cutter or a sharp knife, cut the dough into ten even, 1-inch-wide strips for your lattice top.
- Weave the Lattice Top. Lay five strips of dough horizontally across the pie, leaving a little space between each. Fold back the first, third, and fifth strips. Place one of the remaining strips vertically across the center of the pie, then unfold the horizontal strips back into place. Now, fold back the second and fourth horizontal strips, place another vertical strip, and unfold them. Continue this over-and-under pattern until the pie is covered.
- Crimp and Finish the Edges. Trim the ends of the lattice strips so they are even with the bottom crust's overhang. Fold the edge of the bottom crust up and over the ends of the strips, pressing down firmly to seal them together. Crimp the sealed edge decoratively using your fingers or the tines of a fork, then brush the entire lattice and edge with the prepared egg wash.
Part 3: Baking to Golden Perfection
- Chill Before Baking. Place the fully assembled pie in the refrigerator or freezer for 15 to 20 minutes. This final chill is a professional trick that ensures the butter in the crust is completely solid when it hits the oven, resulting in maximum flakiness and helping any decorative edges hold their shape perfectly.
- Bake the Pie. Preheat your oven to 425°F (220°C) and place a baking sheet on the lower-middle rack to preheat as well; this will catch any drips and help cook the bottom crust. Place the chilled pie on the hot baking sheet and bake for 20 minutes. Next, reduce the oven temperature to 375°F (190°C) and continue to bake for another 35 to 45 minutes. The pie is done when the crust is a deep golden brown and the filling is bubbling thickly up through the lattice vents.
- Cool Completely. This is perhaps the most difficult step, but it is absolutely essential for success. Transfer the hot pie to a wire rack and allow it to cool completely for at least 4 hours before you even think about slicing it. This resting time allows the thickened filling to fully set; slicing into a warm pie will result in a soupy, runny filling, regardless of how well you prepared it.

Tips for the Perfect Recipe
For the Flakiest, Most Tender Crust
- Keep Everything Cold: This is the number one rule of pie making. Use butter directly from the refrigerator and water with ice cubes in it. On a warm day, you can even chill your flour and mixing bowl for 15 minutes before you begin for extra insurance.
- Don’t Overwork the Dough: Mix only until the dough just comes together. Seeing visible streaks and small pieces of butter in the dough is a sign of success—those are your future flaky layers. Overworking the dough develops too much gluten, which results in a tough, leathery crust.
- Add an Acid for Tenderness: For an even more tender and easy-to-handle crust, add 1 teaspoon of lemon juice or white vinegar along with the ice water. The acid helps inhibit strong gluten formation, acting as a safeguard against toughness.
For a Perfect, Non-Runny Filling
- Trust Your Thickener: This recipe uses cornstarch for a reliable, translucent filling. Other excellent options include tapioca starch, which creates a particularly clear and glossy gel, or a specialty product like Instant ClearJel, a favorite among professional bakers for its stability.
- Pre-Cook the Filling: As detailed in our steps, briefly cooking the cherry filling on the stovetop before it goes into the pie is the most foolproof method to activate the thickener. This guarantees your filling will set up perfectly and never be runny.
- Let the Pie Cool Completely: We cannot stress this enough. The starches in the filling need several hours at room temperature to cool down and form a stable, sliceable gel. Your patience will be rewarded with perfect, clean slices.
For a Flawless Finish (No Soggy Bottoms!)
- Bake on a Preheated Surface: Placing your pie plate directly onto a preheated baking sheet or pizza stone gives the bottom crust an initial blast of intense heat. This helps the crust set and brown quickly, before the wet filling has a chance to soak in and make it soggy.
- Use a "Crust Dust": For an extra layer of protection, you can sprinkle a simple mixture of 1 teaspoon all-purpose flour and 1 teaspoon granulated sugar over the bottom of the pie crust before you pour in the filling. This creates a thin barrier that helps absorb any excess juice.
- Shield the Edges: The thin, crimped edges of a pie crust bake much faster than the rest of the pie. If you notice they are browning too quickly, loosely cover them with a pie shield or strips of aluminum foil for the last 15 to 20 minutes of baking to prevent them from burning.

Serving Ideas
- The Classic Scoop: Nothing beats a slice of cherry pie served slightly warm or at room temperature with a generous scoop of high-quality vanilla bean ice cream. The contrast between the warm, tart pie and the cold, sweet cream is a timeless and perfect pairing.
- A Dollop of Cream: For a simpler yet equally elegant presentation, serve each slice with a large spoonful of freshly whipped heavy cream. You can also use tangy crème fraîche to provide a sophisticated counterpoint to the pie's sweetness.
- Go À La Mode with a Twist: Move beyond vanilla and try serving your pie with a scoop of almond, pistachio, or cinnamon ice cream. These flavors beautifully complement the notes of almond and fruit within the pie.
- Deconstructed Delights: The cherry filling itself is a versatile dessert component. Gently warm leftover filling and spoon it over slices of New York cheesecake, angel food cake, or rich pound cake. It's also delicious swirled into Greek yogurt with granola.
- Decorative Flair: Make your pie a true showstopper. Use leftover dough scraps to cut out small decorative shapes like leaves or cherries, bake them separately, and arrange them on the finished pie. Or, try weaving an intricate braided or heart-patterned lattice for a stunning presentation.

Tips for Storing and Keeping Fresh
Storing Leftovers
- For the First 2 Days: To best preserve the flaky texture of the crust, you can store the fully cooled cherry pie at room temperature. Cover it loosely with aluminum foil or an inverted bowl, which protects it while allowing air to circulate and prevent sogginess.
- For Longer Storage (Up to 4 Days): If you still have leftovers after two days, the pie should be moved to the refrigerator for food safety. Wrap it loosely in plastic wrap or place it in a pie container to keep it from absorbing any stray refrigerator odors.
- Freezing for the Future: Fruit pies freeze wonderfully for up to four months. Once the pie has cooled completely, wrap it very securely in several layers of plastic wrap, followed by a final layer of aluminum foil. Thaw it at room temperature before serving or reheating.
Keeping Pie Fresh
- Avoid Airtight Containers at Room Temp: Storing the pie in a sealed, airtight container on the counter can trap residual heat and moisture, which is the fastest way to turn a crisp crust soggy. A loose covering is always the better choice.
- Revive Before Serving: To bring a refrigerated pie back to its just-baked glory, place slices (or the remaining pie) on a baking sheet in a 350°F (180°C) oven for 10 to 15 minutes. This quick reheat will warm the filling and beautifully re-crisp the pastry.
- Parchment Paper Trick: To help combat moisture during storage, you can slip a small piece of parchment paper under the remaining slices in the pie dish. The paper will help absorb any excess juice that might weep from the filling, keeping the bottom crust drier.
Conclusion
There is truly nothing like the satisfaction of slicing into a perfect, homemade cherry pie—a true labor of love that rewards you with every single bite. With its flaky, all-butter crust and a vibrant, sweet-tart filling, this recipe is more than just a dessert; it's a timeless tradition and a memory in the making. We encourage you to roll up your sleeves, embrace the process, and fill your kitchen with the incredible aroma of this classic American treat.
Frequently Asked Questions
Q: Why is my cherry pie filling runny, and how can I fix it?
A: A runny filling is almost always caused by not using enough thickener or not cooking it long enough for the starch to activate. This recipe prevents that issue by pre-cooking the filling on the stovetop with cornstarch, which ensures it thickens perfectly before the pie even goes into the oven.
Q: Can I use canned or frozen cherries instead of fresh?
A: Absolutely! This recipe is designed to work beautifully with high-quality frozen sour cherries, which are often more accessible and save you the time-consuming task of pitting. You can also use canned tart cherries packed in water; just be sure to drain them very well before you begin.
Q: How do I stop the edges of my pie crust from burning?
A: This is a very common issue, as the thin edges of the crust cook much faster than the center of the pie. To prevent this, simply cover the edges with a pie shield or strips of aluminum foil about halfway through the baking time, once they have reached your desired golden-brown color.
Q: Can I use shortening or a mix of fats instead of all butter for the crust?
A: Yes, you can. While an all-butter crust provides the best flavor, using some vegetable shortening will yield a crust that is exceptionally tender and flaky, and many bakers find it easier to handle. You can substitute up to half of the butter with cold vegetable shortening if you prefer that texture.
Works cited
- Ultimate Cherry Pie - Joanne Eats Well With Others, accessed July 15, 2025, https://joanne-eatswellwithothers.com/2014/07/ultimate-cherry-pie.html
- Cherry Pie | King Arthur Baking, accessed July 15, 2025, https://www.kingarthurbaking.com/blog/2016/02/15/cherry-pie
- Smitten Kitchen's Cherry Pie Is an Instant Classic - The Kitchn, accessed July 15, 2025, https://www.thekitchn.com/recipe-review-cherry-pie-smitten-kitchen-23394710
- The Best Cherry Pie Recipe Ever (+ video!) - The Artful Parent, accessed July 15, 2025, https://artfulparent.com/best-cherry-pie-recipe-ever/
- Cherry Pie Recipe - Allrecipes, accessed July 15, 2025, https://www.allrecipes.com/recipe/12701/cherry-pie-iii/
- Best Cherry Pie Recipe - Food.com, accessed July 15, 2025, https://www.food.com/recipe/best-cherry-pie-60581
- I just baked a cherry pie... how should I store overnight? : r/Baking, accessed July 15, 2025, https://www.reddit.com/r/Baking/comments/kgpjh4/i_just_baked_a_cherry_pie_how_should_i_store/
- Sour Cherry Pie Recipe - Food & Wine, accessed July 15, 2025, https://www.foodandwine.com/recipes/sour-cherry-pie
- Cherry Pie Recipe | King Arthur Baking, accessed July 15, 2025, https://www.kingarthurbaking.com/recipes/cherry-pie-recipe
- Sweet Cherry Pie from America's Test Kitchen Recipe | PBS SoCal, accessed July 15, 2025, https://www.pbssocal.org/food-discovery/food/sweet-cherry-pie-from-americas-test-kitchen
- The Best Easy Cherry Pie Recipe - Serious Eats, accessed July 15, 2025, https://www.seriouseats.com/fresh-cherry-pie-filling-recipe
- 15 Pie Crust Tips from a French Pastry Chef - Molly J Wilk, accessed July 15, 2025, https://www.mollyjwilk.com/pie-crust-tips/
- Easy Buttery Flaky Pie Crust Recipe (Top Rated!) - The Kitchn, accessed July 15, 2025, https://www.thekitchn.com/how-to-make-perfectly-flaky-pie-crust-cooking-lessons-from-the-kitchn-191896
- BA's June Cover: Cherry Pie - m's belly, accessed July 15, 2025, https://msbelly.com/bas-june-cover-cherry-pie/
- Cherry Pie Recipe | Food Network, accessed July 15, 2025, https://www.foodnetwork.com/recipes/cherry-pie-recipe-1913275
- sour cherry slab pie - Smitten Kitchen, accessed July 15, 2025, https://smittenkitchen.com/2009/07/sour-cherry-slab-pie/
- sweet cherry pie – smitten kitchen, accessed July 15, 2025, https://smittenkitchen.com/2008/06/sweet-cherry-pie/
- 7 Rules for Making Perfect Pie Dough, According to a Pastry Chef - Serious Eats, accessed July 15, 2025, https://www.seriouseats.com/7-rules-for-making-perfect-pie-dough-8746706
- How To Prevent Soggy Fillings In Your Apple And ... - Food Republic, accessed July 15, 2025, https://www.foodrepublic.com/1723194/prevent-soggy-apple-cherry-pie-filling/
- How to Make Lattice Pie Crust - Inspired Taste, accessed July 15, 2025, https://www.inspiredtaste.net/23250/how-to-make-a-lattice-pie-crust/
- How to Make a Lattice Pie Crust - Sugar Spun Run, accessed July 15, 2025, https://sugarspunrun.com/how-to-make-a-lattice-pie-crust/
- How to Make a Stunning Lattice-Top Pie, According to a Pastry Chef - Serious Eats, accessed July 15, 2025, https://www.seriouseats.com/how-to-make-a-lattice-pie-crust-8738741
- How to weave a lattice pie crust - YouTube, accessed July 15, 2025, https://www.youtube.com/watch?v=vwQYd2ljw-4
- Tart Cherry Pie with Cook's Illustrated Vodka Pie Crust - Jillian Cupcake, accessed July 15, 2025, https://jilliancupcake.wordpress.com/2011/10/05/tart-cherry-pie-with-cooks-illustrated-vodka-pie-crust/
- 5 Easy Ways To Prevent Soggy Pie Crust | The Kitchn, accessed July 15, 2025, https://www.thekitchn.com/5-ways-to-prevent-soggy-pie-crust-tips-from-the-kitchn-212434
- 10 Secrets for Making Great Pie Crust | Land O'Lakes, accessed July 15, 2025, https://www.landolakes.com/expert-advice/10-secrets-for-making-great-pie-crust/
- Easy Flaky Butter Pie Crust Recipe - Inspired Taste, accessed July 15, 2025, https://www.inspiredtaste.net/22662/flaky-pie-crust-recipe/
- Cherry-Berry Pie Recipe - Food & Wine, accessed July 15, 2025, https://www.foodandwine.com/recipes/cherry-berry-pie
- Prevent soggy bottoms in pies with these baker secrets | King Arthur Baking, accessed July 15, 2025, https://www.kingarthurbaking.com/blog/2023/11/06/prevent-pie-soggy-bottom
- How do you keep the bottom crust of a cherry pie from getting soggy? - Quora, accessed July 15, 2025, https://www.quora.com/How-do-you-keep-the-bottom-crust-of-a-cherry-pie-from-getting-soggy
- Things bakers know: “Crust dust” is the secret ingredient to preventing a soggy bottom, accessed July 15, 2025, https://www.kingarthurbaking.com/blog/2022/11/16/prevent-soggy-pie-bottoms-crust-dust
- What to do with a can of cherry pie filling other than pie? : r/AskBaking - Reddit, accessed July 15, 2025, https://www.reddit.com/r/AskBaking/comments/108i333/what_to_do_with_a_can_of_cherry_pie_filling_other/
- 26 Recipes with Cherry Pie Filling - Taste of Home, accessed July 15, 2025, https://www.tasteofhome.com/collection/recipes-with-cherry-pie-filling/
- Cherry Pie Decoration - Pinterest, accessed July 15, 2025, https://www.pinterest.com/ideas/cherry-pie-decoration/928229639606/
- The Best Ways to Store Leftover Pie | The Kitchn, accessed July 15, 2025, https://www.thekitchn.com/the-best-ways-to-store-leftover-pie-tips-from-the-kitchn-213226
- How long can a par-baked pie crust hold? - eGullet Forums, accessed July 15, 2025, https://forums.egullet.org/topic/145554-how-long-can-a-par-baked-pie-crust-hold/
- How to prevent pie crust from becoming pasty in the refrigerator - Quora, accessed July 15, 2025, https://www.quora.com/How-do-I-prevent-pie-crust-from-becoming-pasty-in-the-refrigerator
- www.foodrepublic.com, accessed July 15, 2025, https://www.foodrepublic.com/1724306/how-to-store-leftover-pie-prevent-soggy-crust/#:~:text=Boggiss%20adds%2C%20%22For%20fruit%20pies,topping%20it%20off%20with%20foil.