Introduction
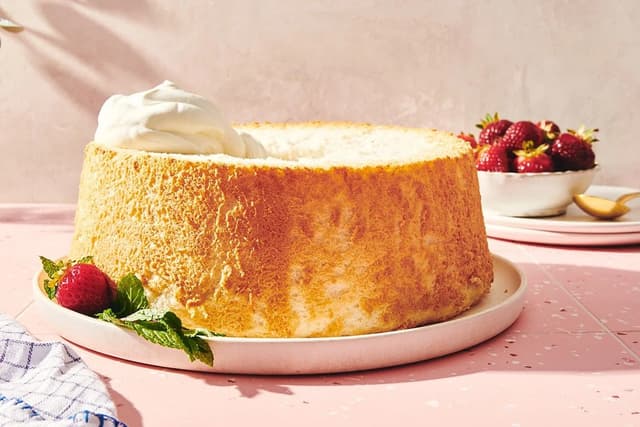
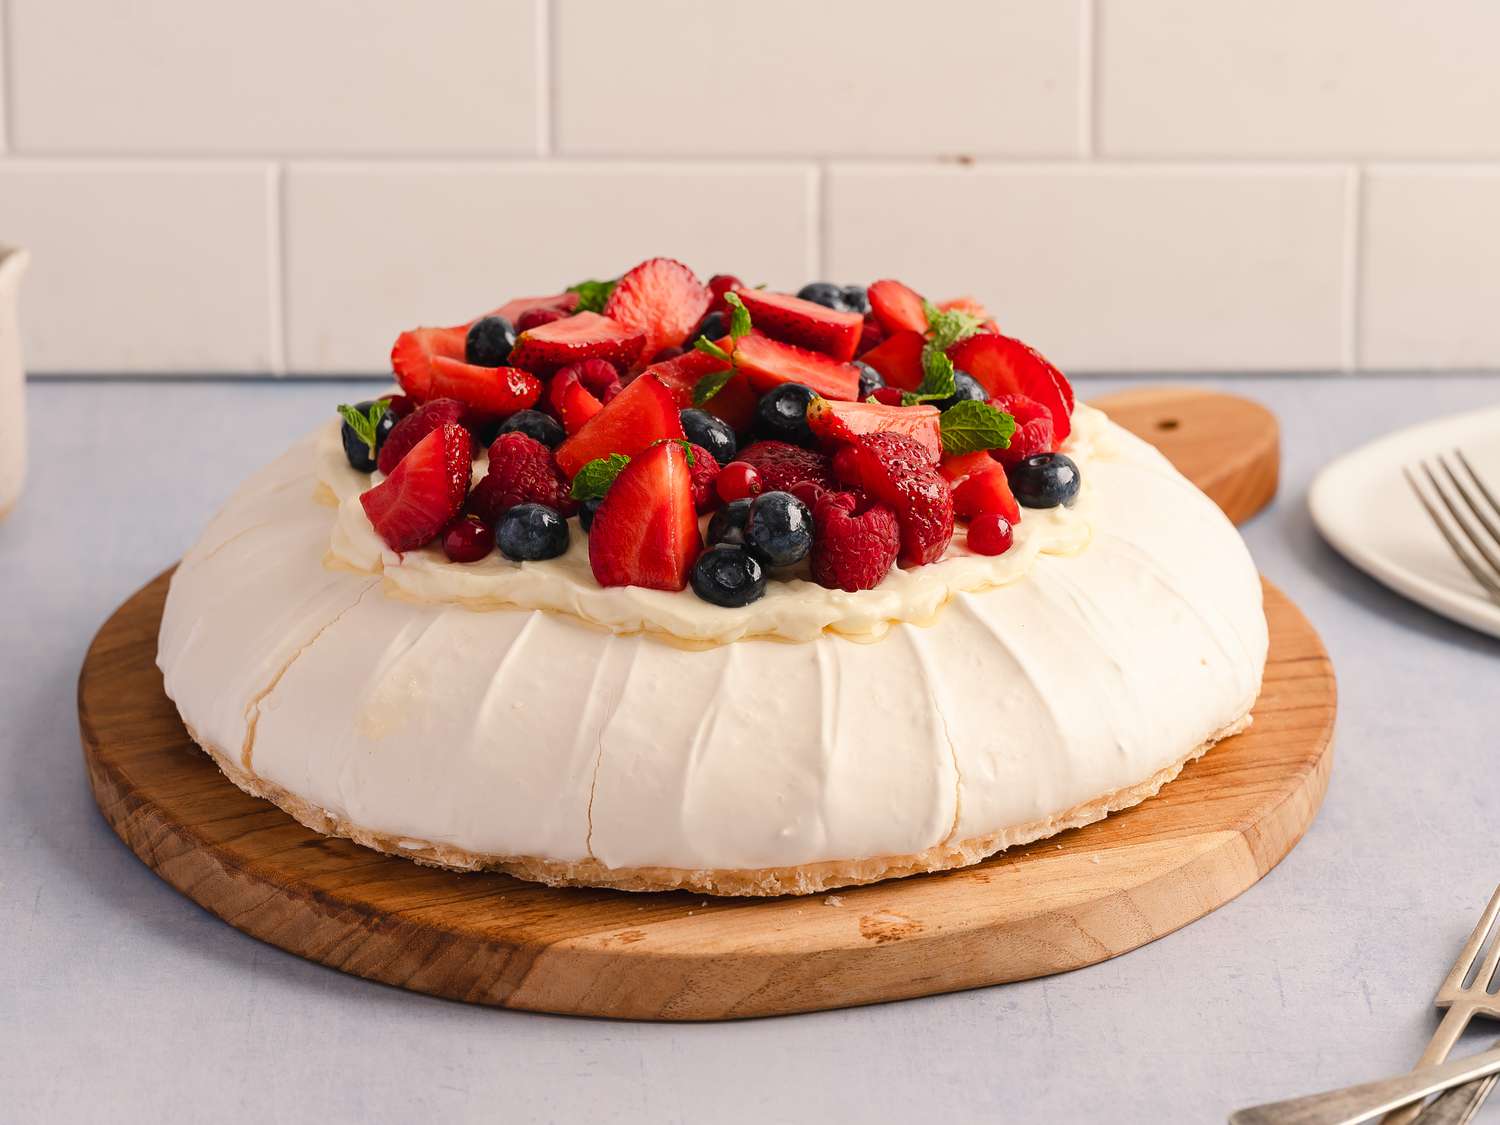
Named after the legendary Russian ballerina Anna Pavlova, this dessert is a vision of ethereal beauty and delightful contrasts. It features a crisp, delicate meringue shell that gives way to a soft, marshmallow-like heart, a textural masterpiece that is both elegant and wonderfully celebratory. It is the kind of dessert that commands attention and admiration, a true centerpiece for any special occasion.
While it has a reputation as a showstopper that might seem intimidating, the pavlova is, in reality, surprisingly achievable for the home baker. With a few key techniques and an understanding of the simple science at play, you can confidently create this stunning confection in your own kitchen. This guide will demystify the process, empowering you to bake a pavlova that is nothing short of perfect.
Why Make This Delicious Creation & When to Serve It
The primary appeal of a pavlova lies in its extraordinary symphony of textures. The experience of breaking through a "crisp, crackly outer shell housing the softest, marshmallowy center" is truly unique and unforgettable. It’s a dessert that feels incredibly light and airy, yet satisfyingly sweet and complex.
Despite its impressive final appearance, the pavlova is one of the simplest desserts you can make. The core ingredients are pantry staples—egg whites, sugar, and a little cornstarch—making it an ideal go-to for last-minute gatherings or when you want to create something special without a trip to the store. Your electric mixer does nearly all the heavy lifting, whipping the meringue into a voluminous, glossy cloud.
Beyond its taste and simplicity, pavlova is a wonderfully inclusive dessert. It is naturally gluten-free, offering a delicious and elegant option for guests with dietary restrictions without the need for expensive specialty flours. It also serves as the ultimate blank canvas; once you master the base, you can adapt it with an endless variety of seasonal toppings and creative flavor combinations.
This versatility makes the pavlova perfect for any celebration. It is a true "party showstopper," worthy of standing in for a traditional birthday or celebration cake. It is particularly popular during summer holidays and Christmas in Australia and New Zealand, where it originated. Consider shaping the meringue into a wreath for a festive Christmas table or a heart for a romantic Valentine's Day treat. For any elegant dinner party, it provides a light yet impressive finish that is guaranteed to wow your guests.

Basic Ingredients (Serves 8-10 people)
This recipe relies on a carefully balanced formula where a trio of stabilizers—sugar, acid, and starch—work together to create the perfect structure and texture.
- For the Meringue Shell:
- 6 large egg whites (approx. 225ml), at room temperature: These are the very foundation of the meringue, providing the protein structure that traps air when whipped to create the pavlova's signature volume and lightness.
- 121 cups (330g) caster (superfine) sugar: This not only sweetens the dessert but is crucial for stabilizing the egg white foam, creating a glossy texture and the crisp shell upon baking.
- 121 teaspoons white vinegar (or lemon juice): This small amount of acid is a critical stabilizer; it helps the egg whites hold their structure and volume, preventing the delicate meringue from collapsing as it bakes.
- 2 teaspoons cornstarch (cornflour): This is the secret to the perfect pavlova texture. It absorbs excess moisture and helps create the soft, marshmallow-like center that distinguishes it from a standard, brittle meringue.
- 1 teaspoon vanilla extract: Added for a subtle depth of flavor, this aromatic extract complements the sweetness of the meringue and the freshness of the fruit toppings that will be added later.
- For the Topping:
- 121 cups (360ml) heavy whipping cream, very cold: Whipped to soft peaks, this provides a luscious, creamy counterpoint to the sweet, crisp meringue and serves as the perfect bed for the fruit toppings.
- 41 cup (30g) powdered sugar: This is used to lightly sweeten the whipped cream. Its fine texture dissolves instantly, ensuring a smooth, non-grainy cream topping that complements the dessert without being overly sweet.
- 2-3 cups fresh fruit (berries, kiwi, passionfruit): The classic topping that adds vibrant color, essential freshness, and a necessary touch of tartness to beautifully balance the sweetness of the meringue base.

Step-by-Step Preparation
Making a pavlova is a masterclass in patience and temperature management. Each step is designed to build a stable structure, from the slow addition of sugar to the gradual cooling process. Following these thermal dynamics is the key to success.
- Prepare Your Oven and Pan: Preheat your oven to 300°F (150°C). Line a large baking sheet with parchment paper. To create a helpful guide for shaping, you can use a pencil to draw a 9-inch (23cm) circle on the back of the paper, then flip it over so the pencil mark doesn't touch the meringue.
- Begin Whipping the Egg Whites: In the scrupulously clean, dry bowl of a stand mixer fitted with the whisk attachment, place the 6 room-temperature egg whites. Begin whisking on a medium speed until the whites transform from a liquid into a white foam with soft, gentle peaks that barely hold their shape.
- Gradually Add the Sugar: With the mixer still running on medium speed, begin adding the 121 cups of caster sugar one tablespoon at a time, waiting about 30 seconds between each addition. This slow, patient process is absolutely crucial for allowing the sugar to fully dissolve into the foam without overwhelming it.
- Whip to a Stiff, Glossy Meringue: Once all the sugar has been incorporated, scrape down the sides of the bowl with a spatula. Increase the mixer speed to medium-high and continue to whisk for another 6 to 8 minutes, or until the meringue becomes very stiff, thick, and brilliantly glossy.
- Test for Sugar Dissolution: Stop the mixer and perform a critical test by rubbing a small amount of the meringue between your thumb and forefinger. It should feel completely smooth. If you feel any sugar granules, the sugar has not fully dissolved, so continue whisking for another minute or two and test again.
- Fold in Stabilizers and Flavor: Add the 121 teaspoons of white vinegar, 2 teaspoons of cornstarch, and 1 teaspoon of vanilla extract to the bowl. Gently fold these ingredients into the meringue with a large spatula just until they are combined, being careful not to overmix and deflate the precious air you've incorporated.
- Shape the Pavlova: Spoon the thick, glossy meringue mixture onto the center of your prepared parchment paper circle. Using a spatula, gently spread the meringue to fill the circle, shaping it into a round nest. Create a slight crater or well in the center, which will hold the cream and fruit later.
- Bake Low and Slow: Place the baking sheet in the preheated oven and immediately reduce the temperature to 250°F (125°C). Bake for 1 hour and 30 minutes. The goal is to dry the meringue out, not to brown it. It is vital that you do not open the oven door at any point during baking.
- Cool the Pavlova Completely: After the baking time is complete, turn the oven off entirely but leave the pavlova inside with the door kept closed. Allow it to cool slowly and completely in the sealed oven for at least 3 hours, or preferably overnight. This gradual cooling process is the best defense against cracking.
- Prepare Toppings and Assemble: Just before you are ready to serve, whip the 121 cups of very cold heavy cream with the 41 cup of powdered sugar until soft, billowy peaks form. Carefully place the cooled pavlova shell on a serving platter, fill the central crater with the whipped cream, and pile generously with your fresh fruit.

Tips for the Perfect Pavlova
Think of these tips not as mere suggestions, but as the "lab rules" for a successful culinary experiment. Controlling the environment is the most important ingredient.
- Achieving the Perfect Meringue
- A Spotless Environment: Your mixing bowl and whisk must be impeccably clean and completely dry. Even a minuscule trace of grease, oil, or fat—like a stray speck of egg yolk—can ruin the meringue by preventing the whites from whipping to their full volume. As a final precaution, wipe the bowl with a paper towel dipped in a little vinegar or lemon juice.
- Room Temperature Egg Whites: It is much easier to separate the yolks from the whites when eggs are cold. However, the whites themselves will whip up higher and more easily when they are at room temperature. Simply let the separated whites sit on the counter for about 30 minutes before you begin whisking.
- Patience with Sugar: Rushing the sugar addition is the most common cause of pavlova failure. Adding it too quickly or before soft peaks have formed can overwhelm the delicate foam structure, resulting in a grainy texture and a "weeping" pavlova later on. Let each spoonful fully dissolve.
- Don't Over-Whip: While you are aiming for stiff, glossy peaks, it is possible to take it too far. Over-whipped egg whites will start to look dry, clumpy, or like cotton wool. At this point, the protein structure has begun to break down, and it will not bake properly.
- Baking and Cooling for Success
- Know Your Oven: Commercial oven temperatures can vary significantly. An inexpensive oven thermometer is a baker's best friend, ensuring you are baking at the precise low temperature required to keep the pavlova beautifully white and prevent it from browning or cooking too quickly.
- Resist the Urge to Peek: Opening the oven door causes a sudden drop in temperature, which is the primary culprit behind a dramatically cracked or collapsed pavlova. Keep the door firmly closed for the entire baking and cooling period to ensure a stable environment.
- Embrace the Cracks: A few cracks are not a sign of failure; they are characteristic of a truly homemade pavlova and add to its rustic charm. Remember, they will be beautifully hidden by a generous layer of cream and fruit anyway.
- Conquering the Elements
- Beware of Humidity: Meringue's greatest enemy is moisture. Sugar is hygroscopic, meaning it actively attracts water from the air. It is best to avoid making pavlova on very humid or rainy days, as this can result in a sticky, soft shell that refuses to crisp up.

Serving Ideas
The pavlova is a versatile canvas. While the classic toppings are timeless, modern interpretations offer exciting new ways to enjoy this dessert.
- Classic & Timeless Pairings
- Berries and Cream: This is the quintessential topping for a reason. A vibrant mix of fresh strawberries, raspberries, blueberries, and the pulp from a passionfruit offers a perfect balance of sweet, tart, and juicy textures and flavors.
- Lemon Curd and Berries: For a sophisticated twist, spread a layer of sharp, tangy lemon curd over the meringue shell before adding the whipped cream. This zesty punch cuts through the sweetness beautifully and adds a wonderful depth.
- Tropical Paradise: Transport your guests to a sunny destination with a topping of sliced ripe mango, fresh kiwi, and passionfruit pulp. The bright, tangy flavors are a fantastic counterpoint to the sweet meringue.
- Creative & Decadent Variations
- Black Forest Pavlova: For a truly decadent spin, top your pavlova with a chocolate-infused whipped cream, fresh or brandied cherries, and generous shavings of dark chocolate.
- Salted Caramel & Banana (Banoffee): This is pure indulgence. Arrange sliced bananas over the cream, add a lavish drizzle of salted caramel sauce, and finish with crushed toffee or honeycomb for a delightful crunch.
- Autumn Spiced Pavlova: In the cooler months, top your pavlova with gently poached pears or apples that have been spiced with cinnamon and star anise. A final sprinkle of toasted walnuts or pecans completes this comforting variation.
- Fig, Honey & Pistachio: For an elegant and visually stunning combination, arrange quarters of fresh fig over the cream, drizzle generously with honey, and scatter with a handful of vibrant green chopped pistachios.
- The Interactive Pavlova Grazing Board
- A Modern Approach: This serving style reflects a contemporary shift towards interactive and customizable dining experiences. Instead of one large pavlova, make individual mini pavlova shells. Arrange them on a large board or platter for a stunning presentation.
- The Perfect Party Dessert: Surround the shells with small bowls of various toppings: whipped cream, lemon curd, chocolate ganache, different fruit compotes, an assortment of fresh fruits, chopped nuts, and toasted coconut. This "DIY" approach is incredibly fun for guests, allowing them to create their own perfect dessert and turning the pavlova into a memorable, edible centerpiece.

Tips for Keeping Your Pavlova Fresh
The storage strategy for a pavlova is fundamentally bifurcated; the undecorated shell and the assembled dessert are treated as two entirely different food products with opposite needs. Understanding this distinction is the key to preserving its texture.
- Keeping Fresh (The Undecorated Shell)
- The Enemy is Moisture: The absolute key to storing a pavlova shell is protecting it from humidity, which will quickly soften its crisp crust. A completely airtight container is non-negotiable for storage.
- Cool and Dry Storage: Store the airtight container in a cool, dry place like a pantry or a cupboard for up to two days. The turned-off oven, once completely cool, also serves as an excellent, sealed storage environment.
- Avoid the Refrigerator: Do not store the undecorated shell in the refrigerator. The cool but moist environment of a fridge is detrimental to the meringue's crispness and will cause it to become soft and sticky.
- The Freezer is Your Friend: For longer-term storage (up to a month), the freezer is surprisingly effective. The dry, cold air preserves the crisp texture perfectly. Wrap the shell well inside an airtight container and allow it to thaw at room temperature for a few minutes before topping.
- Handling Leftovers (The Assembled Pavlova)
- A Fleeting Perfection: Once topped with cream and fruit, a pavlova is at its absolute best when eaten within a few hours. The moisture from the toppings will immediately begin to soften the delicate meringue shell.
- Refrigerate Immediately: Unlike the bare shell, any leftover assembled pavlova must be stored in the refrigerator due to the perishable fresh cream and fruit. Cover it loosely and place it in the fridge as soon as possible.
- Embrace the New Texture: Be aware that the pavlova will not be crisp the next day. The meringue will soften and meld with the cream and fruit, creating a delicious, cake-like dessert reminiscent of an Eton Mess. It's a different but still wonderful texture! It is best eaten within 24 hours.
Conclusion
The pavlova is a truly magical dessert, a cloud-like creation that is simultaneously simple to its core and spectacularly beautiful in its final form. It is a testament to how a few basic ingredients, handled with care and understanding, can be transformed into something extraordinary. With the tips and techniques in this guide, you are now fully equipped to conquer this beautiful creation and bring its unique charm to your own table. Go forth and bake, create, and celebrate with your own perfect pavlova.
Frequently Asked Questions
Q: Why did my pavlova crack?
A: Cracks are very normal and are often a sign of the perfect light, marshmallowy texture inside! They are usually caused by the pavlova cooling too quickly. To minimize large cracks, always cool it slowly in the turned-off oven with the door kept closed.
Q: Why is my pavlova weeping sticky, sugary syrup?
A: This weeping is typically caused by undissolved sugar in the meringue or by over-beating the egg whites. To prevent this, use fine caster sugar, add it very slowly to the egg whites, and stop whisking as soon as the meringue is smooth, stiff, and glossy.
Q: My egg whites won't whip into stiff peaks. What went wrong?
A: This is almost always due to a trace of fat or grease interfering with the protein structure. Ensure your bowl and whisk are perfectly clean and dry, and that not even a tiny speck of egg yolk has contaminated the whites. Using very cold egg whites can also slow the process down.
Q: How far in advance can I make a pavlova?
A: The undecorated meringue shell can be made up to two days in advance and stored in an airtight container in a cool, dry place (or even frozen for up to a month). However, you should only add the whipped cream and fruit toppings right before you plan to serve it for the best texture.
Works cited
- Pavlova - Wikipedia, accessed July 17, 2025, https://en.wikipedia.org/wiki/Pavlova
- What is a Pavlova - Allrecipes, accessed July 17, 2025, https://www.allrecipes.com/article/what-is-pavlova/
- en.wikipedia.org, accessed July 17, 2025, https://en.wikipedia.org/wiki/Pavlova#:~:text=Taking%20the%20form%20of%20a,with%20fruit%20and%20whipped%20cream.
- Perfect Pavlova Recipe - YouTube, accessed July 17, 2025, https://www.youtube.com/watch?v=mW-XF7tLDMQ
- Classic Pavlova {Light & Airy} Recipe - The Mindful Meringue, accessed July 17, 2025, https://themindfulmeringue.com/classic-pavlova/
- Classic Pavlova (Very Easy) - Momsdish, accessed July 17, 2025, https://momsdish.com/pavlova
- Easy Pavlova Recipe with Berries and Cream - Our Best Bites, accessed July 17, 2025, https://ourbestbites.com/pavlova/
- {Mini} Pavlova Recipe - Belly Full, accessed July 17, 2025, https://bellyfull.net/mini-pavlova-recipe/
- The Best Pavlova Recipe Ever! - The Home Cook's Kitchen, accessed July 17, 2025, https://www.thehomecookskitchen.com/best-pavlova-recipe/
- Best Pavlova Toppings – From Classic Berries To Creative Combos Like Figs and Spiced Pears - Melanie May, accessed July 17, 2025, https://www.melaniemay.com/best-pavlova-toppings-from-classic-berries-to-creative-combos-like-figs-and-spiced-pears/
- chestnut pavlova {dinner party menu} - Elizabeth Minchilli, accessed July 17, 2025, https://www.elizabethminchilli.com/2019/01/chestnut-pavlova-dinner-party-menu/
- Mini Pavlovas Are the Perfect French-Inspired Dessert for a Party - Camille Styles, accessed July 17, 2025, https://camillestyles.com/food/mini-pavlovas/
- Classic Pavlova | Olive & Mango, accessed July 17, 2025, https://www.oliveandmango.com/classic-pavlova/
- CLASSIC PAVLOVA RECIPE - Gluten Free From Home, accessed July 17, 2025, https://glutenfreefromhome.com/classic-pavlova-recipe/
- The BEST Pavlova Recipe (Step by step recipe and video) - The Flavor Bender, accessed July 17, 2025, https://www.theflavorbender.com/the-perfect-pavlova-recipe/
- How to Make a Perfect Pavlova - Apple Cake Annie, accessed July 17, 2025, https://applecakeannie.com/how-to-make-a-perfect-pavlova/
- The Perfect Pavlova — The Boy Who Bakes, accessed July 17, 2025, https://www.theboywhobakes.co.uk/recipes/2017/8/4/the-perfect-pavlova
- Classic Pavlova Recipe - What the Fork Food Blog, accessed July 17, 2025, https://www.whattheforkfoodblog.com/2021/03/14/classic-pavlova-recipe/
- Classic Pavlova Recipe, accessed July 17, 2025, https://www.vegetariantimes.com/recipes/classic-pavlova/
- Pavlova!! - RecipeTin Eats, accessed July 17, 2025, https://www.recipetineats.com/pavlova-recipe/
- baking - Why did my pavlova not bake properly? - Seasoned Advice, accessed July 17, 2025, https://cooking.stackexchange.com/questions/10656/why-did-my-pavlova-not-bake-properly
- The Best Pavlova Recipe - Bigger Bolder Baking, accessed July 17, 2025, https://www.biggerbolderbaking.com/perfect-pavlova-how-to/
- Pavlova… WHY CAN I NEVER GET STIFF PEAKS : r/Baking - Reddit, accessed July 17, 2025, https://www.reddit.com/r/Baking/comments/11zscs0/pavlova_why_can_i_never_get_stiff_peaks/
- Pavlova Problems | Ask Nigella.com, accessed July 17, 2025, https://www.nigella.com/ask/pavlova-problems
- How to Trick out Pavlova, the Easiest, Classiest Fruit Dessert for a Crowd - Serious Eats, accessed July 17, 2025, https://www.seriouseats.com/how-to-make-pavlova-meringue-garnish-fancy-fruit-dessert-tips
- How to store pavlova | Cook Free Recipes from Australia's Best Brands | myfoodbook, accessed July 17, 2025, https://myfoodbook.com.au/tips/how-to-store-pavlova
- Pavlova toppings : r/Cooking - Reddit, accessed July 17, 2025, https://www.reddit.com/r/Cooking/comments/rkgrtf/pavlova_toppings/
- Pavlova Grazing Board - Sugar Salt Magic, accessed July 17, 2025, https://www.sugarsaltmagic.com/pavlova-grazing-board/
- Easy Ways to Store Pavlova: 7 Steps (with Pictures) - wikiHow, accessed July 17, 2025, https://www.wikihow.com/Store-Pavlova
- Things bakers know: Store your meringues in the freezer (!), accessed July 17, 2025, https://www.kingarthurbaking.com/blog/2023/08/03/how-to-store-meringues
- Pavlova questions - Gardenweb, accessed July 17, 2025, https://www.gardenweb.com/discussions/2452733/pavlova-questions
- How should I store the pavlova? (Berry Pavlova Cake) - Jack and Beyond, accessed July 17, 2025, https://jackandbeyond.com/a/answers/4048354/How-should-I-store-the-pavlova
- Keeping Pavlova Overnight | Ask Nigella.com, accessed July 17, 2025, https://www.nigella.com/ask/keeping-pavlova-overnight
- Storing Pavlovas - Pastry Arts Magazine, accessed July 17, 2025, https://pastryartsmag.com/general/storing-pavlovas/
- In advance Pavlova? : r/AskBaking - Reddit, accessed July 17, 2025, https://www.reddit.com/r/AskBaking/comments/1d7hm6i/in_advance_pavlova/