Introduction
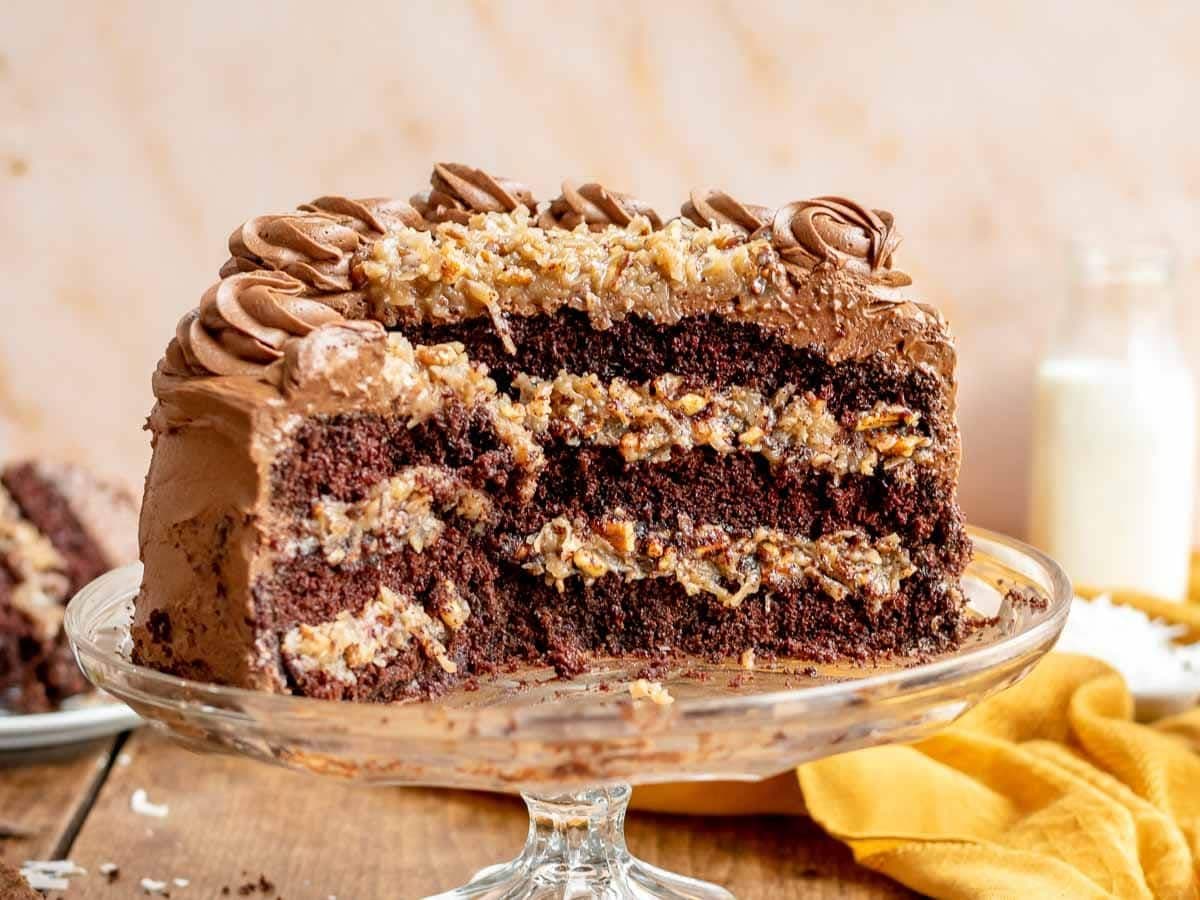
German chocolate cake is a timeless American classic, celebrated for its decadent layers, unique texture, and show-stopping presence. It is a truly special indulgence, combining a moist chocolate cake with a gooey, nutty, coconut-filled frosting that is utterly unforgettable.
This beloved dessert holds a delightful secret: it is not from Germany at all, but a treasured recipe born in the heart of Texas. This guide will take you on a journey to create this iconic cake from scratch, proving that its impressive results and incredible flavor are well within the reach of any home baker.
Why Make This Delicious Recipe & When to Serve It
The appeal of this cake lies in its masterful blend of textures. It is far more than a simple chocolate cake; it is a complete sensory experience. The soft, tender crumb of the cake provides the perfect backdrop for the chewy shredded coconut and crunchy toasted pecans, all suspended in a rich, caramel-like frosting.
This dessert is a natural centerpiece for any special occasion. Its impressive layers and decadent topping make it perfect for birthdays, holiday gatherings like Christmas and Easter, or any family celebration that calls for something truly spectacular.
Baking this cake is an immensely rewarding project. While it involves a few distinct components, each step is straightforward. The final product is a testament to the care put into its creation, destined to become a new "family favorite" that will be requested for years to come.

Basic Ingredients (Serves 12-16)
This recipe creates a two-layer, 9-inch round cake. The ingredients are divided into three essential components for clarity.
For the Moist Chocolate Cake
- 1 ¾ cups (210g) all-purpose flour: This ingredient provides the essential structure and foundation for the cake layers. Proper measurement is vital to ensure a light crumb rather than a dense, heavy cake.
- ¾ cup (75g) unsweetened cocoa powder: This is the source of the cake's deep, foundational chocolate flavor. Sifting the cocoa powder removes lumps, guaranteeing a smooth batter and a richer, more uniform taste.
- 1 ½ teaspoons baking soda & 1 ½ teaspoons baking powder: These are the crucial leavening agents that make the cake rise. The baking soda reacts with the acidic buttermilk for initial lift, while the baking powder provides additional leavening for a perfectly light and fluffy texture.
- 1 teaspoon salt: An indispensable flavor enhancer, salt masterfully balances the overall sweetness of the cake. It also works to intensify and deepen the complex notes of the chocolate.
- 2 cups (400g) granulated sugar: This provides the necessary sweetness for the cake and plays a key role in creating a moist, tender crumb by interacting with the other ingredients during the baking process.
- 2 large eggs (at room temperature): Eggs act as a binder, holding the ingredients together while adding richness and structure. Using them at room temperature allows them to mix more evenly into the batter for a smoother final product.
- 1 cup (240ml) buttermilk (at room temperature): This is the secret weapon for an incredibly tender and moist cake. Its natural acidity tenderizes gluten for a softer texture and activates the baking soda for a superior rise.
- ½ cup (120ml) vegetable or canola oil: Oil is the key to a cake that stays exceptionally moist and soft for days. It provides a level of lasting moisture that is often superior to butter in cake recipes.
- 2 teaspoons vanilla extract: This classic flavoring works in the background to enhance and round out the other ingredients. It particularly complements the chocolate, making the cake's overall flavor more complex and aromatic.
- 1 cup (240ml) boiling water: Adding boiling water at the end "blooms" the cocoa powder, a technique that coaxes out the deepest flavor particles for a more intense and robust chocolate taste throughout the cake.
For the Coconut-Pecan Frosting
- 1 cup (240ml) evaporated milk: This forms the rich base of the custard frosting. With less water than regular milk, it creates a creamier, thicker consistency that is essential for the frosting's signature gooey texture.
- 1 cup (200g) granulated sugar & ½ cup (100g) packed light brown sugar: This duo provides sweetness with a delicious complexity. The brown sugar contributes a subtle caramel note that is characteristic of the classic frosting flavor.
- ½ cup (115g) unsalted butter (cubed): Butter is essential for the frosting's decadent flavor and silky mouthfeel. It adds an unmistakable richness that transforms the custard base into a truly luxurious spread.
- 4 large egg yolks: As the primary thickening agent, egg yolks create a rich and velvety smooth custard. Using only the yolks ensures a creamy consistency without the distinct "eggy" flavor that whole eggs can impart.
- 1 tablespoon vanilla extract: This adds a warm, aromatic depth that beautifully complements the coconut and pecans. It is the final touch that ties all the frosting's delicious flavors together.
- 1 ⅓ cups (110g) sweetened shredded coconut: This is the heart and soul of the frosting, providing its iconic sweet and chewy texture. Lightly toasting the coconut beforehand can further deepen its nutty, tropical flavor.
- 1 cup (120g) pecans (toasted and chopped): Toasting the pecans is a non-negotiable step that elevates the frosting from good to great. The heat releases their natural oils, making them crunchier and intensely nutty.
For the Chocolate Buttercream (Recommended)
- ½ cup (115g) unsalted butter (softened): This serves as the creamy, rich foundation for the buttercream. It provides the perfect base for frosting the sides of the cake and creating a stable structure.
- ⅔ cup (65g) unsweetened cocoa powder: This gives the buttercream a rich, pure chocolate flavor that perfectly complements the milder chocolate notes of the cake layers themselves.
- 3 cups (360g) powdered sugar (sifted): This ingredient both sweetens and thickens the frosting. Sifting is an essential step to guarantee a silky-smooth, non-gritty texture in the final buttercream.
- ⅓ cup (80ml) evaporated milk or whole milk: This liquid is used to thin the frosting to a perfect, spreadable consistency. Using evaporated milk will contribute an extra layer of creaminess to the final product.
- 1 teaspoon vanilla extract: Vanilla enhances the chocolate flavor of the buttercream, adding a final layer of aromatic sweetness that completes the cake's flavor profile.

Step-by-Step Preparation
Part 1: Making the Chocolate Cake Layers
- Preheat and Prepare Pans: Set your oven to 350°F (175°C). Thoroughly grease and flour two 9-inch round cake pans. For a guaranteed easy release, trace the pan bottoms onto parchment paper, cut out the circles, and place them inside the greased pans before flouring.
- Combine Dry Ingredients: In a large mixing bowl, whisk together the 2 cups of flour, 2 cups of sugar, ¾ cup of cocoa powder, 1 ½ teaspoons of baking soda, 1 ½ teaspoons of baking powder, and 1 teaspoon of salt. Whisking everything together thoroughly is the first step to a light, airy cake as it aerates and evenly distributes the ingredients.
- Mix Wet Ingredients: In a separate medium bowl, beat the 2 large eggs lightly. Then, whisk in the 1 cup of buttermilk, ½ cup of oil, and 2 teaspoons of vanilla extract until they are just combined. Using room temperature ingredients is crucial here, as it helps create a smooth, properly emulsified batter.
- Combine and Add Boiling Water: Pour the wet ingredients into the bowl of dry ingredients and mix with an electric mixer on low speed until just combined. While the mixer is still on low, carefully and slowly stream in the 1 cup of boiling water. The resulting batter will be very thin; this is perfectly normal and is the secret to its incredible moistness.
- Bake to Perfection: Divide the thin batter evenly between your two prepared pans. Bake for 30-35 minutes, or until a wooden toothpick inserted into the center of the cakes comes out clean or with a few moist crumbs attached. Take care not to overbake, as this will ensure the final cake is perfectly moist.
- Cool the Cakes: Allow the cakes to cool in their pans on a wire rack for about 10-15 minutes. Afterward, carefully invert them onto the wire rack, peel off the parchment paper circles, and let them cool completely before you begin the frosting process.
Part 2: Crafting the Coconut-Pecan Frosting
- Create the Custard Base: In a medium saucepan, combine the 1 cup of evaporated milk, 1 cup of granulated sugar, ½ cup of brown sugar, ½ cup of butter, and 4 egg yolks. It is best to whisk these ingredients together before placing the pan over heat to ensure the egg yolks are fully incorporated and won't cook unevenly.
- Cook and Thicken: Cook the mixture over medium-low heat, whisking constantly and scraping the bottom of the pan. Bring it to a gentle boil and continue to cook until it has thickened enough to coat the back of a spoon, which should take about 10-12 minutes. Constant whisking is critical to prevent the yolks from scrambling.
- Add the Stars of the Show: As soon as the custard has thickened, remove the saucepan from the heat immediately. Stir in the 1 tablespoon of vanilla, 1 ⅓ cups of shredded coconut, and 1 cup of toasted, chopped pecans. The mixture will appear somewhat loose at this stage, but do not be concerned.
- Cool Completely: Transfer the frosting to a separate heatproof bowl to stop the cooking process and allow it to cool completely to room temperature, which can take about an hour. The frosting will thicken significantly as it cools, transforming into a glorious, thick, and spreadable consistency.
Part 3: Assembling Your Masterpiece
- Make the Chocolate Buttercream: While the coconut frosting is cooling, prepare the chocolate buttercream. In a large bowl, beat the ½ cup of softened butter with an electric mixer until it is creamy. Sift in the ⅔ cup of cocoa powder and 3 cups of powdered sugar, then add the ⅓ cup of milk and 1 teaspoon of vanilla. Beat on low speed until combined, then increase to high and beat for 2 minutes until it is light and fluffy.
- The First Layer and Frosting Dam: Place one of the completely cooled cake layers on your serving plate or cake stand. Using an offset spatula, spread a thin layer of the chocolate buttercream over the top. Then, pipe a border or "dam" of chocolate buttercream around the top edge of the cake, which will act as a barrier to hold in the gooey filling.
- Fill with Goodness: Spoon about half of the cooled coconut-pecan frosting inside the buttercream dam you just created. Spread it evenly to fill the entire center. This professional technique ensures a clean look for your finished cake and prevents the delicious filling from oozing out the sides when you slice it.
- Stack and Finish: Gently place the second cake layer on top of the first. Frost the entire top and sides of the cake with the remaining chocolate buttercream, using a bench scraper or offset spatula to create a smooth, polished finish. Finally, pile the rest of the coconut-pecan frosting on the very top of the cake, spreading it gently to the edges.

Tips for the Perfect Recipe
- Room Temperature is Key: For the best cake batter, using room temperature eggs and buttermilk is non-negotiable. This allows the ingredients to emulsify properly, creating a uniform structure and a lighter, fluffier texture in the final cake.
- Toast Your Nuts and Coconut: Do not skip toasting the pecans. Spreading them on a baking sheet and baking at 350°F for 8-10 minutes releases their essential oils, deepening their flavor and making them extra crunchy. You can even lightly toast the coconut for more flavor.
- Don't Rush the Cooling: Both the cake layers and the coconut-pecan frosting must be completely cool before assembly. Frosting a warm cake is a recipe for disaster—it will melt, slide, and create a mess. Patience is a baker's best friend.
- The Frosting Dam Technique: Piping a border of the sturdier chocolate buttercream around the edge of each layer before adding the coconut filling is a professional trick. It contains the looser filling, leading to cleaner slices and a more stable cake.
- Chill for Clean Slices: For perfectly clean, beautiful slices that show off your hard work, chill the finished cake in the refrigerator for at least 30 minutes before cutting. Use a long, sharp knife, wiping it clean between each slice.

Serving Ideas
- The Classic Slice: Serve a generous slice on its own to let the incredible flavors and textures shine. It needs no accompaniment, but a dollop of unsweetened whipped cream or a small scoop of vanilla bean ice cream can be a lovely touch.
- Garnish with Style: For a bakery-worthy presentation, press extra toasted chopped pecans around the bottom edge of the cake. You can also arrange whole toasted pecan halves in a decorative circle on top of the coconut frosting.
- A Drizzle of Chocolate: For extra decadence, you can make a simple chocolate ganache by melting 2 oz of chopped chocolate into ¼ cup of hot heavy cream. Drizzle it over the top of the finished cake, letting it drip artfully down the sides.
- Deconstructed Delights: The flavors of German chocolate cake are incredibly versatile. Consider using this recipe as inspiration for other treats like German Chocolate Cupcakes, Brownies, or even Cake Bars for easier, potluck-friendly serving.

Tips for Storing and Reheating
Storing Leftovers
- Refrigeration is Best: Due to the egg yolks and milk in the cooked frosting, it is safest to store the cake in the refrigerator. The frosting is a custard and should not be left at room temperature for extended periods.
- Prevent Drying: The main enemy of refrigerated cake is dryness. Store the cake in an airtight cake carrier or cover it loosely with plastic wrap. For cut cake, press a piece of plastic wrap directly against the exposed surfaces to keep it moist.
- Storage Duration: Properly stored in the refrigerator, the cake will remain delicious for up to 5 days.
- Freezing for Later: This cake freezes beautifully. You can freeze individual slices wrapped tightly in plastic wrap and then foil, or freeze the whole cake. For a whole cake, "flash freeze" it unwrapped for an hour to set the frosting, then wrap it tightly. It will last for up to 3 months.
Reheating Tips
- Bring to Room Temperature: Cake is always best enjoyed at room temperature, not cold from the fridge. Take a slice out of the refrigerator about 20-30 minutes before serving to allow the cake and frosting to soften and the flavors to bloom.
- Avoid the Microwave: Do not reheat this cake in the microwave. The frosting will melt and separate, and the cake can become tough. Room temperature is all you need for the perfect texture and taste.
Conclusion
Baking a German chocolate cake from scratch is more than just following a recipe; it's about creating a moment of pure, decadent joy. With its tender chocolate layers and the iconic, gooey coconut-pecan frosting, this cake is a true labor of love that is worth every single step. We hope you embrace the process and share this incredible dessert with the people you cherish most.
Frequently Asked Questions
Q: Is German Chocolate Cake actually from Germany?
A: Surprisingly, no! It's a 100% American invention. The cake was named after Samuel German, an American baker who developed a sweet baking chocolate in 1852. A recipe using his "German's Sweet Chocolate" was published in a Dallas newspaper in 1957, and the name stuck after the possessive ('s) was dropped.
Q: Can I make this cake ahead of time?
A: Absolutely! You can bake the cake layers up to two days in advance; just wrap them tightly in plastic wrap and store them at room temperature. The coconut-pecan frosting can also be made a week ahead and refrigerated in an airtight container. Let it come to room temperature before you assemble the cake.
Q: Why is the cake batter so thin and watery?
A: Don't be alarmed by the thin batter, as it is supposed to be that way. This recipe uses the "boiling water method," where hot water is added at the end. This technique blooms the cocoa powder for a richer chocolate flavor and adds significant moisture, resulting in an incredibly tender final cake crumb.
Q: Do I have to use the chocolate buttercream on the sides?
A: While traditional German chocolate cake often has bare sides, we highly recommend the chocolate buttercream. It not only adds another delicious layer of chocolate flavor but also seals the cake layers to keep them moist for longer, providing a beautiful, polished finish to your masterpiece.
Works cited
- The History of German Chocolate Cake - Kitchen Project, accessed July 16, 2025, https://kitchenproject.com/history/GermanChocolateCake/index.htm
- Where Did German Chocolate Cake Originate And How Did It Get Its Name? - Allrecipes, accessed July 16, 2025, https://www.allrecipes.com/article/how-did-german-chocolate-cake-get-its-name/
- Homemade German Chocolate Cake - Tastes Better From Scratch, accessed July 16, 2025, https://tastesbetterfromscratch.com/german-chocolate-cake/
- German Chocolate Cake Recipe - Sugar & Sparrow, accessed July 16, 2025, https://sugarandsparrow.com/german-chocolate-cake-recipe/
- Buttermilk Chocolate Cake - Southern Bite, accessed July 16, 2025, https://southernbite.com/buttermilk-chocolate-cake/
- Classic German Chocolate Cake Recipe - Sprinkle Bakes, accessed July 16, 2025, https://www.sprinklebakes.com/2024/02/classic-german-chocolate-cake-recipe.html
- German in Name, American in Origins - Taste Cooking, accessed July 16, 2025, https://tastecooking.com/german-in-name-american-in-origins/