How to Master the Legendary Fire-and-Ice Dessert
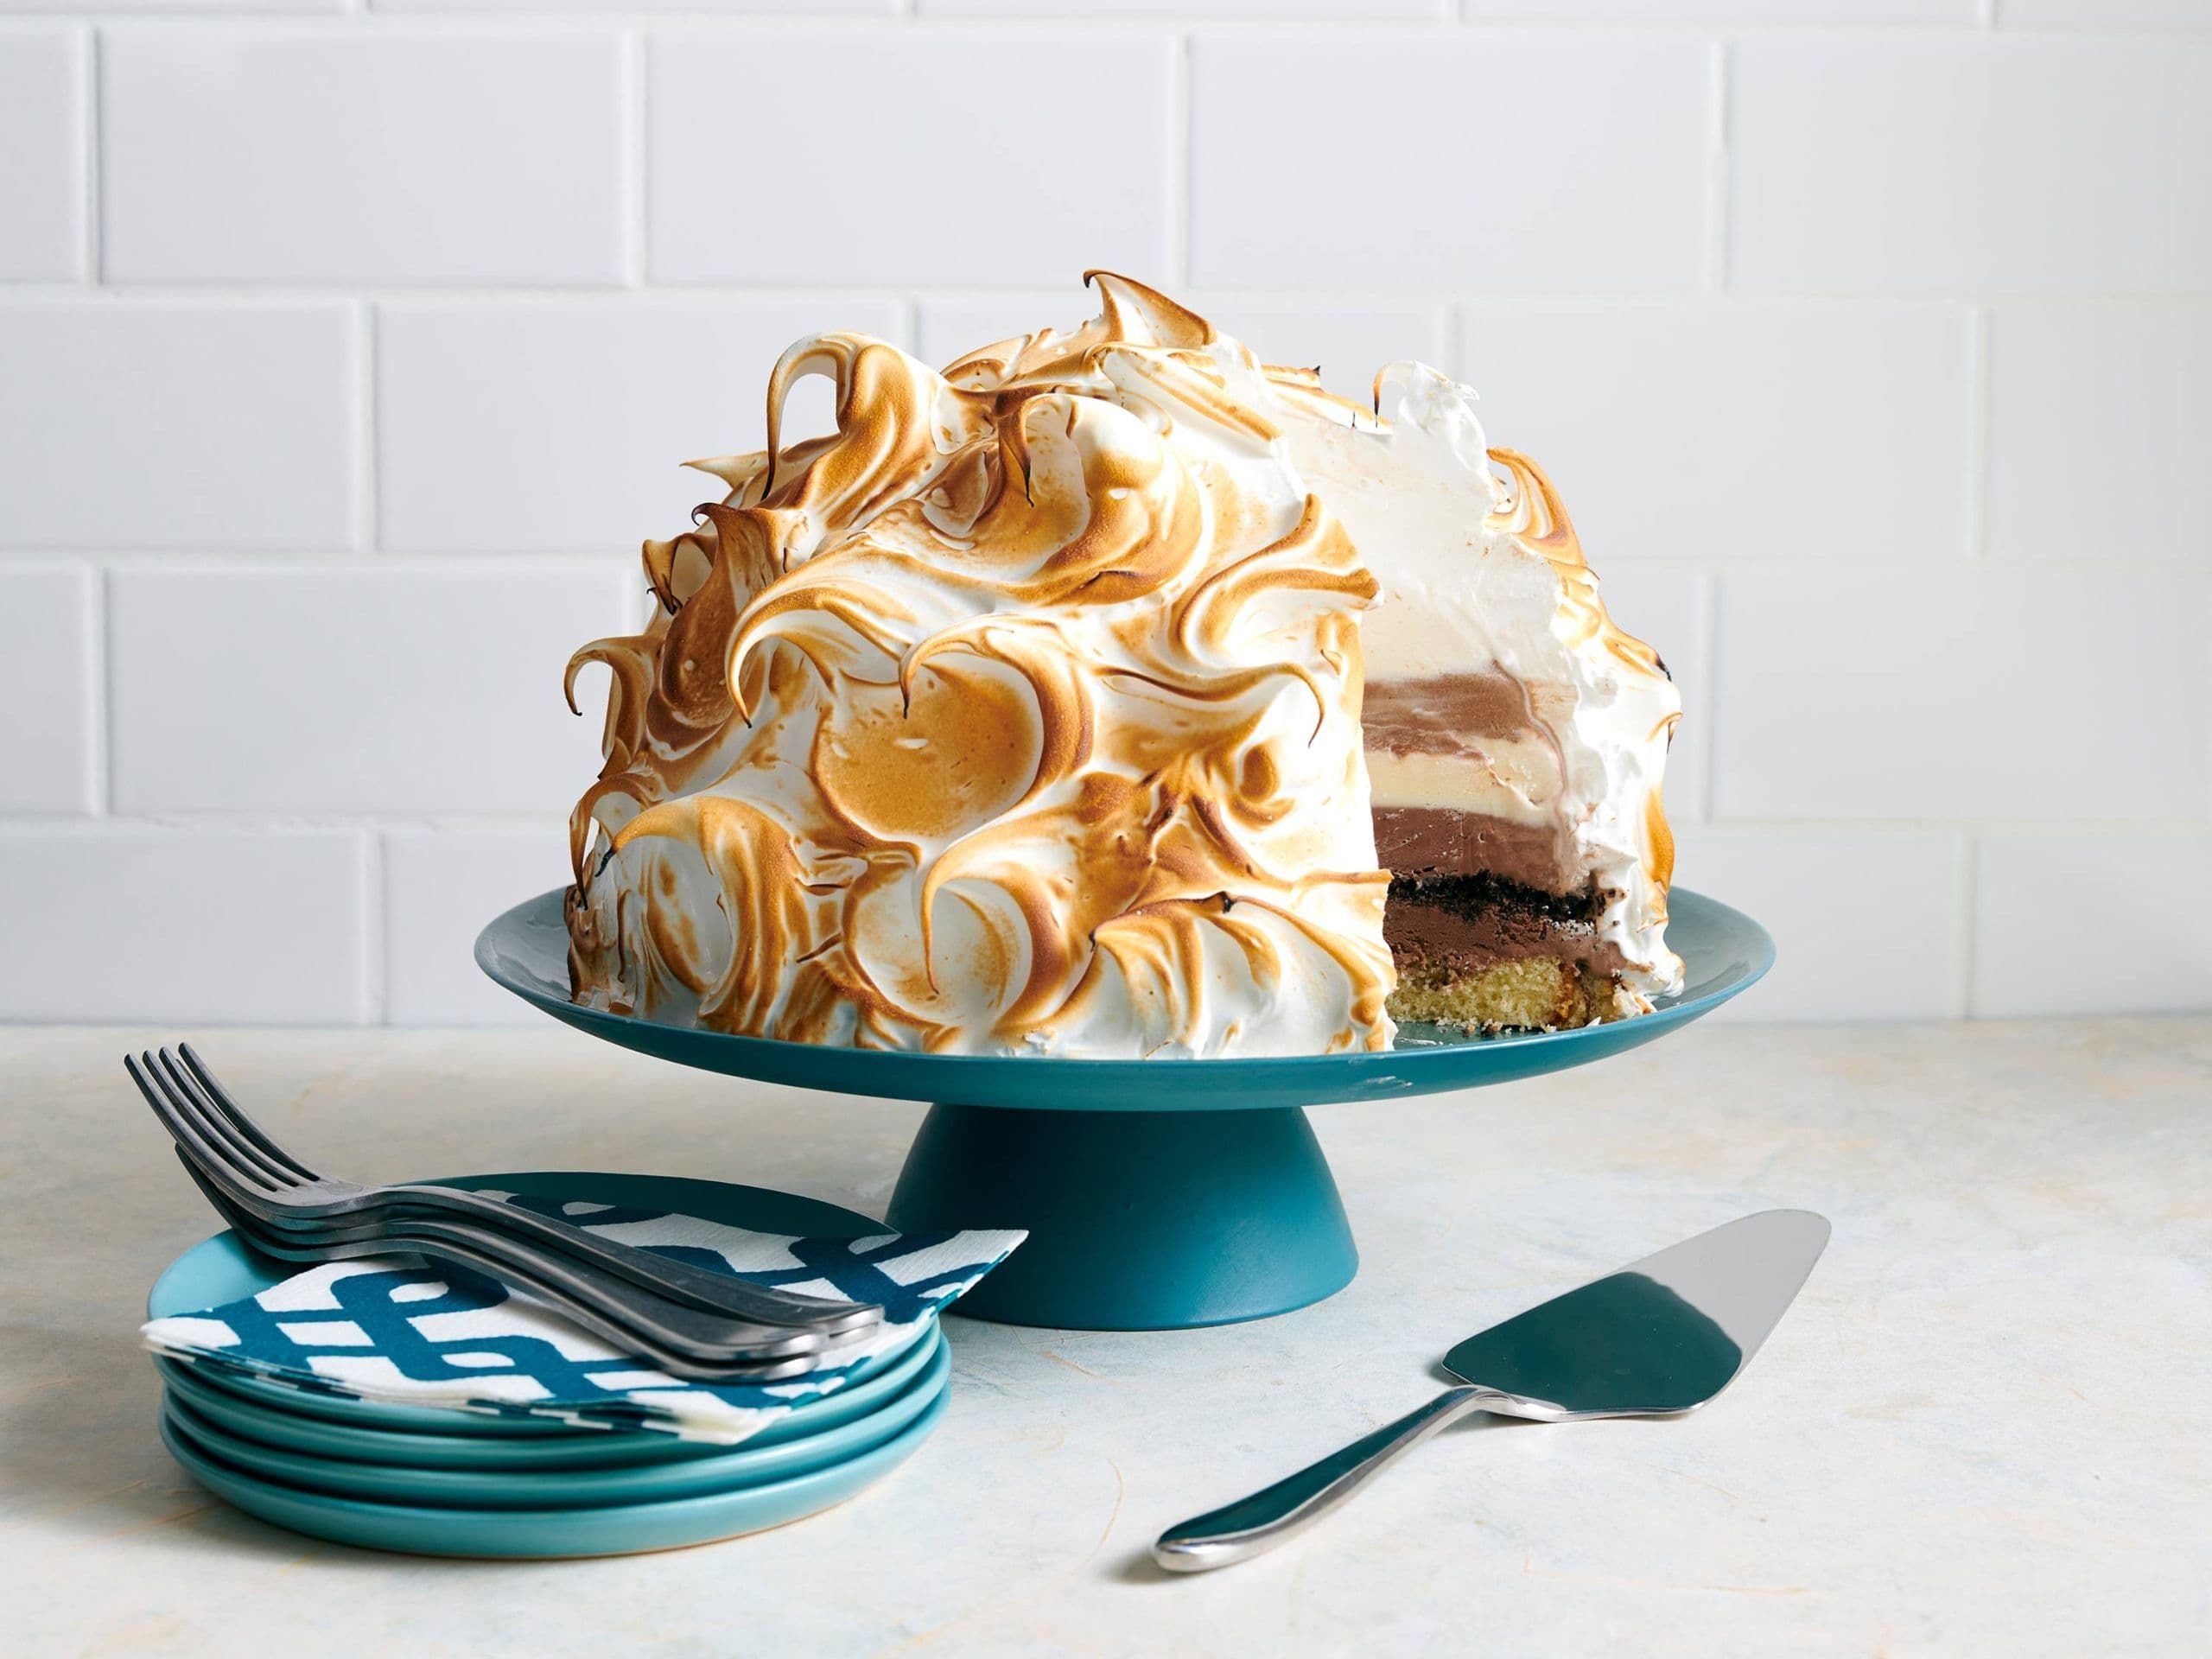
There are desserts, and then there are legends. The baked alaska is pure culinary theater, a spectacle of fire and ice that never fails to draw gasps of awe. Imagine a magnificent dome of golden-brown, toasted meringue, warm to the touch. A knife slices through the pillowy shell, revealing the impossible: a vibrant, frozen core of ice cream, perfectly solid and creamy. It’s a gastronomic magic trick, a dessert that defies logic and delights the senses.
This showstopper has a history as rich as its taste, with its most famous origin story dating back to the Gilded Age at New York's iconic Delmonico's restaurant. Created to celebrate the purchase of the Alaska territory, it quickly became a symbol of opulence and celebration. To make a baked alaska is to tap into that history, creating not just a dessert, but a nostalgic and unforgettable moment.
Why Make This Delicious Recipe & When to Serve It
Let’s be honest: baked alaska can look intimidating. With its distinct layers and fiery finish, it seems like something best left to professional pastry chefs. But it is one of the most rewarding projects a home baker can undertake, a true "level-up" dessert that is guaranteed to impress.
Baked alaska is the perfect grand finale for any special occasion. Think of it as the centerpiece for holiday dinners, a spectacular birthday surprise, or the talk of your next dinner party. Because it’s a "plan ahead" dessert that requires several freezing stages, the process itself becomes part of the celebration, building anticipation for the dramatic reveal.
Beyond its classic form, this dessert is a brilliant canvas for your creativity. Every single element—from the type of cake to the combination of ice cream flavors to the decorative swirls of meringue—can be customized. Each baked alaska you make can be a completely unique masterpiece, tailored perfectly to your celebration.

Basic Ingredients (Serves 8-10)
The success of baked alaska lies in choosing the right ingredients for each layer, as each plays a crucial scientific role in the dessert's structure and "magic."
For the Vanilla Sponge Cake Base:
- 1 1/2 cups all-purpose flour: This provides the essential framework for the cake, creating a light yet stable crumb that is strong enough to support the weight of the ice cream dome without collapsing.
- 1/2 teaspoon baking powder: As a chemical leavener, this ingredient works in tandem with the whipped eggs to produce the signature "spongy" texture that is critical for a cake that remains tender and easy to slice even when frozen.
- 1/4 teaspoon kosher salt: A small but vital amount of salt sharpens and balances the sweetness of the cake, enhancing the overall flavor profile and preventing the dessert from tasting one-dimensional.
- 2 large eggs: Eggs are the workhorse of this sponge cake, providing richness, moisture, and, most importantly, the primary aeration when whipped with sugar that gives the cake its light, airy structure.
- 1 cup granulated sugar: Beyond providing sweetness, sugar is crucial for stabilizing the whipped eggs. It helps create a strong foam structure, which results in a tender, fine-textured cake that won't become tough.
- 1/2 cup whole milk: Milk contributes essential moisture and a touch of richness to the batter, ensuring the final cake has a soft, tender crumb that resists turning hard or dry in the freezer—a common problem with denser, butter-heavy cakes.
- 8 tablespoons unsalted butter, melted: Used more for flavor than for structure in this recipe, a small amount of melted butter adds a lovely richness without weighing down the batter, preserving the light texture needed for the frozen dessert.
- 1 teaspoon vanilla extract: This provides the classic, aromatic flavor for the cake base, creating a delicious yet versatile foundation that pairs beautifully with nearly any ice cream flavor you can imagine.
For the Ice Cream Dome:
- 3 pints ice cream (e.g., vanilla, chocolate, strawberry): Using several different flavors of slightly softened ice cream is key to the dessert's visual appeal. When sliced, it reveals a beautiful mosaic of colors and tastes that adds to the "wow" factor.
- 1 cup crushed chocolate wafer cookies (optional): This clever addition, pressed onto the surface of the ice cream before the cake is added, creates a firm, even base for the cake to adhere to while adding a delightful textural crunch to every bite.
For the Insulating Meringue Cloak:
- 6 large egg whites, at room temperature: The proteins in egg whites are what create the foam structure of the meringue. Bringing them to room temperature before whipping allows them to trap more air and reach a much greater volume, resulting in a lighter, fluffier, and more effective insulating cloak.
- 1/4 teaspoon cream of tartar: This powdered acid is a baker's secret weapon and is critical for stabilizing the egg whites. It strengthens the protein network, preventing the meringue from weeping or collapsing and ensuring it forms a perfect, heat-proof barrier around the ice cream.
- 1 cup granulated sugar: Sugar provides both sweetness and essential structure to the meringue. When added gradually, it dissolves completely into the egg whites, creating a thick, glossy, and exceptionally stable foam that holds its shape and toasts to a perfect golden brown.

Step-by-Step Preparation
- Prepare the Foundation: Baking the Sponge Cake. Preheat your oven to 350°F (175°C). Grease a 9-inch round cake pan and line the bottom with parchment paper for easy removal. In a medium bowl, whisk together the 1 1/2 cups of all-purpose flour, 1/2 teaspoon of baking powder, and 1/4 teaspoon of kosher salt to ensure they are evenly distributed for a perfect crumb.
- Create the Cake Batter: In the bowl of a stand mixer fitted with the whisk attachment, beat the 2 large eggs and 1 cup of granulated sugar on high speed for about 5 minutes. The mixture should become pale, very thick, and more than triple in volume. On low speed, mix in the dry ingredients, then stream in the 1/2 cup of whole milk, 8 tablespoons of melted butter, and 1 teaspoon of vanilla until just combined.
- Bake and Cool the Cake: Pour the finished batter into your prepared pan, spreading it into an even layer. Bake for 25 to 30 minutes, or until the cake is lightly browned and a toothpick inserted into the center comes out clean. Transfer the pan to a wire rack and let the cake cool completely in the pan; a fully cooled cake is crucial to prevent melting the ice cream during assembly.
- Sculpt the Core: Molding the Ice Cream Dome. Take a 3-quart metal or glass bowl and coat it lightly with cooking spray, then line it with two overlapping pieces of plastic wrap, leaving a generous 6-inch overhang on all sides. Working quickly, fill the bowl with alternating scoops of your 3 pints of slightly softened ice cream, pressing down firmly with a spatula to eliminate air pockets and create a colorful mosaic.
- Add the Crunch Layer and Set the Dome: If using, sprinkle the 1 cup of crushed chocolate wafers evenly over the ice cream surface and press down gently to create a flat, stable layer. Fold the overhanging plastic wrap over the top to cover the surface completely. Transfer the bowl to the freezer for at least 2 hours, or until the ice cream is frozen completely firm.
- The Grand Assembly: Uniting Cake and Ice Cream. Once the ice cream dome is rock-solid, place your completely cooled 9-inch sponge cake onto a parchment-lined baking sheet. Unwrap the top of the ice cream and confidently invert it onto the center of the cake. Lift off the bowl and carefully peel away all the plastic wrap.
- Fuse the Layers: The Second Freeze. If your cake layer is wider than the ice cream dome, use a long serrated knife to carefully trim the excess cake from around the base. This step is important as it allows the meringue to seal directly to the baking sheet. Place the entire assembled dessert back into the freezer for at least 1 more hour to fuse the layers and ensure it is thoroughly frozen.
- Whip the Magic: Creating a Flawless Meringue. In a meticulously clean, dry, and grease-free bowl of a stand mixer, combine the 6 large room-temperature egg whites and 1/4 teaspoon of cream of tartar. Whisk on medium-high speed until the whites are foamy. Increase the speed to high and begin adding the 1 cup of granulated sugar very gradually, about one tablespoon at a time, beating continuously until the meringue is stiff, brilliantly glossy, and holds a sharp, unwavering peak when the whisk is lifted.
- Encase in Meringue: The Final Insulation. Remove the frozen cake and ice cream assembly from the freezer. Working quickly, use an offset spatula to generously cover the entire structure with the freshly made meringue, starting at the base and working your way to the top. You must ensure the meringue completely covers every bit of cake and ice cream and is sealed tightly to the parchment paper on all sides to create a perfect insulating barrier.
- Create the Peaks and Final Freeze: Use the back of a spoon or the tip of your spatula to create dramatic swirls, swoops, and tall peaks all over the meringue surface. These beautiful textures are not just for show; they will catch the heat and toast to a stunning golden brown. Place the fully assembled baked alaska back into the freezer for at least 3 more hours, or even overnight, to ensure it is frozen solid before the final step.
- The Fiery Finale: Toasting the Meringue. When ready to serve, preheat your oven to a blistering 500°F (260°C). Place the frozen baked alaska on the lowest oven shelf and bake for just 3 to 4 minutes, watching carefully until the meringue peaks are beautifully browned. For more control and a touch of drama, you can instead use a kitchen blowtorch to toast the meringue to perfection right at the table.

Tips for the Perfect Recipe
- Meringue Mastery
- Use Room Temperature Eggs: For the fluffiest, most voluminous meringue, always use egg whites that have been allowed to sit at room temperature for about 30 minutes. Cold whites simply won't whip as high.
- A Fat-Free Zone: The number one enemy of meringue is fat. Even a tiny speck of egg yolk or a greasy film on your bowl will prevent the whites from whipping up properly. Use a glass or stainless steel bowl and, for extra insurance, wipe it down with a bit of vinegar or lemon juice before you start.
- The Power of Acid: Do not skip the cream of tartar. This acidic powder is your guarantee for a stable, strong meringue. It helps the egg white proteins hold their structure, preventing the dreaded collapse or weeping that can ruin your dessert.
- Add Sugar Slowly: Be patient when adding the sugar. Tossing it in all at once will result in a grainy, weak meringue. Adding it gradually, one spoonful at a time, allows it to dissolve completely, creating a smooth, glossy, and structurally sound foam.
- The Perfect Base
- Avoid the "Ice Brick": A dense, buttery cake like a classic pound cake or a fudgy brownie will freeze into a rock-solid, difficult-to-cut brick. A light, airy sponge cake is the superior choice, as it remains tender and easy to slice even when frozen.
- Moisture is Key for Alternatives: If you decide to experiment with a drier base like ladyfingers, be sure to brush them with a light simple syrup or a complementary liqueur. This adds necessary moisture and prevents them from becoming unpleasantly hard and stale in the freezer.
- Flavor Alchemy
- Creative Combinations: The classic Neapolitan is just a starting point. Think like a pastry chef and pair flavors: rich coffee ice cream on a chocolate sponge base, tangy raspberry sorbet on a lemon cake, or a tropical duo of mango sorbet and coconut cake.
- Incorporate Add-ins: Elevate your dessert by layering interesting textures and flavors within the ice cream dome. A layer of crushed cookies, a swirl of fudge sauce, or ribbons of salted caramel will add a delightful surprise to every slice.
- Presentation is Everything
- Work Quickly and Freeze Solidly: Success hinges on keeping everything as cold as possible for as long as possible. Do not rush the freezing steps. A rock-solid, thoroughly frozen base is non-negotiable before you even think about applying the meringue.
- Seal the Deal: This is the most critical step in the entire process. The meringue must act as a complete, unbroken seal, covering every inch of the ice cream and cake and touching the baking sheet all the way around. Any gap, no matter how small, will act as a tunnel for heat to rush in and melt your ice cream core.

Serving Ideas
- The Flambé Finish: For the ultimate in tableside drama, gently warm 2 tablespoons of a high-proof spirit like brandy or dark rum. At the table, carefully pour the warm liqueur over the top of the finished dessert and ignite it with a long match. Serve as soon as the flames die down.
- Festive Garnishes: To create a stunning holiday presentation, garnish the serving platter with "frosted" rosemary sprigs and sugared cranberries. Simply dip them in a little water, roll them in granulated sugar, and let them dry. These can be prepared hours in advance.
- Decadent Sauces: Elevate each slice by serving it with a complementary sauce. A warm chocolate fudge sauce is perfect for a chocolate-based Alaska, while a tangy raspberry coulis or a rich salted caramel sauce can be paired with a variety of fruit or vanilla flavors.
- Individual Portions: For easier serving at a large party, create mini baked alaskas. Use cupcakes or brownies as the base, top each with a single scoop of ice cream, and follow the same meringue and toasting process. This also allows you to offer several different flavor combinations to your guests.

Tips for Storing and Reheating
Storing Leftovers
- Wrap Tightly: After serving, wrap any remaining baked alaska (or individual slices) tightly in a layer of plastic wrap, followed by a layer of aluminum foil to prevent freezer burn.
- Freeze Immediately: Return the wrapped leftovers to the freezer as quickly as possible. When properly stored, your baked alaska will stay delicious for up to one week.
Reheating Tips
- Do Not Re-Bake: Never attempt to reheat a slice of baked alaska in a conventional oven or microwave. This will destroy the dessert, resulting in a puddle of melted ice cream and soggy cake.
- The "Refresh" Torch: The best way to enjoy leftovers is to serve them directly from the freezer, allowing them to sit at room temperature for just 5-10 minutes to soften slightly. To revive the "just-made" magic, you can briefly re-torch the meringue with a kitchen blowtorch to give it a fresh, warm toast before serving.
Conclusion
With its breathtaking presentation and the delightful paradox of a warm, toasted shell surrounding a frozen heart, the baked alaska is far more than a dessert—it's a culinary triumph and a memory in the making. Armed with an understanding of the science, a nod to its history, and these expert techniques, you are now fully equipped to conquer this legendary showstopper. Embrace the process, enjoy the magic, and prepare for the well-deserved applause.
Frequently Asked Questions
Q: How does the ice cream not melt in the oven?
A: The secret is pure science! The meringue is a foam made of countless tiny air bubbles trapped within egg whites. This foam acts as a powerful thermal insulator, effectively shielding the frozen ice cream from the oven's intense heat during the brief time it takes to toast the exterior.
Q: Why is it called "Baked Alaska"?
A: The name is a clever commemoration of the United States' purchase of the Alaska territory from Russia in 1867. Chef Charles Ranhofer of New York's famed Delmonico's restaurant originally dubbed his creation "Alaska, Florida," a nod to the dessert's dramatic temperature contrast.
Q: Can I make this dessert ahead of time?
A: Yes, it is an ideal make-ahead dessert. You can fully assemble the baked alaska, including the final meringue coating, and store it uncovered in your freezer for up to three days. When you're ready to serve, simply transfer it straight from the freezer to a hot oven or toast it with a torch.
Q: What's the difference between a Baked Alaska and a Bombe Alaska?
A: The main difference lies in the dramatic, fiery finish. While a traditional baked alaska is browned in the oven or with a torch, a bombe alaska is flambéed at the table. This is done by pouring warmed, high-proof liqueur like rum over the dessert and setting it alight for a truly spectacular presentation.
