Introduction
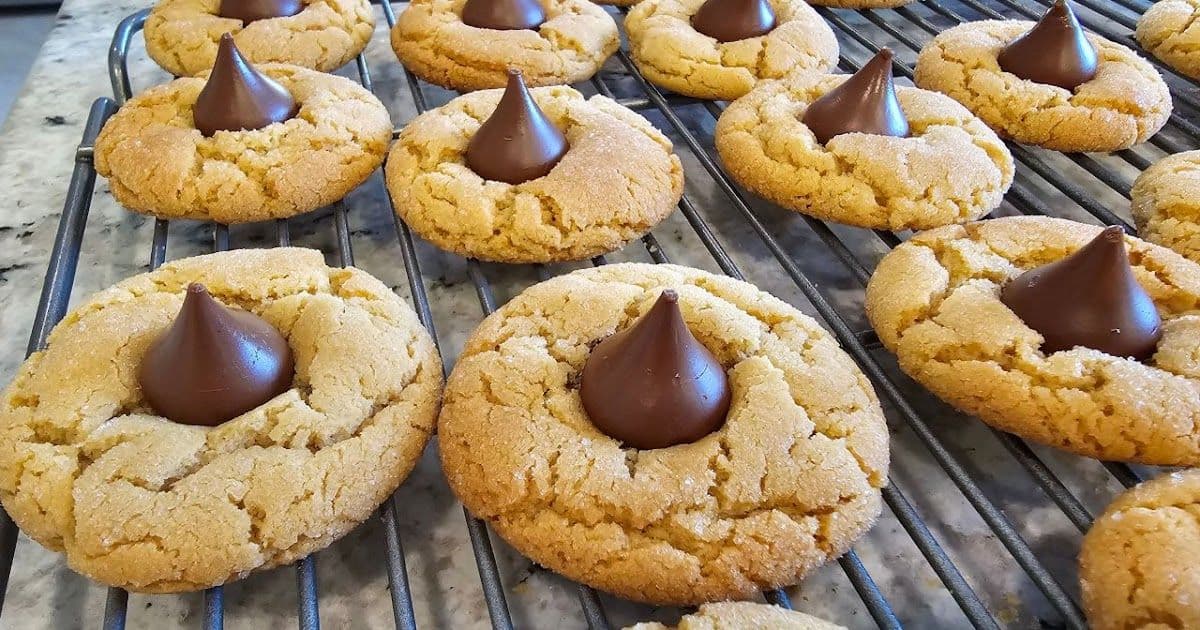
Peanut Butter Blossoms are more than just cookies; they're bite-sized bundles of comfort, a crowd-pleasing classic that evokes a sense of sweet nostalgia with every mouthful. These delightful treats, featuring a soft, chewy peanut butter cookie base famously crowned with a milk chocolate kiss, have graced countless holiday tables and family gatherings, becoming a cherished American tradition. Their enduring charm lies in their simplicity and the irresistible pairing of peanut butter and chocolate.
The story of the Peanut Butter Blossom began in 1957, not in a famed pastry kitchen, but from the home oven of Freda Strasel Smith of Gibsonburg, Ohio. She entered her creation, originally named "Black-eyed Susans," into the Pillsbury Bake-Off contest. While it didn't clinch the grand prize, its popularity was undeniable, leading Pillsbury to rename it and Hershey to feature the recipe on their Kisses bags, cementing its iconic status. It's a testament to how everyday creativity can lead to legendary results, often being the first cookie to disappear from any dessert spread.
Why You'll Love Baking Peanut Butter Blossoms And When to Share Them!
There's an undeniable magic to the combination of rich, nutty peanut butter and smooth, sweet milk chocolate, and Peanut Butter Blossoms capture this pairing perfectly. These cookies are a joy to bake, not just for their delicious outcome, but because the process itself is wonderfully straightforward. They're "super easy to whip up," making them an ideal project for bakers of all levels, and the recipe can be easily doubled if you're baking for a crowd.
The versatility of Peanut Butter Blossoms makes them suitable for a wide array of occasions. They are a quintessential feature on holiday cookie trays, especially at Christmas, instantly adding a touch of tradition and warmth. Their crowd-pleasing nature also makes them perfect for bake sales, where they're always a hit, or as a delightful contribution to family gatherings and potlucks. Beyond big events, they're a wonderful treat for a cozy weekend at home or can be packaged beautifully as thoughtful homemade gifts.
More than just a tasty treat, baking these cookies offers a chance to slow down and create sweet memories, especially when shared with loved ones. The simple act of pressing the chocolate kiss into the warm cookie can become a cherished tradition, particularly for children who love to help with that final, delightful touch. While often associated with winter holidays, their appeal is truly year-round, making them a welcome dessert at summer barbecues or any time you crave a classic, comforting cookie.

Essential Ingredients (This Recipe Serves approximately 4 dozen cookies)
- 48 HERSHEY'S KISSES Milk Chocolates: The star of the show, these iconic candies are pressed into the warm cookies, providing a burst of milk chocolate that perfectly complements the peanut butter flavor and creates the signature "blossom" look.
- 1/2 cup Shortening: Contributes to a tender, soft texture in the final cookie, helping them stay moist and preventing excessive spreading during baking for that classic, slightly puffy appearance.
- 3/4 cup REESE’S Creamy Peanut Butter (or other no-stir creamy peanut butter): The heart of the cookie, providing the rich, nutty peanut butter flavor and a wonderfully chewy texture; smooth, no-stir varieties ensure consistency and prevent a dry, crumbly result.
- 1/3 cup Granulated Sugar: Works in tandem with brown sugar to provide sweetness and helps the cookies achieve a desirable spread and slightly crisp edges, contributing to the overall texture.
- 1/3 cup Packed Light Brown Sugar: Adds moisture, a hint of molasses flavor for depth, and contributes to a softer, chewier cookie texture compared to using only granulated sugar.
- 1 Large Egg (at room temperature): Acts as a crucial binder, holding all the ingredients together for proper structure, while also adding richness and moisture to the cookie dough.
- 2 Tablespoons Milk: Provides additional moisture to the dough, resulting in a softer, more tender cookie and aiding in the smooth blending of ingredients.
- 1 Teaspoon Vanilla Extract: Enhances all the other flavors in the cookie, particularly the peanut butter and chocolate, adding a warm, aromatic background note for a more complex taste.
- 1 1/2 cups All-Purpose Flour: The primary structural component of the cookies, providing the framework and determining their final shape and density; proper measurement is key to avoid dry cookies.
- 1 Teaspoon Baking Soda: The main leavening agent in this recipe, reacting with other ingredients to create carbon dioxide gas, which helps the cookies rise and achieve a light, tender crumb.
- 1/2 Teaspoon Salt: Balances the sweetness from the sugars and chocolate while sharpening and enhancing the rich flavor of the peanut butter, making all the ingredients pop.
- 1/3 cup Granulated Sugar (for rolling): Creates a delightful, slightly sparkly and crisp exterior on the cookies as they bake, adding an extra layer of sweetness and an appealing textural contrast to the soft interior.

Step-by-Step Preparation
Follow these meticulous steps to create your own batch of perfect Peanut Butter Blossoms. Each stage is important, from creaming the fats and sugars to the crucial moment of pressing in the chocolate kiss.
- Preheat and Prep Kisses: First, preheat your oven to 375∘F (190∘C) so it's ready when your cookies are. While the oven heats, take the time to unwrap all 48 HERSHEY'S KISSES Milk Chocolates and set them aside; this preparation ensures the final step is quick and seamless when the cookies emerge hot from the oven.
- Cream Fats and Sugars: In a large mixing bowl, combine the 1/2 cup of shortening and 3/4 cup of REESE’S Creamy Peanut Butter. Beat them together with an electric mixer until they are thoroughly blended and smooth. Then, add the 1/3 cup of granulated sugar and 1/3 cup of packed light brown sugar to the bowl, continuing to beat until the mixture becomes light and fluffy, a process that incorporates air for a more tender cookie.
- Incorporate Wet Ingredients: To the fluffy sugar mixture, add the 1 large egg, 2 tablespoons of milk, and 1 teaspoon of vanilla extract. Beat these ingredients well until everything is fully combined and the mixture is smooth. This step ensures the egg is evenly distributed, providing essential binding and richness to the dough.
- Combine and Add Dry Ingredients: In a separate medium bowl, whisk together the 121 cups of all-purpose flour, 1 teaspoon of baking soda, and 1/2 teaspoon of salt to ensure even distribution. Gradually add this dry mixture to the wet peanut butter mixture in the large bowl. Beat on low speed (or stir with a sturdy spoon) only until the flour is just incorporated and a cohesive dough forms; be careful not to overmix at this stage, as it can lead to tougher cookies.
- Shape and Roll Dough: Take the prepared cookie dough and shape it into 1-inch balls using your hands or a small cookie scoop for uniformity, which helps in even baking. Pour the additional 1/3 cup of granulated sugar into a small, shallow bowl. Roll each dough ball gently in this sugar until it's fully coated; this coating will give the baked cookies a lovely sparkle and a slight exterior crunch.
- Arrange and Bake: Place the sugar-coated dough balls onto an ungreased cookie sheet, ensuring they are spaced about 1-2 inches apart to allow for slight spreading as they bake. Bake in your preheated 375∘F (190∘C) oven for 8 to 10 minutes. The cookies are ready when the edges are lightly browned and they appear set but still soft in the center; it's important not to overbake to maintain their characteristic chewiness.
- The Signature Blossom Touch: This step is critical and time-sensitive. As soon as you remove the cookies from the oven, while they are still hot and puffy, immediately press one unwrapped HERSHEY'S KISSES Milk Chocolate firmly into the center of each cookie. The cookie will crack slightly around the edges, creating the classic and charming "blossom" effect; working quickly ensures the chocolate adheres properly as it melts slightly from the cookie's heat.
- Cool Completely: After pressing in the chocolates, carefully transfer the finished Peanut Butter Blossoms from the hot cookie sheet to a wire rack. Allow them to cool completely on the rack. This step is important as it helps the chocolate to set properly and prevents the bottoms of the cookies from becoming soggy from trapped steam.

Expert Tips for Irresistible Peanut Butter Blossoms
Achieving that perfect balance of chewy peanut butter cookie and meltingly smooth chocolate is an art. These tips will help you master it, ensuring your Peanut Butter Blossoms are truly irresistible every time. Many of these suggestions focus on achieving the ideal soft and chewy texture, a hallmark of this beloved cookie and an area where attention to detail pays off significantly.
Achieving Perfect Texture:
- Measure Flour Correctly: Spoon and Level Your Flour. This is perhaps one of the most crucial tips for tender cookies. Avoid scooping flour directly from the bag with your measuring cup, as this compacts it, leading to an excess of flour in your dough. Too much flour is a primary culprit for dry, hard cookies. Instead, gently spoon the flour into your measuring cup and then level it off with a straight edge.
- Don't Overmix Dough: Mix Until Just Combined. Once the dry ingredients are added to the wet, mix only until the flour streaks disappear. Overmixing develops the gluten in the flour more than necessary, which can result in cookies that are tough rather than delightfully tender and soft.
- Chill the Dough (Optional but Recommended): Consider a Brief Chill for Better Shape. If your cookie dough feels overly soft or sticky, or if you've had issues with cookies spreading too thin in the past, refrigerating the dough for at least 30 minutes to an hour can make a noticeable difference. Chilled dough is easier to roll and tends to spread less, resulting in a thicker, chewier cookie.
- Soften Butter Properly: Use Room Temperature Butter, Not Melted. For the best cookie structure, your butter should be softened to room temperature – it should yield to gentle pressure from your finger but not be greasy or melted. Using melted butter can cause the cookies to spread excessively and become flat and oily. Allow butter to soften naturally on the counter.

Enhancing Flavor:
- Quality Peanut Butter: Choose Creamy, No-Stir Peanut Butter. The type of peanut butter used significantly impacts the final cookie. Commercial "no-stir" creamy peanut butters (like JIF or Skippy) are generally recommended for their consistency and robust peanut flavor, which translates well in baking. Natural peanut butters, which tend to separate, can sometimes yield a drier, more crumbly cookie.
- Brown Butter Power (Advanced Tip): Experiment with Browning Your Butter. For an elevated flavor profile, consider browning your butter before incorporating it into the recipe. This process cooks the milk solids in the butter, creating a deep, nutty, toasty aroma and taste that adds a wonderful complexity to the cookies. If you try this, remember that browning reduces the butter's volume, so you may need to adjust the initial quantity or weigh it after browning.

Presentation & Kisses:
- Unwrap Kisses Beforehand: Have Kisses Ready to Go. This simple preparation step is a game-changer. Unwrap all your Hershey's Kisses and have them ready in a bowl before your cookies come out of the oven. This allows you to work quickly and efficiently, pressing the Kisses into the cookies while they are at the perfect, hot temperature for adhesion.
- Press Kisses Gently but Firmly: Secure the Kiss Properly. When pressing the Kiss into the center of each hot cookie, use gentle but firm pressure. You want the Kiss to adhere well and for the cookie to form those characteristic cracks around the edges, but avoid pushing so hard that you completely flatten the cookie or cause it to crumble excessively.
- Prevent Melting Kisses (If in a Hot Environment): Freeze Kisses Briefly if Needed. If your kitchen is particularly warm, or if you're baking on a hot day, the residual heat from the cookies can sometimes cause the Kisses to melt more than desired and lose their shape. To counteract this, you can place the unwrapped Kisses in the freezer for about 10-15 minutes before pressing them onto the hot cookies. This helps them maintain their iconic shape.
- Festive Sugars: Roll in Decorative Sugars for Extra Sparkle. To enhance the visual appeal, especially for holidays or special occasions, try rolling the dough balls in different types of sugar. Coarse sparkling sugar, colored decorating sugars (like traditional red and green for Christmas), or even fine sprinkles can add a festive touch and an extra textural element. This allows for a degree of personalization while maintaining the cookie's classic charm.
Delicious Ways to Serve Your Peanut Butter Blossoms
Peanut Butter Blossoms are delightful on their own, but a thoughtful presentation or pairing can elevate the experience. Their comforting nature lends itself well to classic accompaniments, while their festive look makes them a star on any dessert spread.
Classic Companions:
- A Glass of Cold Milk: The Ultimate Classic Pairing. There's hardly a more iconic cookie companion than a tall glass of cold milk. Its creamy coolness provides the perfect contrast to the rich peanut butter and sweet chocolate, a simple pleasure that evokes pure comfort.
- Hot Chocolate or Coffee: Warm and Cozy Beverages. For a truly comforting treat, especially on cooler days or during the holiday season, serve your Peanut Butter Blossoms with a steaming mug of rich hot chocolate or a freshly brewed cup of coffee. The warmth enhances the cookie's melt-in-your-mouth quality.

Elevated Presentations:
- Holiday Cookie Platters: The Star of the Dessert Show. Peanut Butter Blossoms are a must-have on any holiday cookie platter. Arrange them artfully alongside other festive favorites like Italian Wedding Cookies, spicy Gingerbread Crinkle Cookies, or rich Chocolate Crinkles for a visually stunning and delicious assortment that caters to every taste.
- With a Scoop of Ice Cream: A Decadent Dessert Duo. Transform your cookie into an even more indulgent dessert by serving a warm (or room temperature) Peanut Butter Blossom alongside a generous scoop of creamy vanilla bean ice cream. The contrast in temperatures and textures is simply divine.
- Kid-Friendly Fun: Decorate for Occasions with a Creative Twist. Get creative, especially if children are involved! For Christmas, a little green candy melt or frosting and some tiny sprinkles can transform the Hershey's Kiss into an adorable miniature Christmas tree. This adaptability makes them fun for various holidays and themes.

Gifting and Sharing:
- Thoughtful Homemade Gifts: Packaged with Love and Care. Once completely cooled, arrange your Peanut Butter Blossoms in decorative tins, cellophane bags tied with a festive ribbon, or charming cookie boxes. They make a wonderfully personal and delicious homemade gift for friends, family, neighbors, or teachers.
- Bake Sale Favorites: A Guaranteed Crowd-Pleasing Contribution. Thanks to their immense popularity and classic appeal, Peanut Butter Blossoms are an excellent choice for bake sales or community fundraisers. They are visually appealing, easy to package individually, and almost always one of the first items to sell out.
Keeping Your Cookies Fresh: Storing
Proper storage is key to enjoying your Peanut Butter Blossoms for as long as possible while maintaining their delightful taste and texture. While they are best enjoyed fresh, these tips will help you keep them well.
- Cool Completely First: Ensure Cookies are Fully Cooled Before Storing. This is a vital first step. Before you even think about storing them, allow your Peanut Butter Blossoms to cool completely on a wire rack. Storing warm cookies can create condensation inside the container, leading to soggy cookies and potentially causing the chocolate Kisses to become overly soft or messy.
- Airtight Container is Key: Store in an Airtight Container for Maximum Freshness. Once cooled, transfer the cookies to an airtight container. This is crucial for preventing them from drying out and absorbing any ambient odors, thus maintaining their intended flavor and soft, chewy texture.
- Room Temperature Storage: Keep at Room Temperature for Several Days. Peanut Butter Blossoms can be stored effectively at room temperature. In a well-sealed container, they should remain fresh and delicious for up to 3-5 days. Some sources suggest they can last even up to a week if stored with particular care.
- Freezing Baked Cookies: Freeze for Longer Storage Options. If you've made a large batch or want to save some for later, Peanut Butter Blossoms freeze quite well. Ensure they are completely cooled, then arrange them in a single layer in a freezer-safe airtight container or a heavy-duty freezer zip-top bag. They can be frozen for up to a month, or even up to three months according to some bakers, without significant loss of quality. Thaw them at room temperature before serving.
Conclusion
With their irresistible blend of peanut butter and chocolate, their heartwarming nostalgic charm, and their surprising ease of making, Peanut Butter Blossoms are more than just a recipe—they're an invitation to create joy. So, preheat your oven, gather your ingredients, and bake a batch to share, savor, and create your own sweet, lasting memories with this timeless American classic.
Frequently Asked Questions
Q: Why are my peanut butter blossoms dry or crumbly?
A: This usually happens if you measure the flour incorrectly-spoon it into the cup and level it off, rather than scooping. Over-baking can also dry them out, so remove the cookies when they look slightly underdone; they’ll finish setting as they cool.
Q: Can I use natural peanut butter instead of regular creamy peanut butter?
A: It’s not recommended for classic results, since natural peanut butter’s oil separation can make the cookies dry and crumbly. Standard creamy peanut butter gives the traditional soft, chewy texture.
Q: How do I prevent the Hershey's Kisses from melting too much or falling off?
A: Press the Kisses onto the cookies right after baking while they’re hot, so the chocolate base melts slightly and sticks. If your kitchen is warm, chill the Kisses in the freezer for 10-15 minutes before using to help them keep their shape.
Q: Can I freeze Peanut Butter Blossom dough or the baked cookies?
A: Yes, you can freeze unbaked dough balls (roll in sugar before baking) for up to 2-3 months, adding a minute or two to the bake time. Baked cookies also freeze well for about a month in an airtight container-just thaw at room temperature when ready to enjoy.
Works cited
- Peanut butter blossom cookie - Wikipedia, accessed May 19, 2025, https://en.wikipedia.org/wiki/Peanut_butter_blossom_cookie
- The History of Peanut Butter Blossoms & New Recipes to Try - Hersheyland, accessed May 19, 2025, https://www.hersheyland.com/stories/the-history-of-peanut-butter-blossoms.html
- Weight Watchers Peanut Butter Blossoms Are Perfect Holiday Cookies - Drizzle Me Skinny!, accessed May 19, 2025, https://drizzlemeskinny.com/weight-watchers-peanut-butter-blossoms-are-perfect-holiday-cookies/
- Peanut Butter Blossoms (soft and chewy) - If You Give a Blonde a Kitchen, accessed May 19, 2025, https://www.ifyougiveablondeakitchen.com/peanut-butter-blossoms-recipe/
- HERSHEY'S Peanut Butter Blossoms Recipe | Hersheyland, accessed May 19, 2025, https://www.hersheyland.com/recipes/peanut-butter-blossoms.html
- 15 Irresistible Peanut Butter Blossoms to Make this Holiday Season - Cooklist, accessed May 19, 2025, https://cooklist.com/recipes/article/15-irresistible-peanut-butter-blossoms-to-make-this-holiday-season
- The Very Best Peanut Butter Blossoms Recipe | The Kitchn, accessed May 19, 2025, https://www.thekitchn.com/best-peanut-butter-blossoms-recipe-23698292
- Peanut Butter Blossoms - Sugar Spun Run, accessed May 19, 2025, https://sugarspunrun.com/peanut-butter-blossoms/
- Classic Peanut Butter Blossom Cookies Recipe - BettyCrocker.com, accessed May 19, 2025, https://www.bettycrocker.com/recipes/classic-peanut-butter-blossom-cookies/a3563f6e-96b0-443f-ae0a-53cef4be6db6
- Peanut Butter Blossoms, accessed May 19, 2025, https://www.jif.com/recipes/cookies-and-desserts/peanut-butter-blossoms
- Soft and Chewy Double Peanut Butter Blossom Cookies - Cloudy ..., accessed May 19, 2025, https://cloudykitchen.com/blog/peanut-butter-blossom-cookies/
- The Best Peanut Butter Blossoms Cookies - Donuts2Crumpets, accessed May 19, 2025, https://donuts2crumpets.com/2021/12/the-very-best-peanut-butter-blossom.html
- Peanut Butter Blossoms | Jif, accessed May 19, 2025, https://www.jif.com/recipes/cookies-and-desserts/peanut-butter-blossoms?bvstate=pg:2/ct:r
- Peanut Butter Blossoms - Food Trails, accessed May 19, 2025, https://foodtrails25.com/peanut-butter-blossoms/
- Classic Peanut Butter Blossoms, accessed May 19, 2025, https://beyondthebutter.com/classic-peanut-butter-blossoms/
- Classic Peanut Butter Blossoms Recipe - Little Sunny Kitchen, accessed May 19, 2025, https://littlesunnykitchen.com/peanut-butter-blossoms/
- Peanut Butter Blossoms Recipe - Allrecipes, accessed May 19, 2025, https://www.allrecipes.com/recipe/9920/peanut-blossoms-ii/
- Best Peanut Butter Blossoms {Hershey Kiss Cookies} - Feel Good Foodie, accessed May 19, 2025, https://feelgoodfoodie.net/recipe/peanut-butter-blossoms/
- Giant Almond Butter Blossoms - Pies and Plots, accessed May 19, 2025, https://piesandplots.net/giant-almond-butter-blossoms/